
ls# Electronic Driving Licence — Public User Manual
सवारी चालक अनुमतिपत्र — प्रयोगकर्ता पुस्तिका
Government of Nepal · Ministry of Infrastructure Development
नेपाल सरकार · पूर्वाधार विकास मन्त्रालय
| Document reference | MAN/EDL-PUB/2083-03-28 |
| Date (BS) | 2083 Ashad 28 |
| Date (AD) | 12 July 2026 |
| Version | 1.0 |
| Language | English and Nepali · अङ्ग्रेजी र नेपाली |
| Prepared by | YAJ Tech Pvt. Ltd. |
| Classification | Official — for departmental use |
This manual covers every online driving-licence service, one section per service.
यो प्रयोगकर्ता पुस्तिकाले हरेक अनलाइन सवारी चालक सेवालाई एउटा-एउटा खण्डमा समेट्छ।
Before you start · **
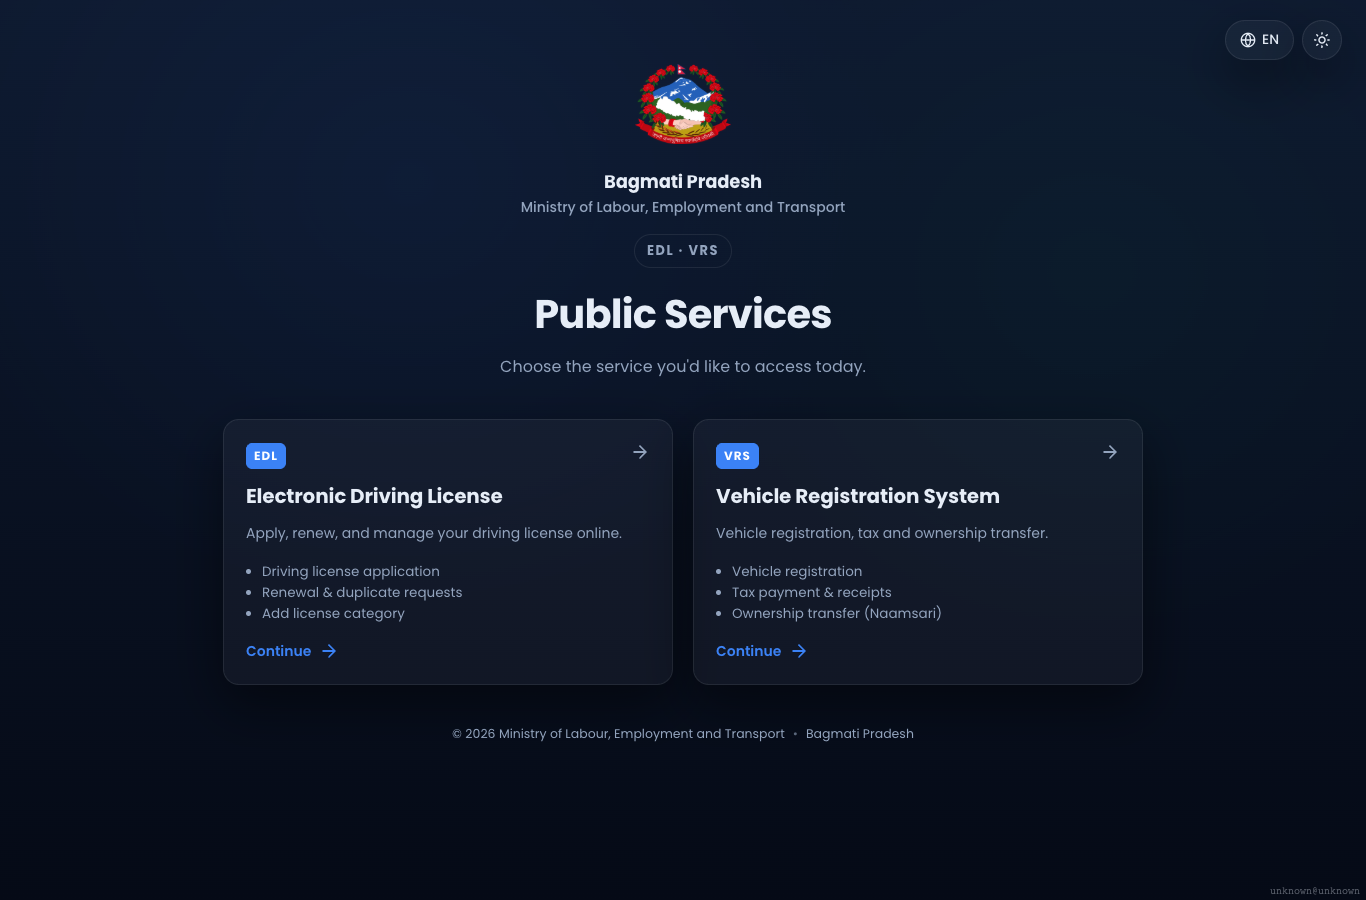
- Open your province's citizen portal (see the province list at the end).
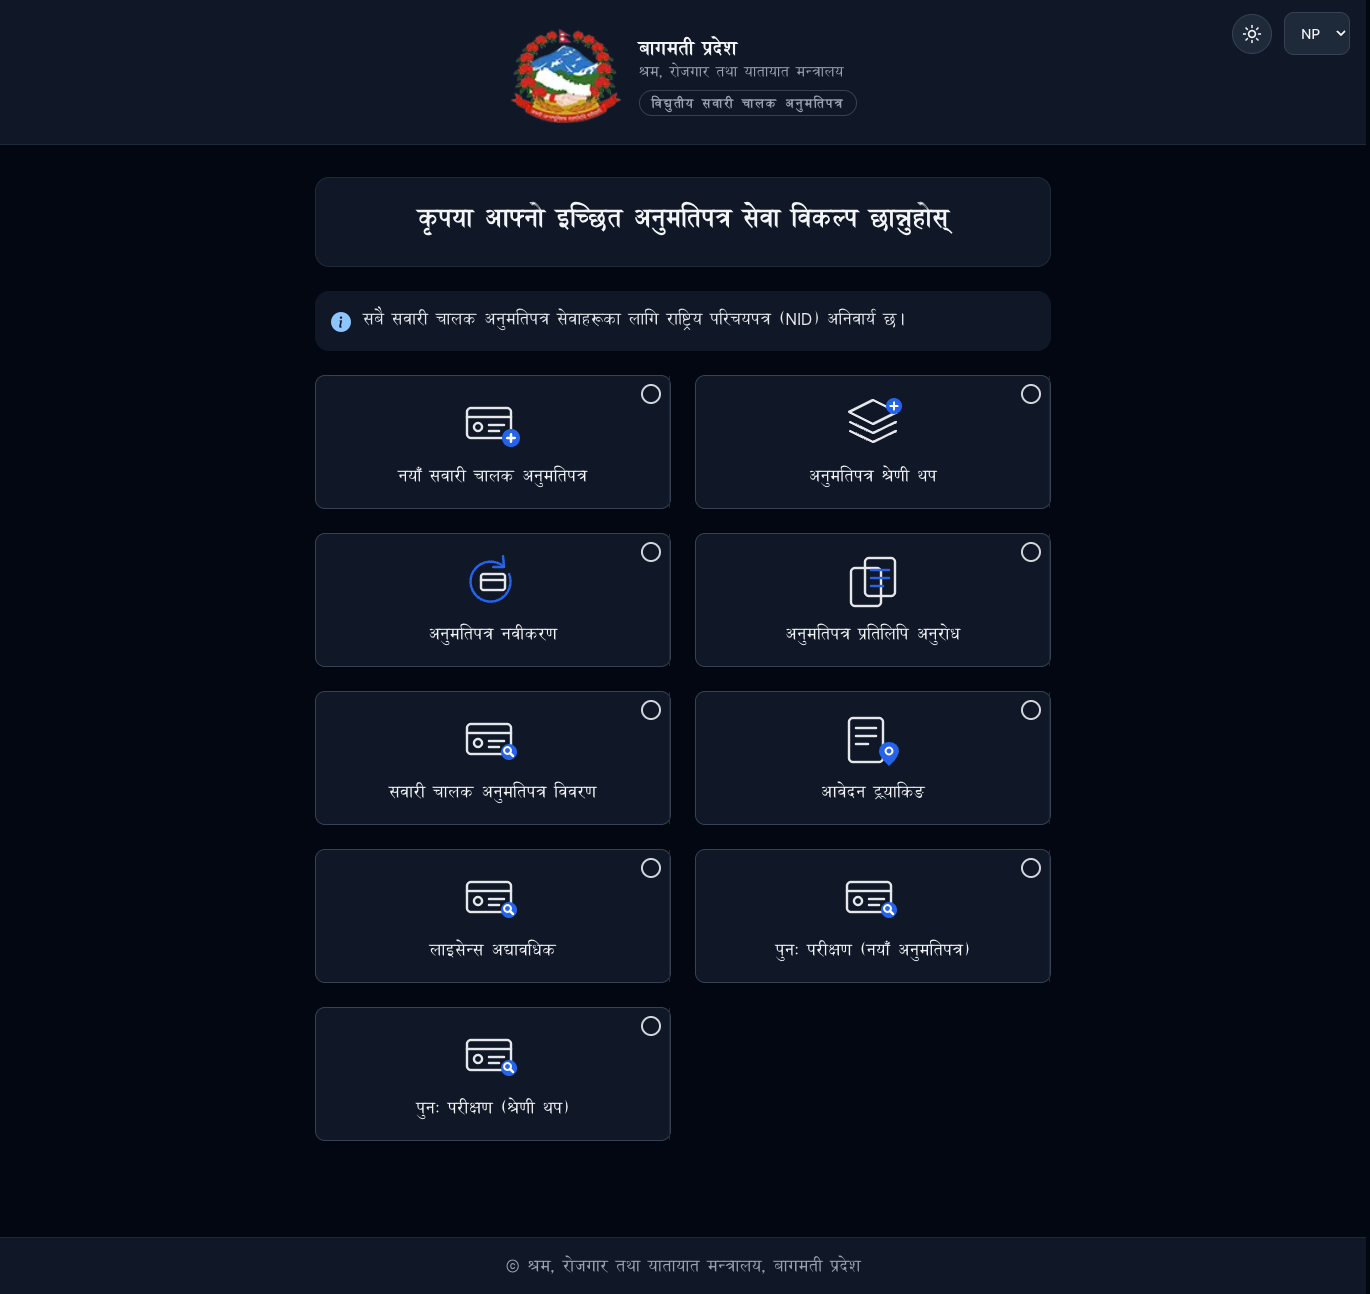
Use the EN / NP** switch (top-right) to change language.
-
A National ID (NID) is required. Keep your NID number, a mobile number
registered in your own name, and your email ready. -
Note: in Koshi, a Medical Fee is paid before the
medical, and the application and exam fee are collected together as one
Application & Exam Fee. Every other province follows the steps exactly as
written below. ·
सर्व प्रथम आफ्नो प्रदेशको पोर्टल खोल्नुहोस्; भाषा बदल्न माथि-दायाँको EN / NP प्रयोग गर्नुहोस्।
राष्ट्रिय परिचयपत्र (NID) अनिवार्य छ। NID नम्बर, आफ्नै नाममा दर्ता मोबाइल,
र इमेल तयार राख्नुहोस्।
कोशी प्रदेश: कोशी मा स्वास्थ्य परीक्षण अघि स्वास्थ्य
शुल्क तिर्नुपर्छ, र आवेदन तथा परीक्षा शुल्क एकैसाथ आवेदन तथा परीक्षा शुल्क
मा लिइन्छ। अन्य सबै प्रदेशमा तलकै प्रक्रिया लागू हुन्छ।
Services · सेवाहरू
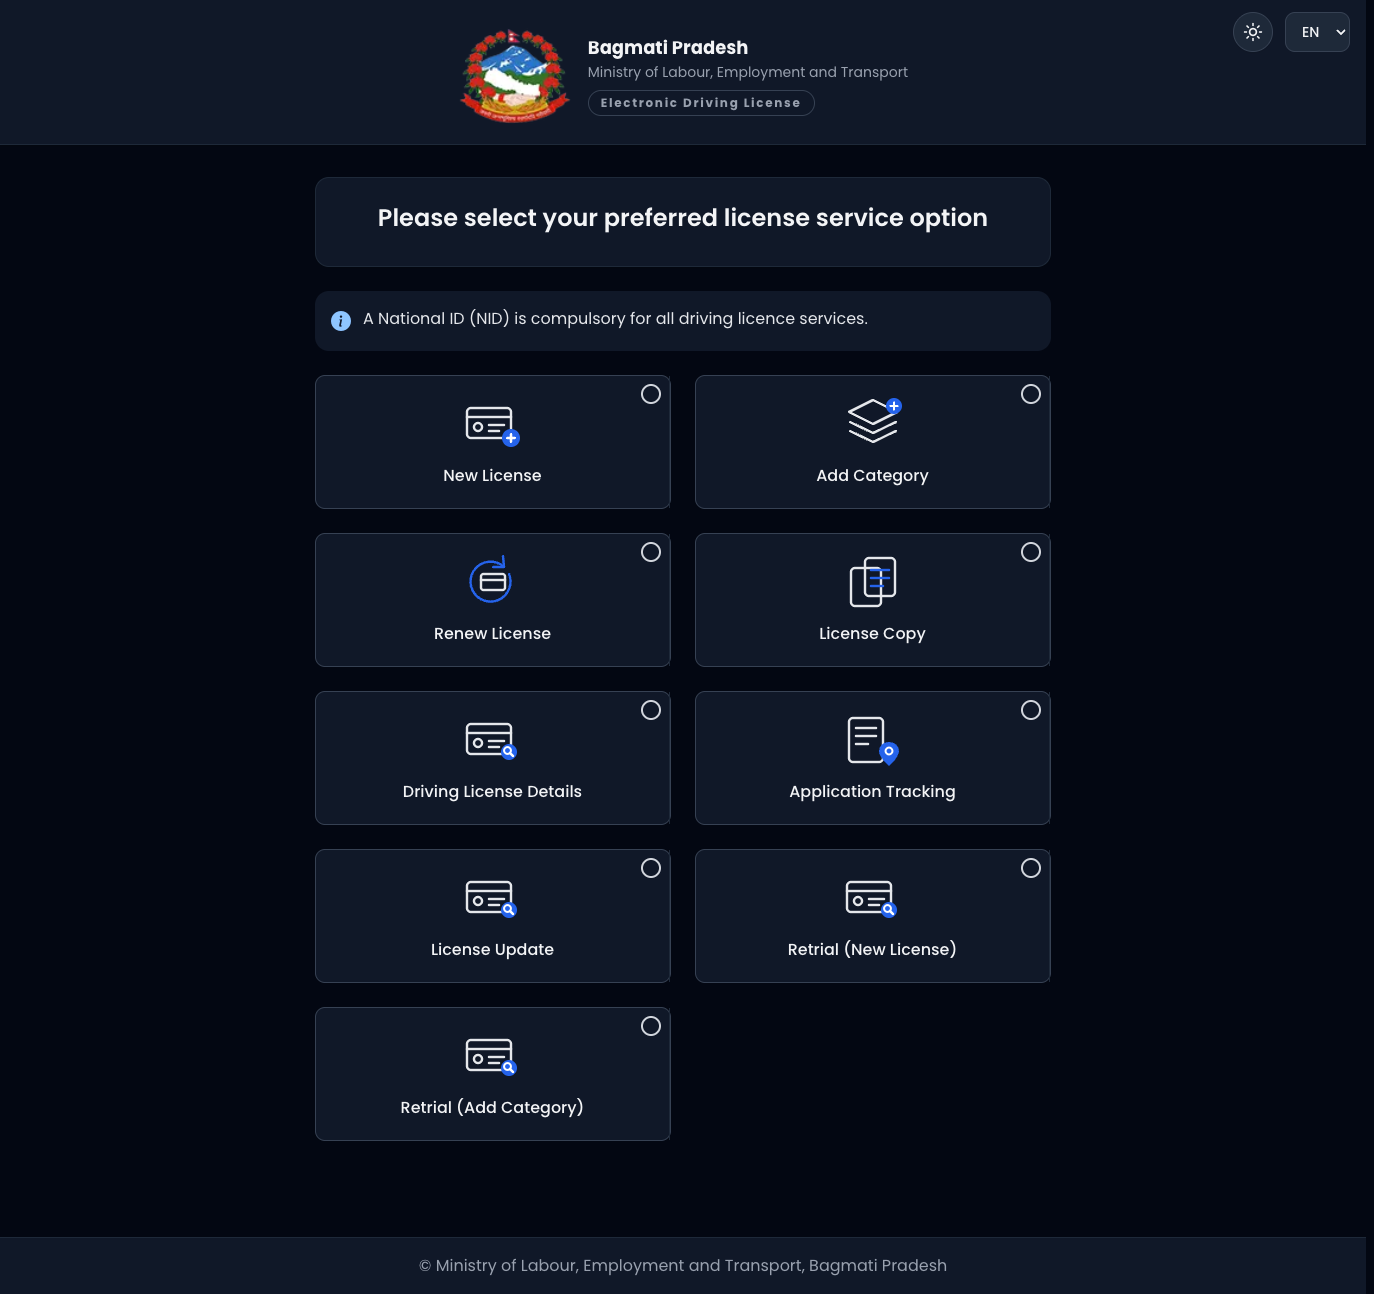
- New Driving Licence · नयाँ सवारी चालक अनुमतिपत्र
- Renew License Application · सवारी चालक अनुमतिपत्र नवीकरण
- Add Category Application · सवारी चालक अनुमतिपत्र वर्ग थप
- License Copy Application · सवारी चालक अनुमतिपत्र प्रतिलिपि अनुरोध
- Retrial (New License) Application · पुनः परीक्षण (नयाँ अनुमतिपत्र)
- Retrial (Add Category) Application · पुनः परीक्षण (वर्ग थप)
- License Correction Application · सवारी चालक अनुमतिपत्र सच्याउने आवेदन
- Driving License Details · सवारी चालक अनुमतिपत्र विवरण
- Track Application · आवेदन ट्र्याकिङ
- Renew with Copy · प्रतिलिपि सहित नवीकरण
1. New Driving Licence · नयाँ सवारी चालक अनुमतिपत्र
Apply for your first driving licence through the Electronic Driving Licence system.
विद्युतीय सवारी चालक अनुमतिपत्र प्रणालीमार्फत पहिलो सवारी चालक अनुमतिपत्रका लागि आवेदन दिनुहोस्।
Journey · प्रक्रिया
8 main stages · ८ मुख्य चरण
Step 1 · चरण १
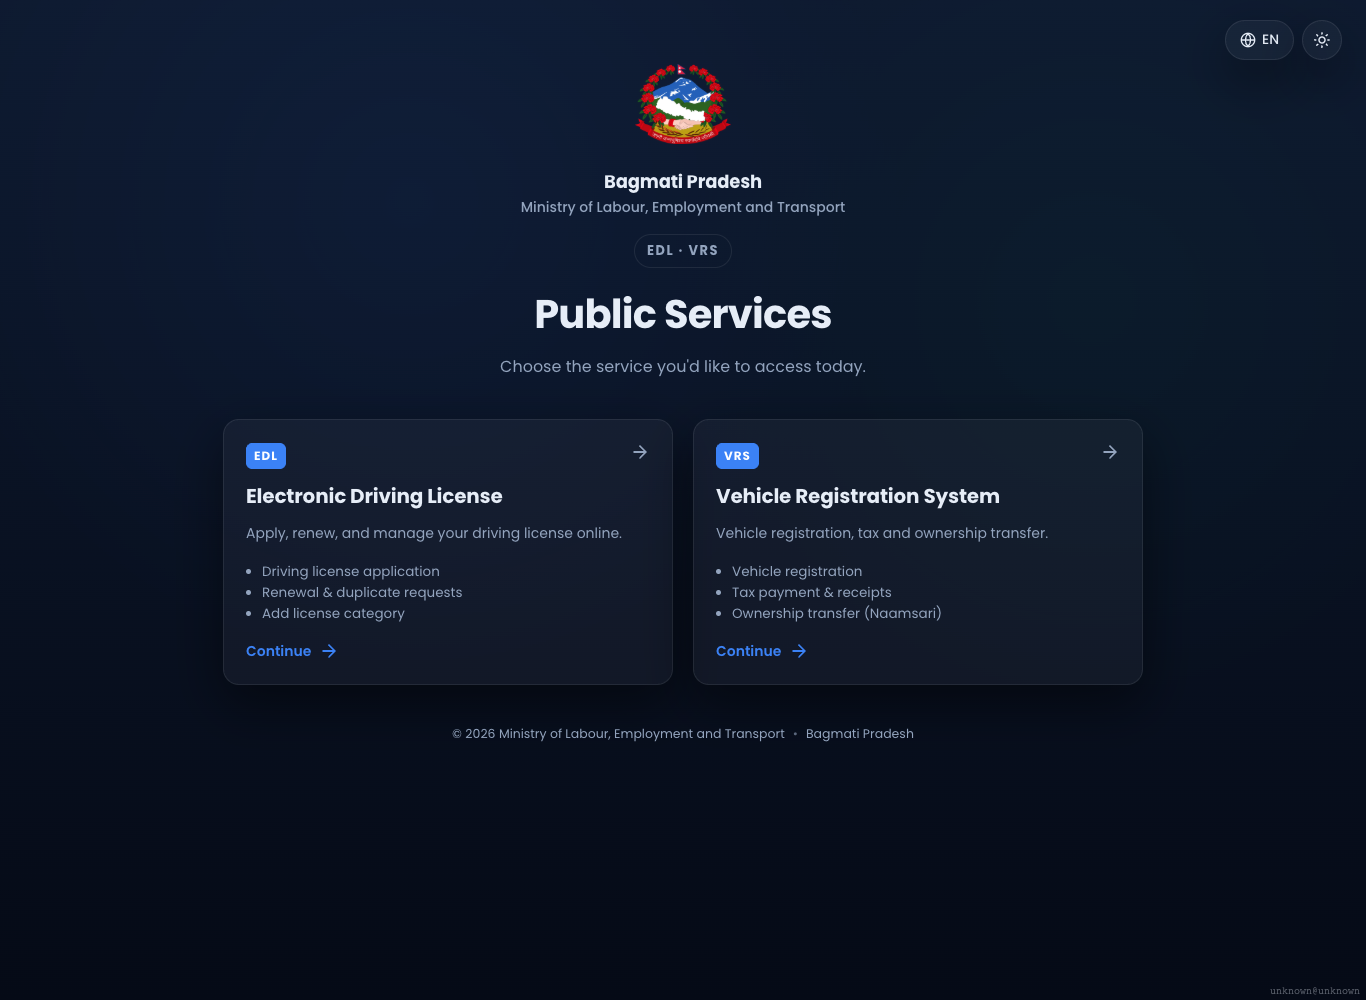
Open the Portal and Select New Driving Licence · पोर्टल खोली नयाँ सवारी चालक अनुमतिपत्र छान्नुहोस्
Open the portal and select Electronic Driving Licence, then choose New Driving Licence.
पोर्टल खोली विद्युतीय सवारी चालक अनुमतिपत्र सेवा छान्नुहोस् र त्यसपछि नयाँ सवारी चालक अनुमतिपत्र चयन गर्नुहोस्।
Step 2 · चरण २
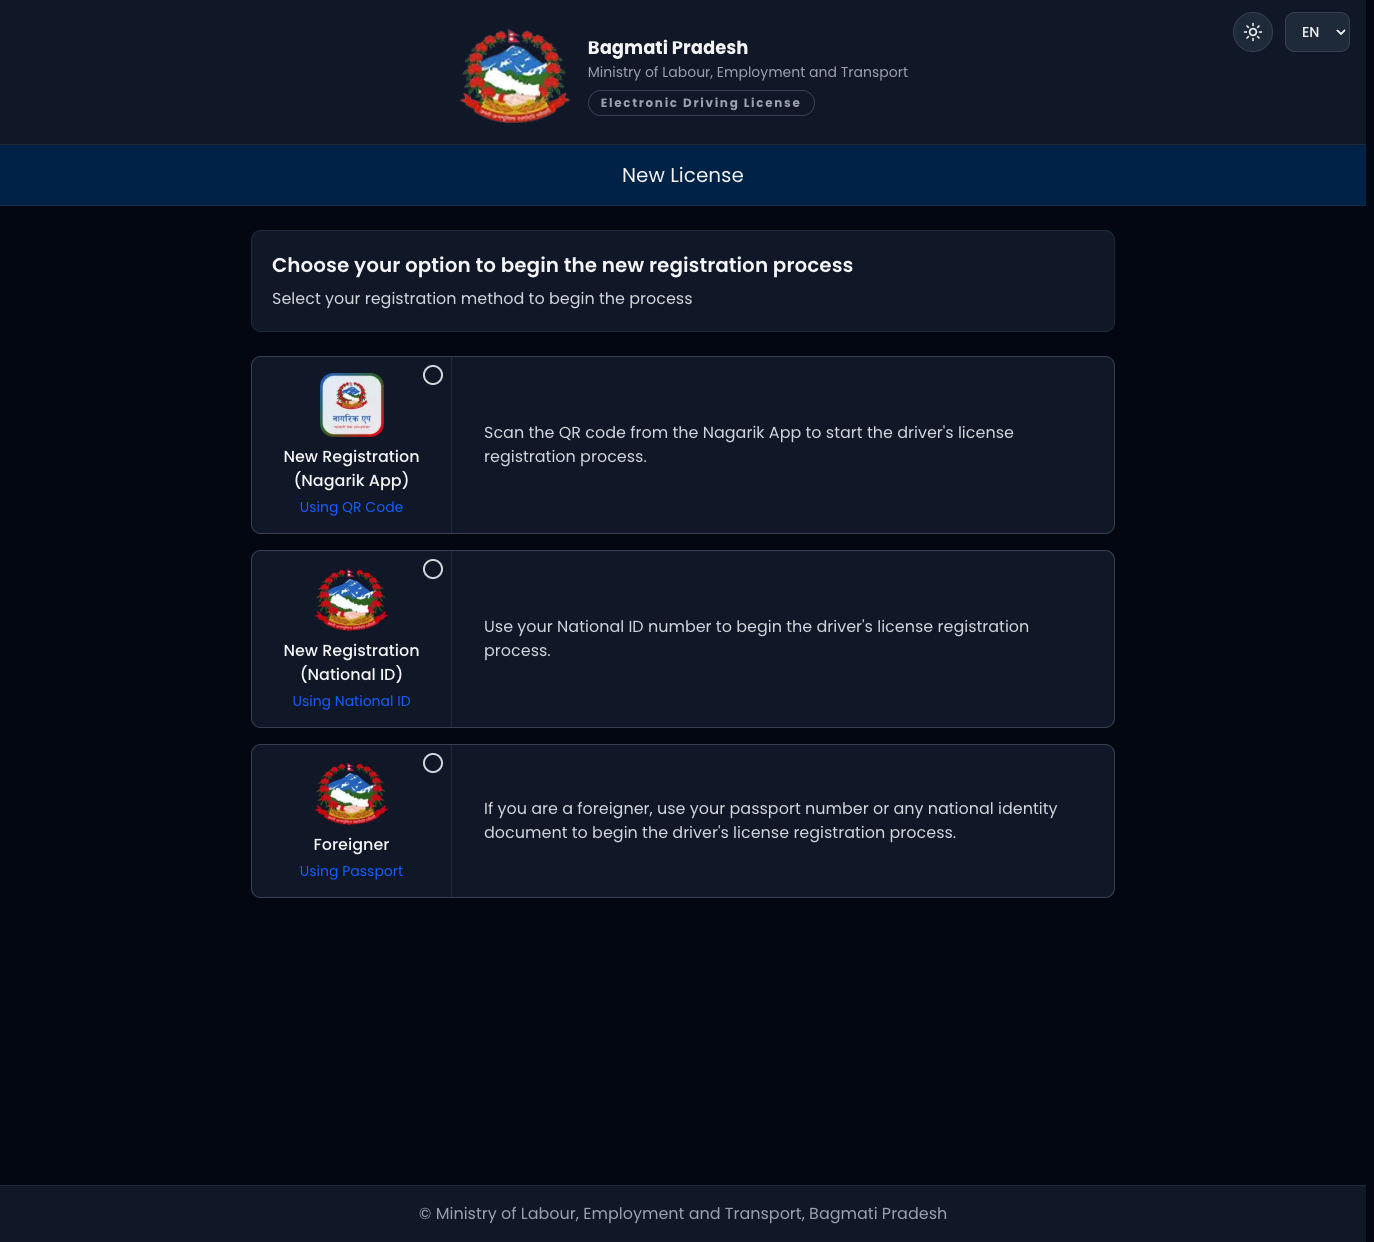
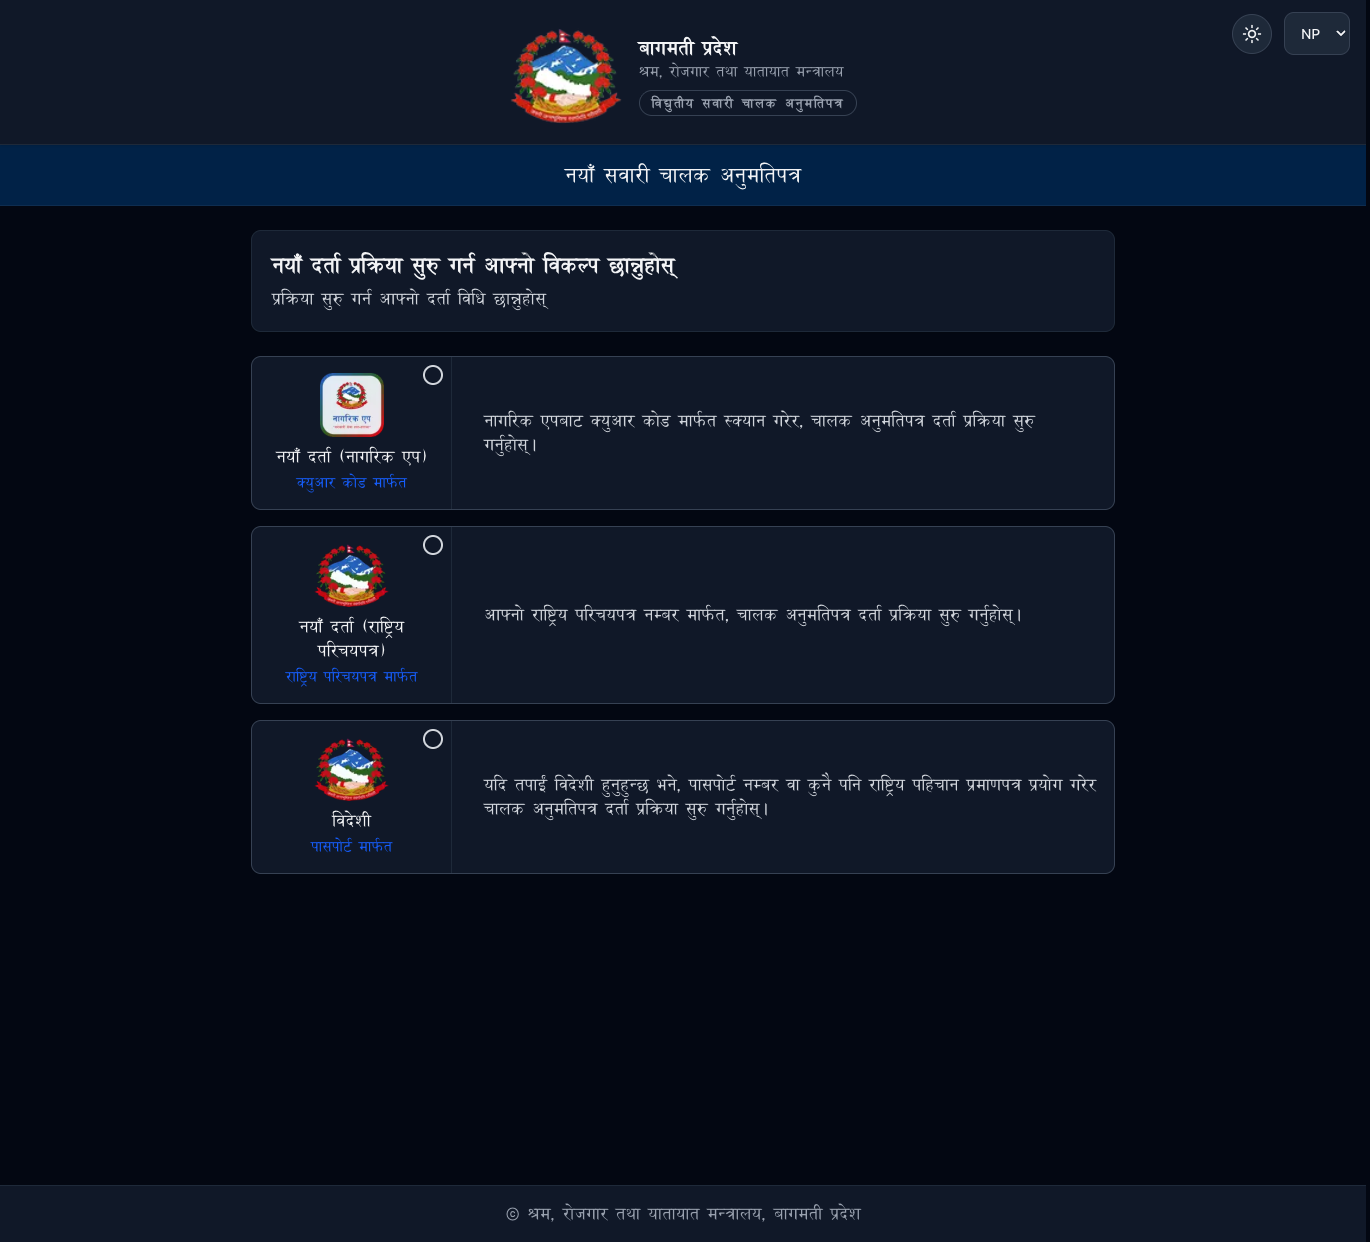
Choose Registration Method · दर्ता विधि छान्नुहोस्
Choose one of the available registration methods:
National ID, Nagarik App using QR, or Foreigner using Passport.
उपलब्ध दर्ता विधिमध्ये कुनै एक छान्नुहोस्:
राष्ट्रिय परिचयपत्र, नागरिक एप मार्फत QR, वा विदेशी नागरिकका लागि राहदानी।
Step 2.1 · चरण २.१
New Registration through National ID · राष्ट्रिय परिचयपत्रमार्फत नयाँ दर्ता
If you choose National ID, continue the registration process using your National ID details.
राष्ट्रिय परिचयपत्र विकल्प छनोट गरेको अवस्थामा राष्ट्रिय परिचयपत्रमा रहेको विवरण प्रयोग गरी दर्ता प्रक्रिया अगाडि बढाउनुहोस्।
Step 3 · चरण ३
National ID and OTP Verification · राष्ट्रिय परिचयपत्र तथा OTP प्रमाणीकरण
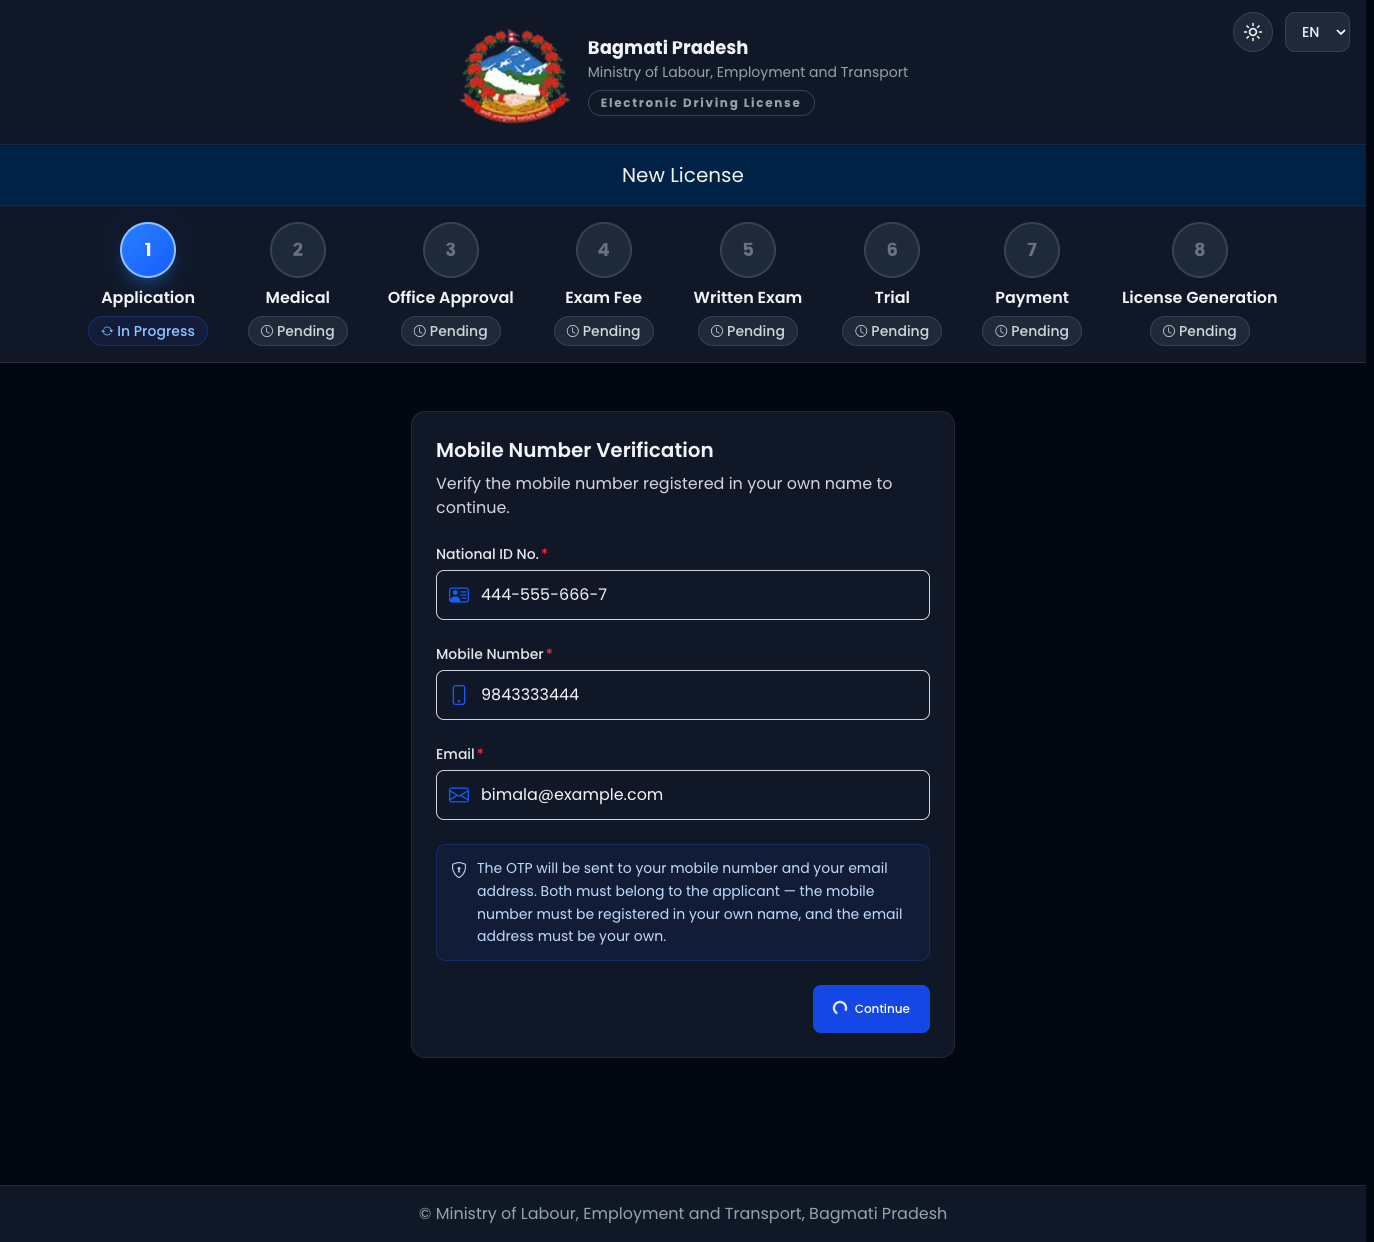
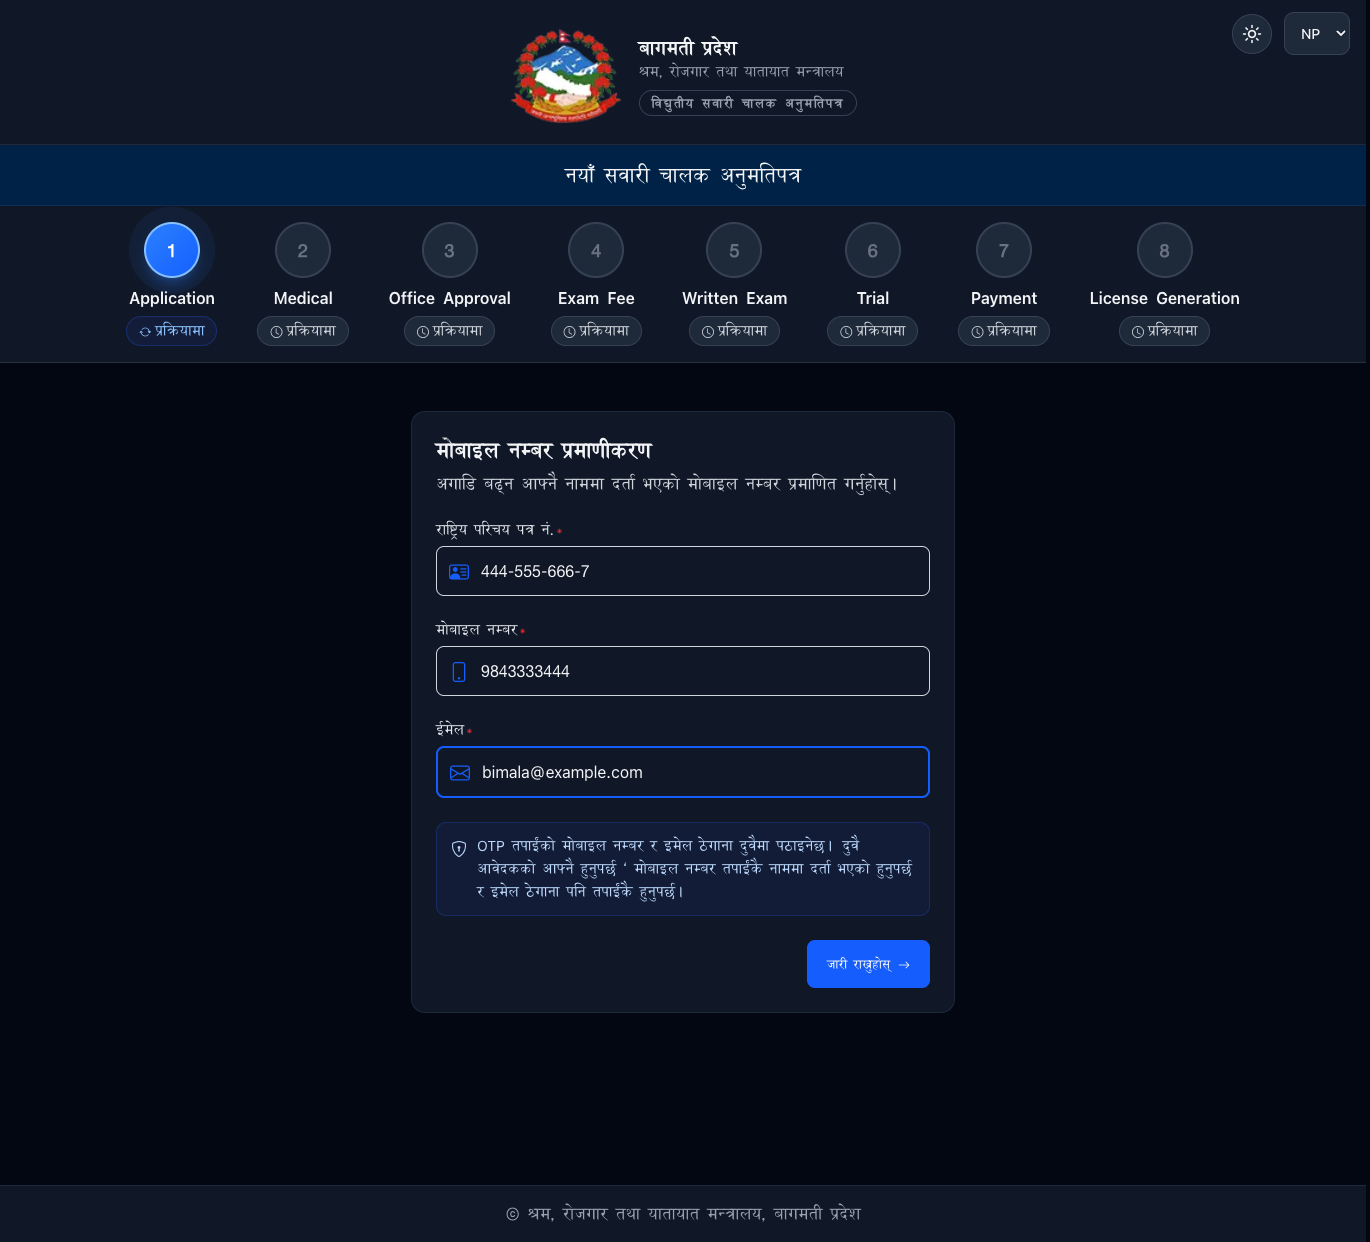
Enter your National ID Number, a mobile number registered in your own name, and your email address.
Click Continue. An OTP will be sent to the required verification channels. Enter the OTP to complete verification.
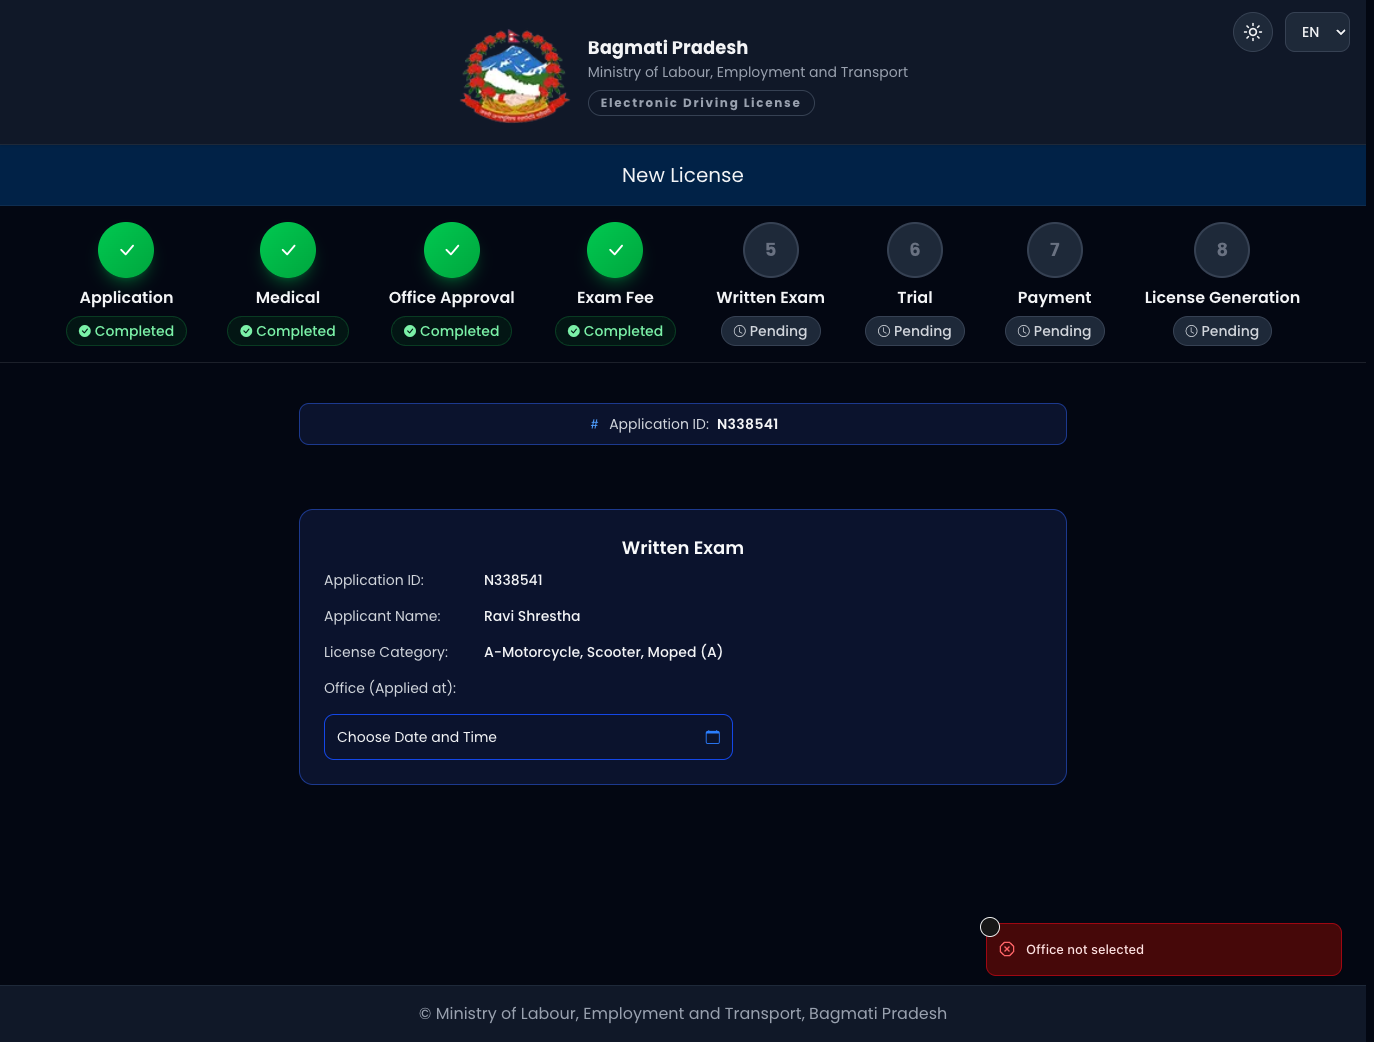
The progress indicator at the top of the page shows your current position in the application process.
आफ्नो राष्ट्रिय परिचयपत्र नम्बर, आफ्नै नाममा दर्ता भएको मोबाइल नम्बर, र इमेल ठेगाना प्रविष्ट गर्नुहोस्।
Continue मा क्लिक गर्नुहोस्। प्रमाणीकरणका लागि सम्बन्धित माध्यममा प्राप्त OTP प्रविष्ट गरी प्रमाणीकरण पूरा गर्नुहोस्।
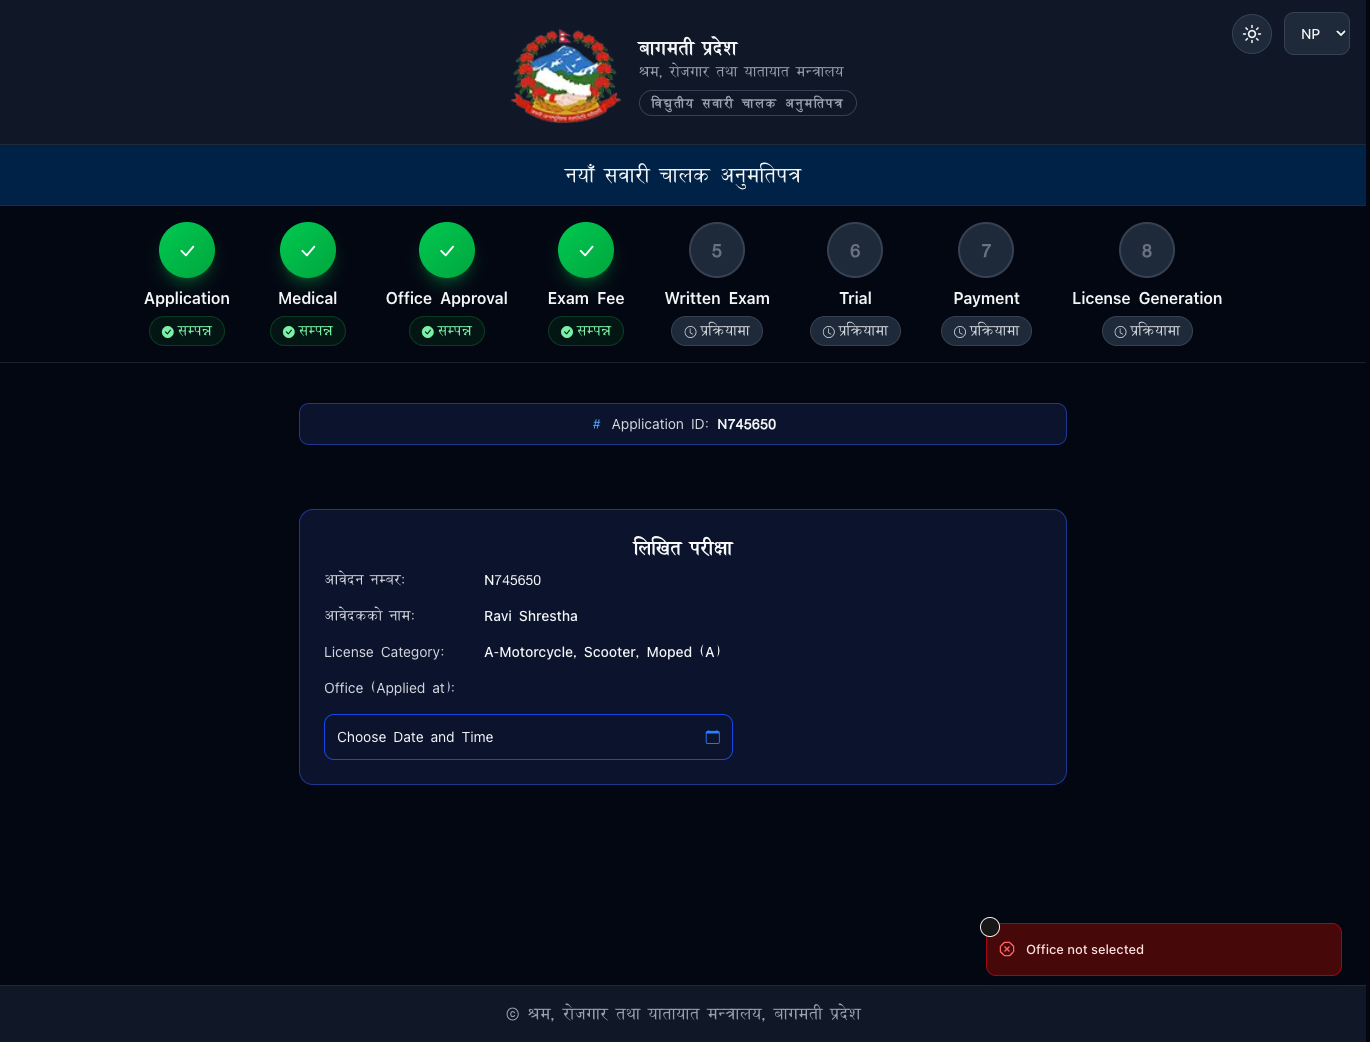
पृष्ठको माथिल्लो भागमा रहेको प्रगति सूचकले आवेदन प्रक्रियामा तपाईं कुन चरणमा हुनुहुन्छ भन्ने देखाउँछ।
Step 4 · चरण ४
Complete and Submit the Application · आवेदन पूरा गरी पेश गर्नुहोस्
Review the personal information automatically received from the National ID system and complete any additional information required by the application.
Select the appropriate Driving Licence Category and submit the application.
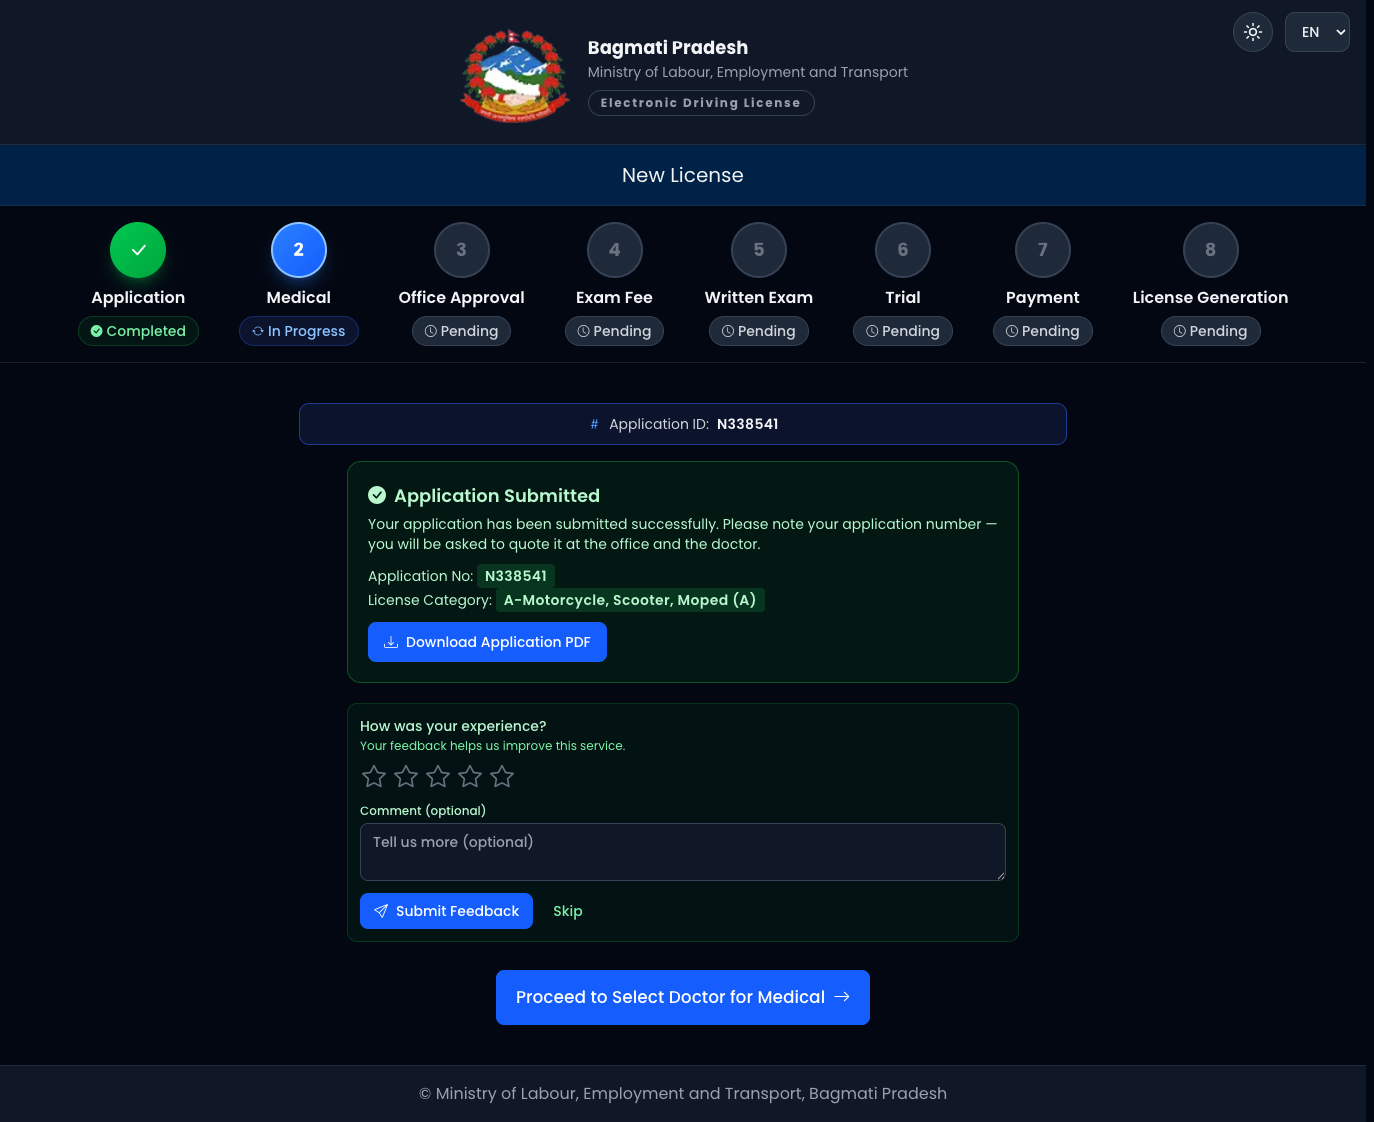
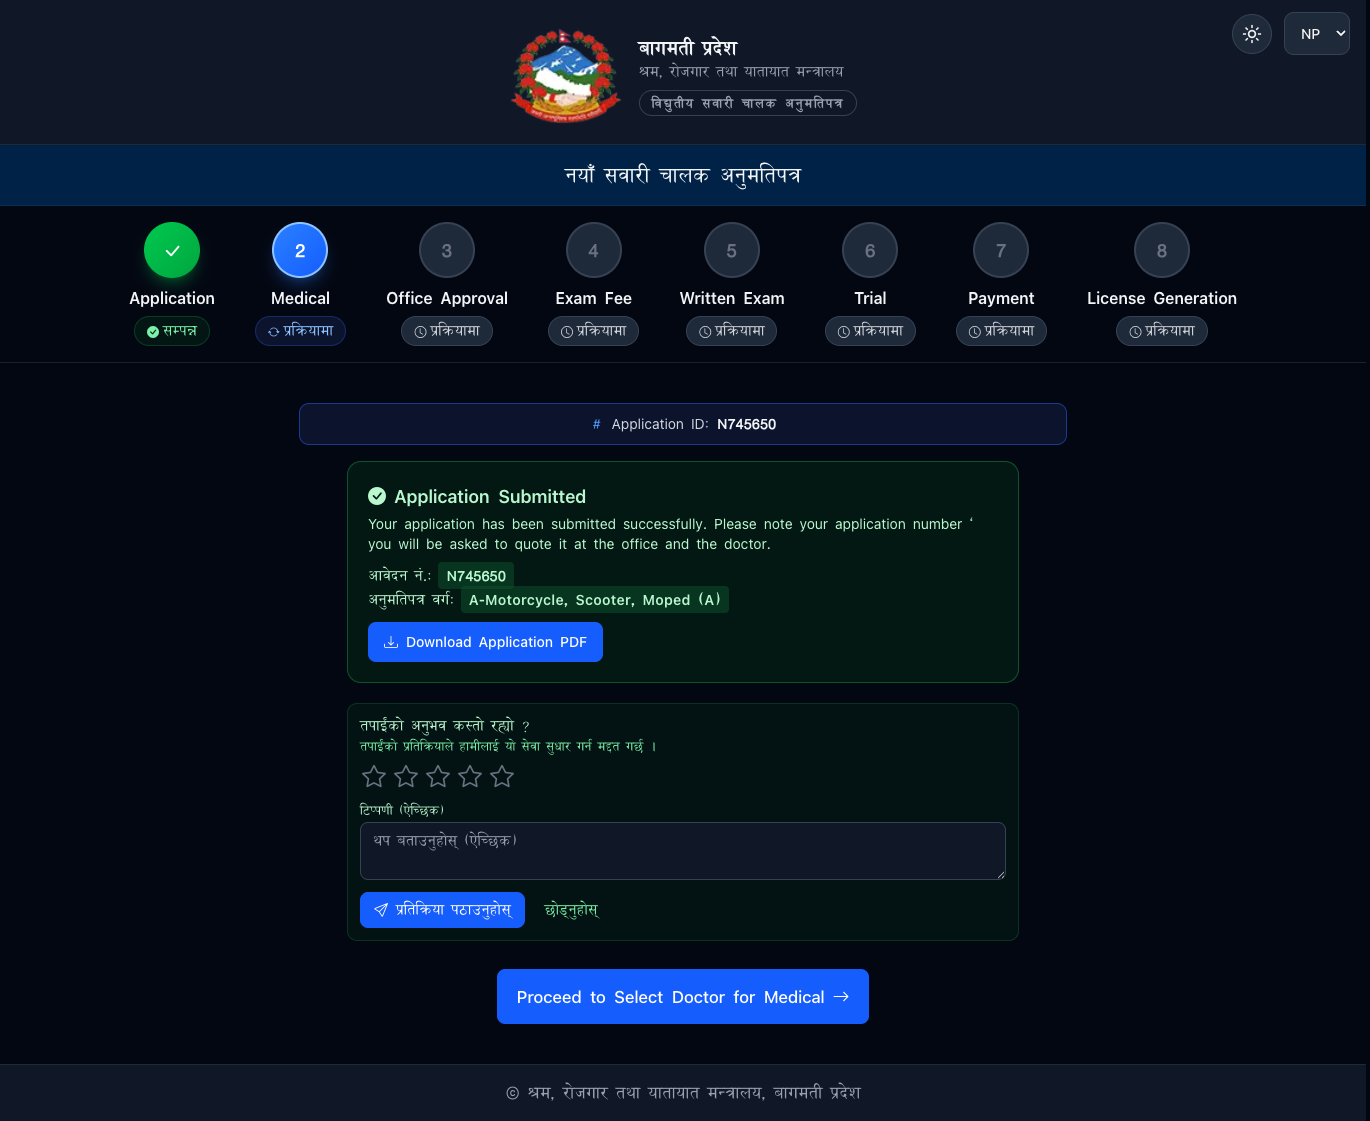
After successful submission, you will receive an Application Number. Keep this number safe because it may be required during office verification, medical examination, and other stages of the process.
Click Download Application PDF to save your application details. The downloaded application contains important information including the Application Number, Tracking Link, and QR Code.
After saving the application, click Proceed to Select Doctor for Medical.
राष्ट्रिय परिचयपत्र प्रणालीबाट स्वतः प्राप्त भएको व्यक्तिगत विवरण जाँच गर्नुहोस् र आवेदनमा आवश्यक थप विवरण पूरा गर्नुहोस्।
आफूले आवेदन दिन चाहेको सवारी चालक अनुमतिपत्र वर्ग छनोट गरी आवेदन पेश गर्नुहोस्।
आवेदन सफलतापूर्वक पेश भएपछि आवेदन नम्बर प्राप्त हुनेछ। उक्त नम्बर कार्यालय प्रमाणीकरण, स्वास्थ्य परीक्षण तथा अन्य चरणमा आवश्यक पर्न सक्ने भएकाले सुरक्षित राख्नुहोस्।
Download Application PDF मा क्लिक गरी आवेदन विवरण सुरक्षित गर्न सकिन्छ। डाउनलोड गरिएको आवेदनमा आवेदन नम्बर, Tracking Link तथा QR Code लगायतका विवरण उपलब्ध हुन्छन्।
त्यसपछि Proceed to Select Doctor for Medical मा क्लिक गर्नुहोस्।
Step 5 · चरण ५
Medical Examination · स्वास्थ्य परीक्षण
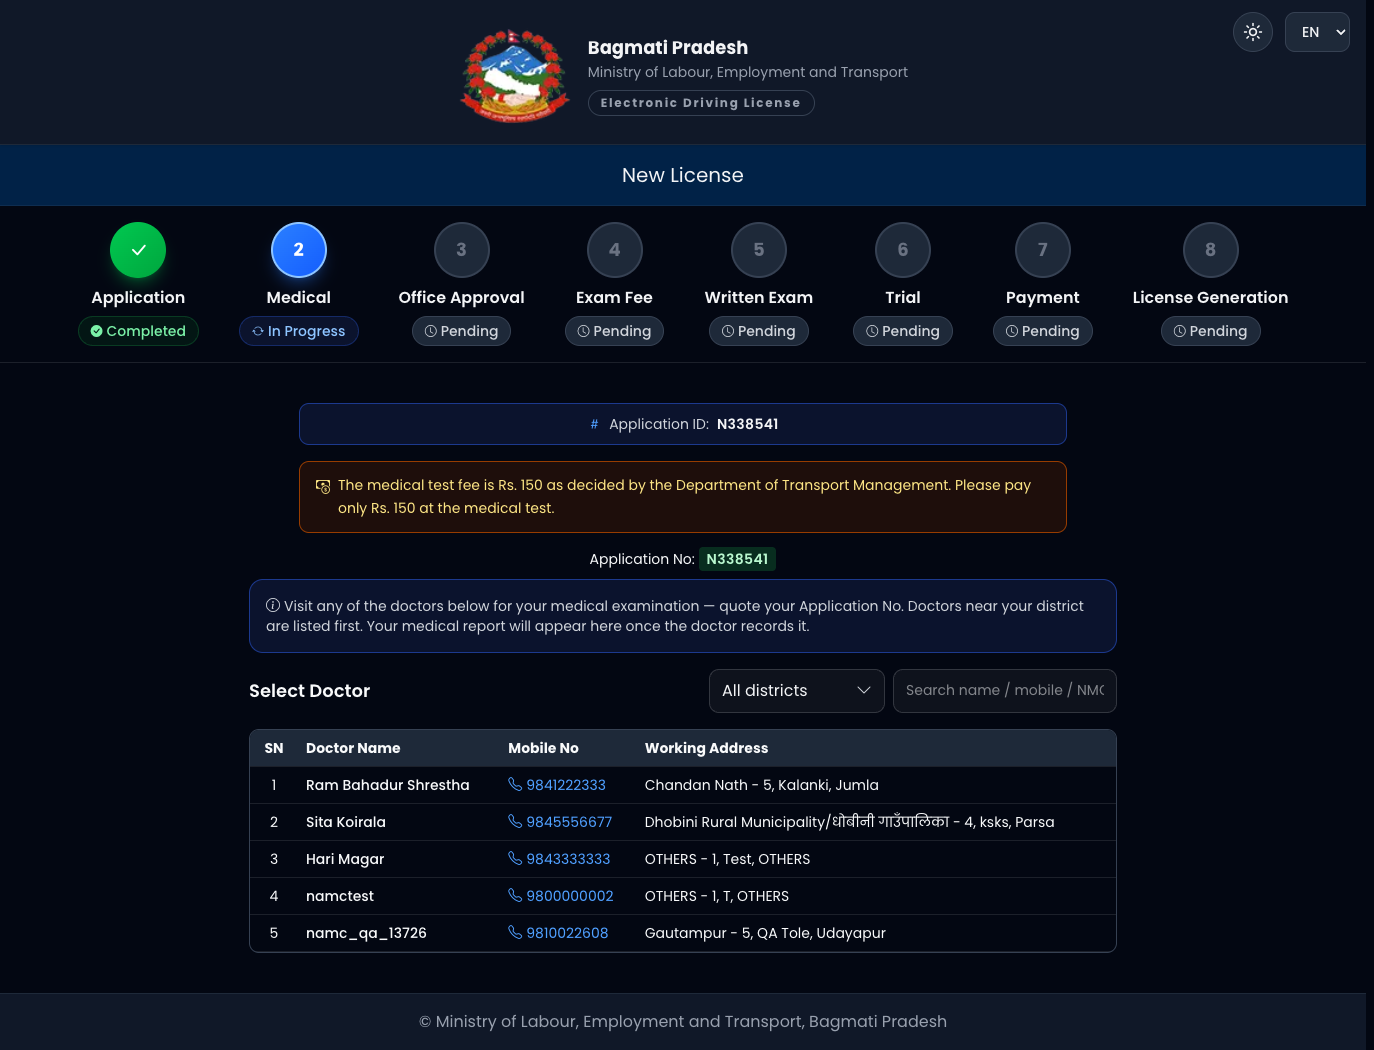
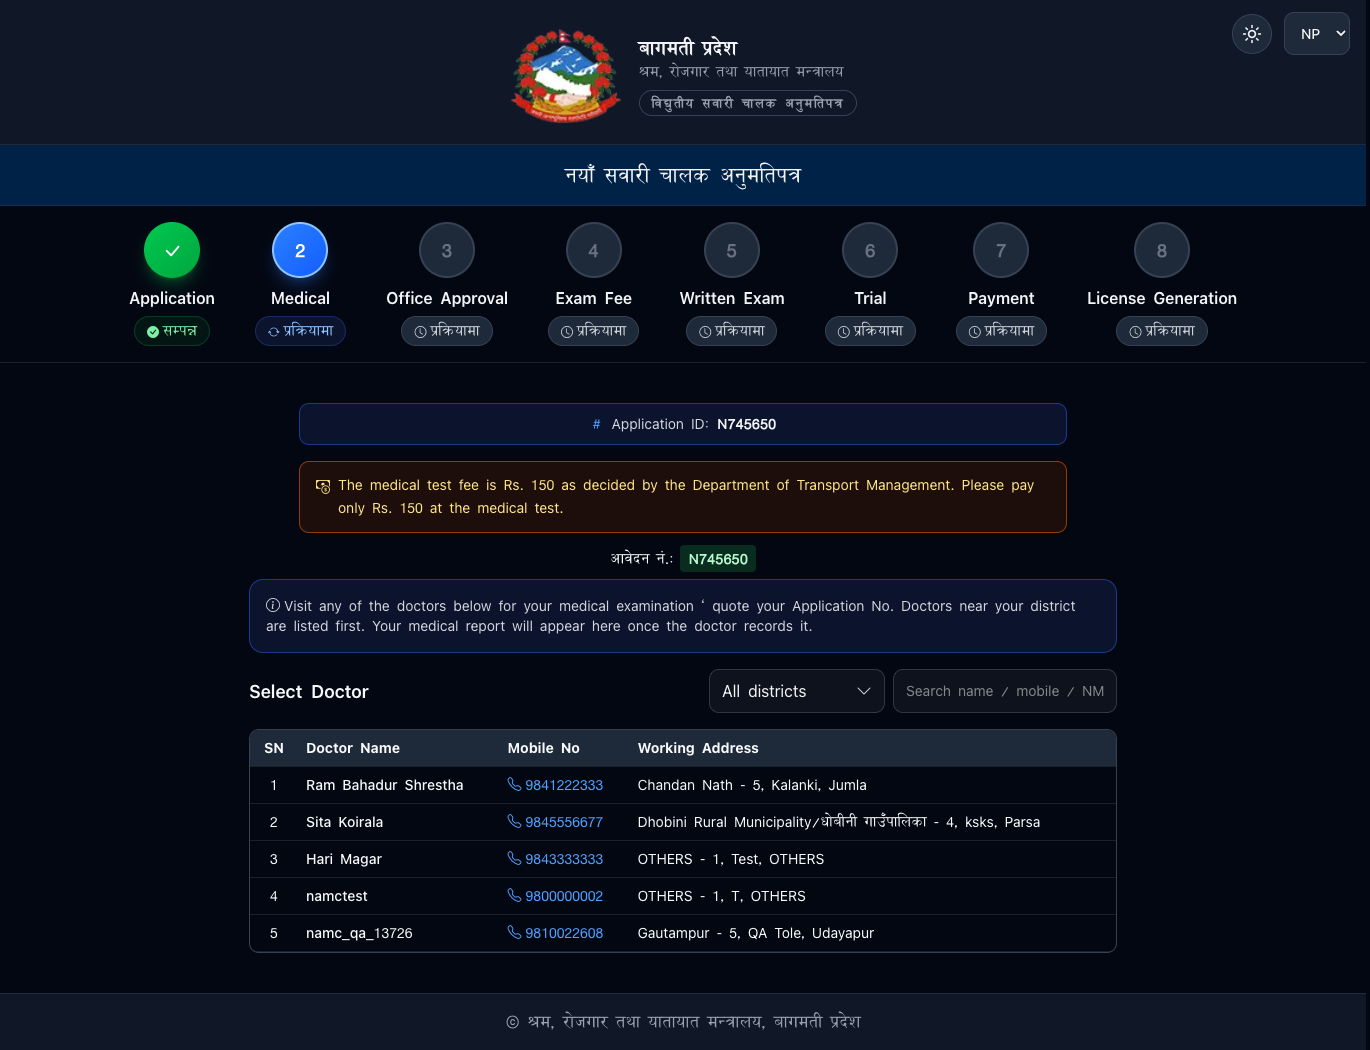
Select a suitable registered or approved doctor from the list available in the system.
Visit the selected doctor and provide your Application Number or other required application details.
The doctor will conduct the required medical examination and record the result in the system as FIT or UNFIT.
Once the applicant is marked FIT, the application can proceed to the next stage.
After completion of the medical stage, click Proceed to Office Approval.
प्रणालीमा उपलब्ध मान्यता प्राप्त वा सूचीकृत चिकित्सकहरूको सूचीबाट आफूलाई पायक पर्ने चिकित्सक छनोट गर्नुहोस्।
छनोट गरिएको चिकित्सककहाँ गई आफ्नो आवेदन नम्बर वा आवश्यक आवेदन विवरण उपलब्ध गराई स्वास्थ्य परीक्षण गराउनुहोस्।
चिकित्सकले आवश्यक स्वास्थ्य परीक्षण गरी परीक्षणको नतिजा प्रणालीमा FIT वा UNFIT का रूपमा प्रविष्ट गर्नेछन्।
आवेदक FIT भएको अवस्थामा मात्र आवेदन अर्को चरणमा अगाडि बढाउन सकिनेछ।
स्वास्थ्य परीक्षण पूरा भएपछि Proceed to Office Approval मा क्लिक गर्नुहोस्।
Step 6 · चरण ६
Office Selection and Approval · कार्यालय छनौट तथा स्वीकृति
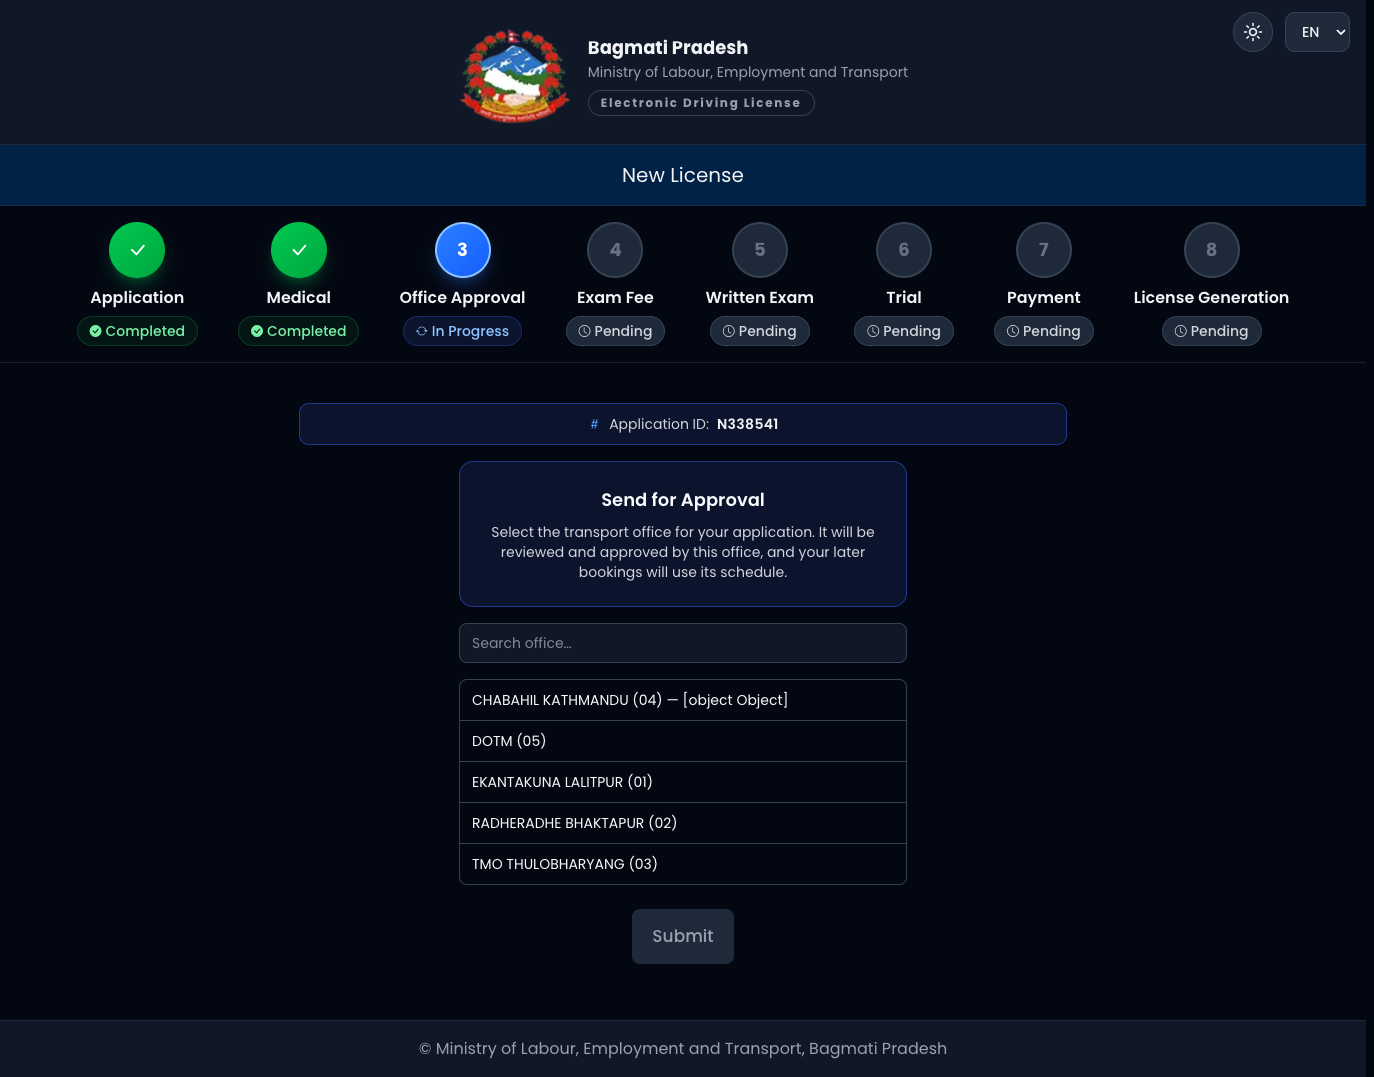
Choose the transport office where you want to complete the remaining licence examination process, including the written and trial examinations.
The authorised official of the selected transport office will review the application and the information available in the system.
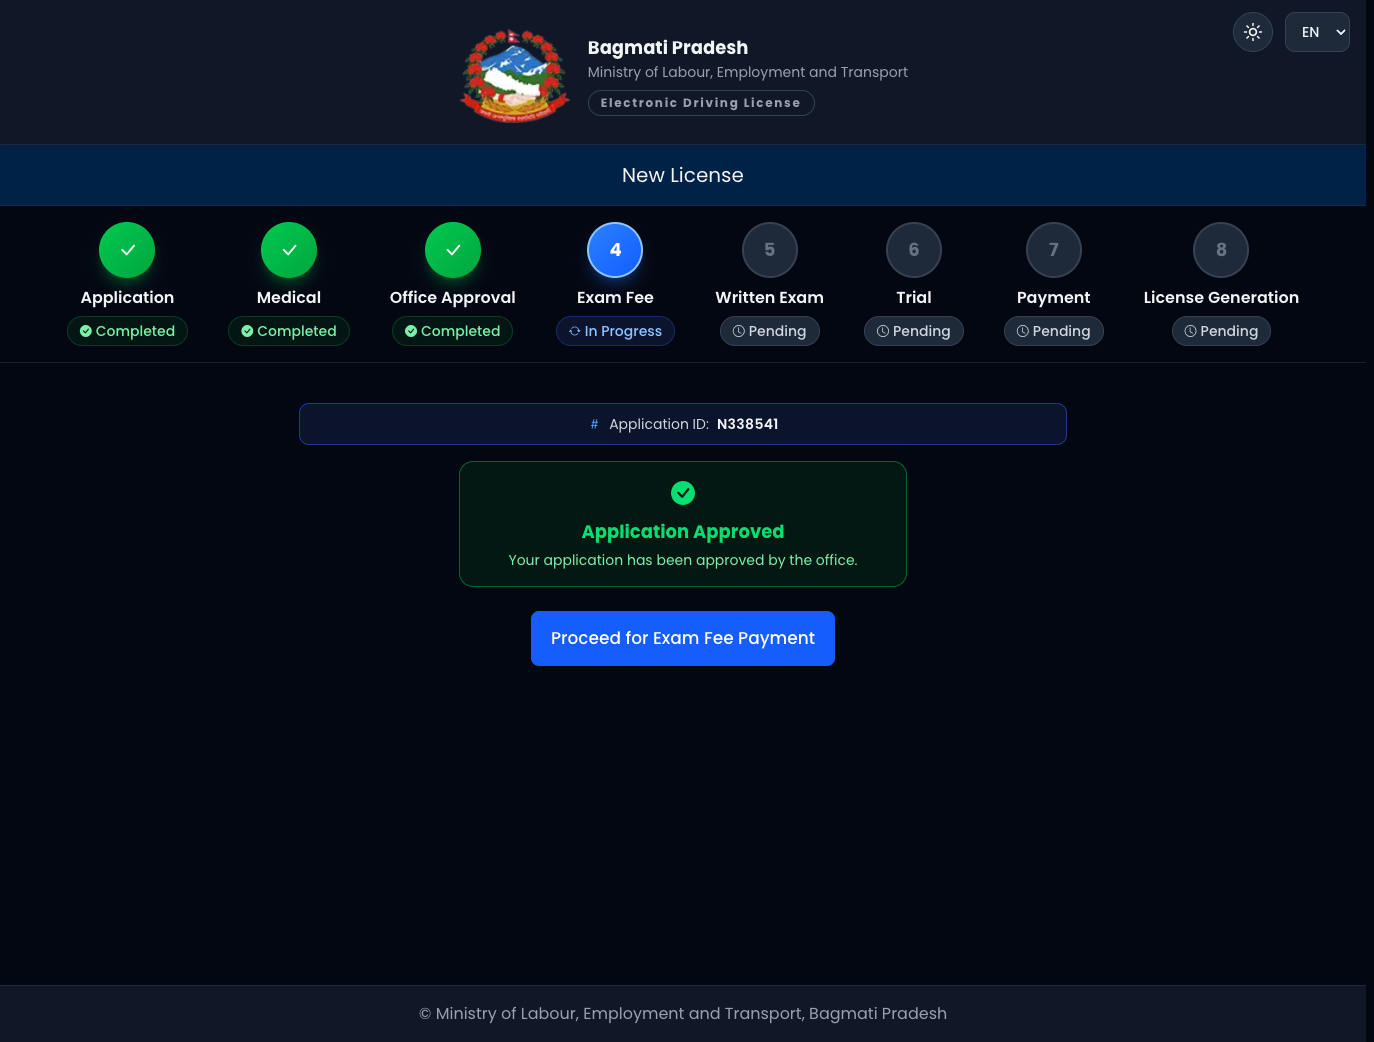
Based on the verification, the office may Approve or Reject the application.
Once the application is approved, click Proceed for Exam Fee Payment.
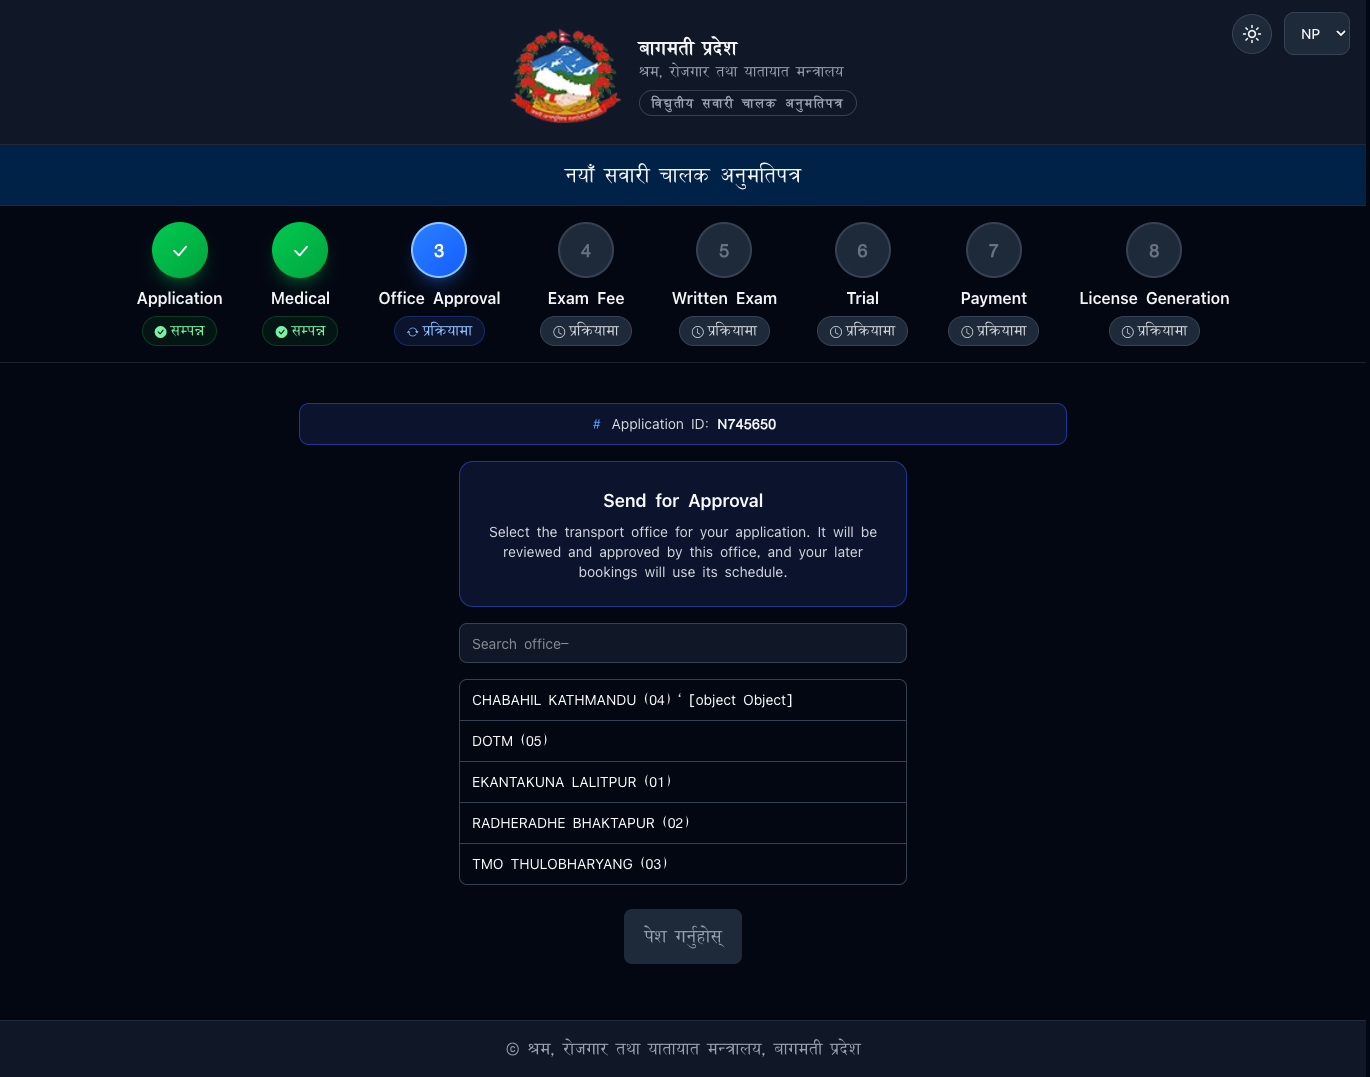
लिखित तथा प्रयोगात्मक परीक्षा लगायतका बाँकी प्रक्रिया पूरा गर्न आफूले सेवा लिन चाहेको यातायात कार्यालय छनोट गर्नुहोस्।
सम्बन्धित कार्यालयको अधिकार प्राप्त कर्मचारीले आवेदन तथा प्रणालीमा उपलब्ध विवरण जाँच गर्नेछ।
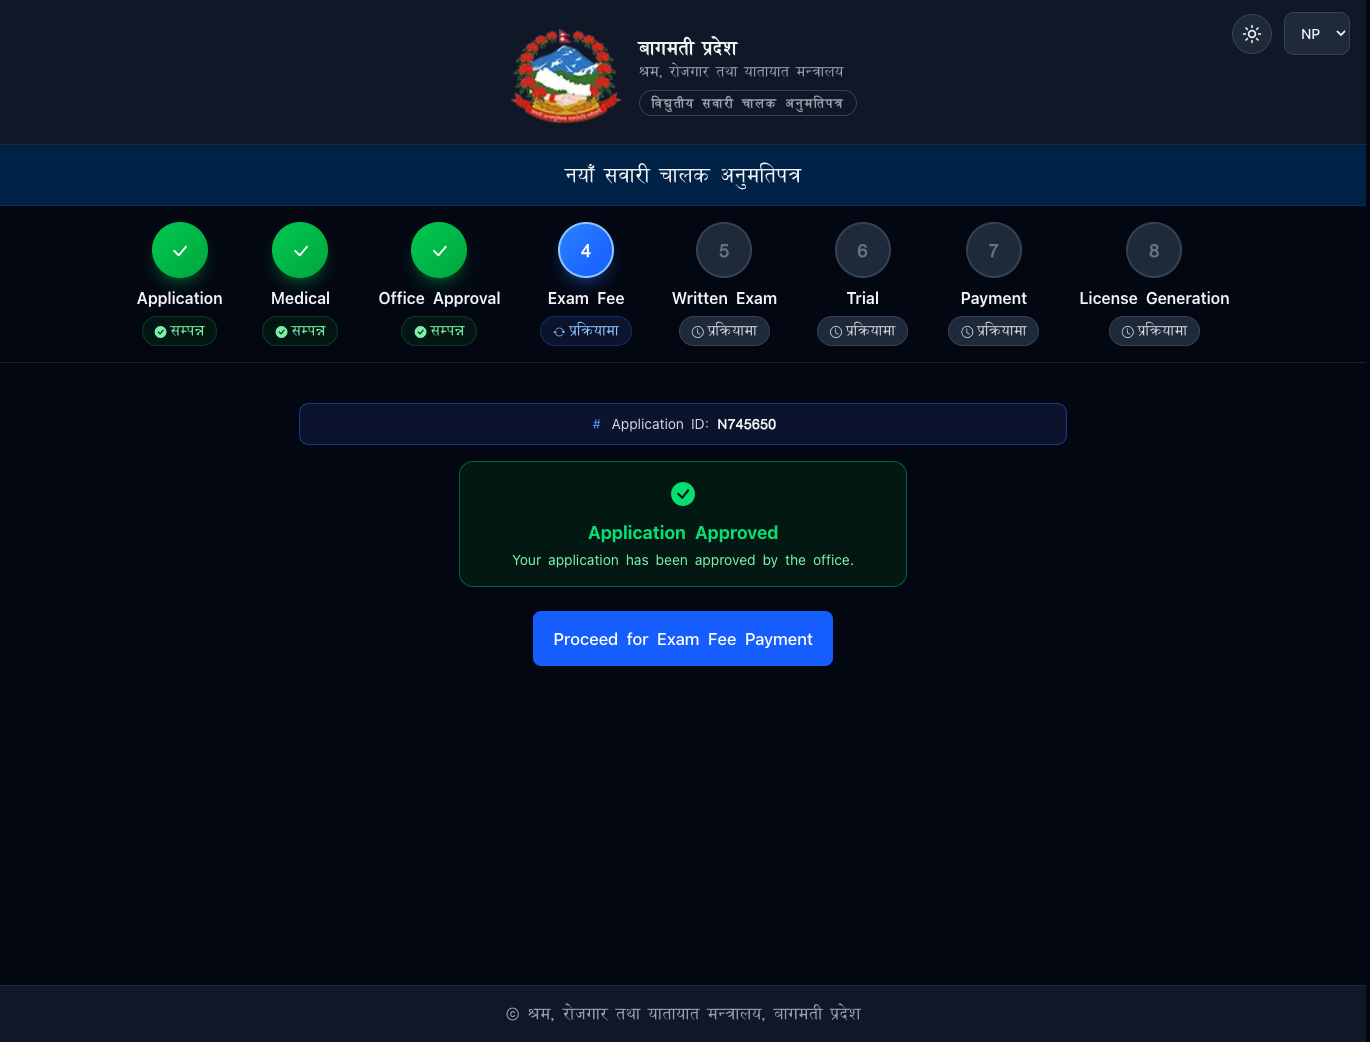
विवरण जाँचका आधारमा कार्यालयले आवेदन स्वीकृत वा अस्वीकृत गर्न सक्नेछ।
आवेदन स्वीकृत भएपछि Proceed for Exam Fee Payment मा क्लिक गर्नुहोस्।
Step 7 · चरण ७
Exam Fee Payment · परीक्षा शुल्क भुक्तानी
After office approval, click Generate Payment Voucher to generate the examination fee voucher.
Review the payable amount and payment deadline shown in the system.
Click Pay Now and make the payment using one of the electronic payment methods available in the system, such as:
QR Code, eSewa, Khalti, connectIPS, Mobile Banking, or another supported payment method.
After completing the payment, click Verify Payment to confirm that the payment has been successfully recorded in the system.
Once the payment is verified, click Proceed to Written Exam.
कार्यालयबाट आवेदन स्वीकृत भएपछि Generate Payment Voucher मा क्लिक गरी परीक्षा शुल्कको भौचर तयार गर्नुहोस्।
प्रणालीमा देखाइएको भुक्तानी रकम तथा भुक्तानी गर्नुपर्ने म्याद जाँच गर्नुहोस्।
त्यसपछि Pay Now मा क्लिक गरी प्रणालीमा उपलब्ध विद्युतीय भुक्तानी माध्यम प्रयोग गरेर तोकिएको शुल्क भुक्तानी गर्नुहोस्।
भुक्तानीका लागि QR Code, eSewa, Khalti, connectIPS, Mobile Banking वा प्रणालीले उपलब्ध गराएको अन्य विद्युतीय भुक्तानी माध्यम प्रयोग गर्न सकिन्छ।
भुक्तानी पूरा भएपछि Verify Payment मा क्लिक गरी भुक्तानी प्रणालीमा सफलतापूर्वक अभिलेख भएको सुनिश्चित गर्नुहोस्।
भुक्तानी प्रमाणीकरण भएपछि Proceed to Written Exam मा क्लिक गर्नुहोस्।
Step 8 · चरण ८
Written Examination · लिखित परीक्षा
After the examination fee has been successfully paid and verified, select an available date and time slot for the written examination.
Choose a date and time that is convenient for you from the slots available in the system.
Attend the selected transport office on the scheduled date and time and take the written examination.
The authorised office or examiner will enter the examination result into the system.
Click Download Admit Card and save or print your admit card.
You must take the admit card and required original identification documents, such as your National ID Card or Citizenship Certificate, when attending the examination.
After passing the written examination, click Proceed to Trial Exam.
परीक्षा शुल्क सफलतापूर्वक भुक्तानी तथा प्रमाणीकरण भएपछि प्रणालीमा उपलब्ध मिति तथा समयमध्ये आफूलाई पायक पर्ने लिखित परीक्षाको मिति र समय छनोट गर्नुहोस्।
सेवाग्राहीले आफूले छनोट गरेको मिति र समयमा सम्बन्धित कार्यालयमा उपस्थित भई लिखित परीक्षा दिनुपर्नेछ।
परीक्षाको नतिजा सम्बन्धित कार्यालय वा अधिकार प्राप्त परीक्षकले प्रणालीमा प्रविष्ट गर्नेछ।
Download Admit Card मा क्लिक गरी प्रवेशपत्र डाउनलोड गर्नुहोस् र आवश्यक परे प्रिन्ट गरी राख्नुहोस्।
लिखित परीक्षामा सहभागी हुँदा प्रवेशपत्रसँगै राष्ट्रिय परिचयपत्र वा नागरिकताको प्रमाणपत्र जस्ता आवश्यक सक्कल परिचयपत्र अनिवार्य रूपमा साथमा लैजानुहोस्।
लिखित परीक्षा उत्तीर्ण भएपछि Proceed to Trial Exam मा क्लिक गर्नुहोस्।
Step 9 · चरण ९
Trial Examination · प्रयोगात्मक परीक्षा
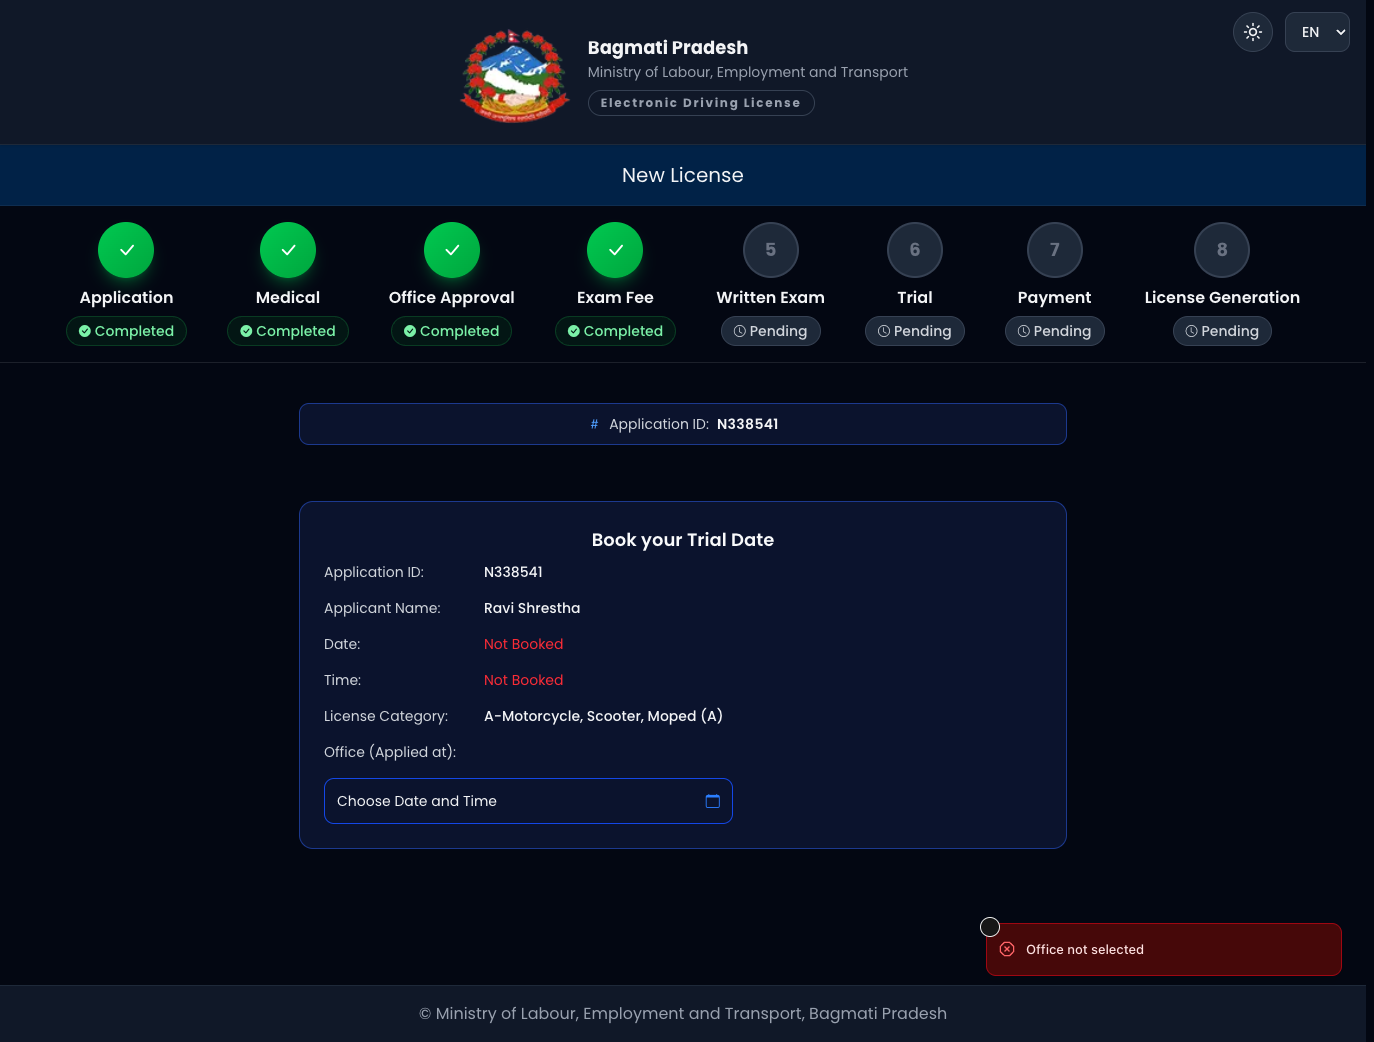
After passing the written examination, select an available date and time for the Trial Examination.
Choose the most convenient available trial slot and attend the designated trial centre on the selected date and time.
The authorised examiner or office will record the trial examination result in the system.
Click Download Admit Card and save or print the trial admit card.
Take the admit card together with the required original identification documents, such as your National ID Card or Citizenship Certificate, when attending the trial examination.
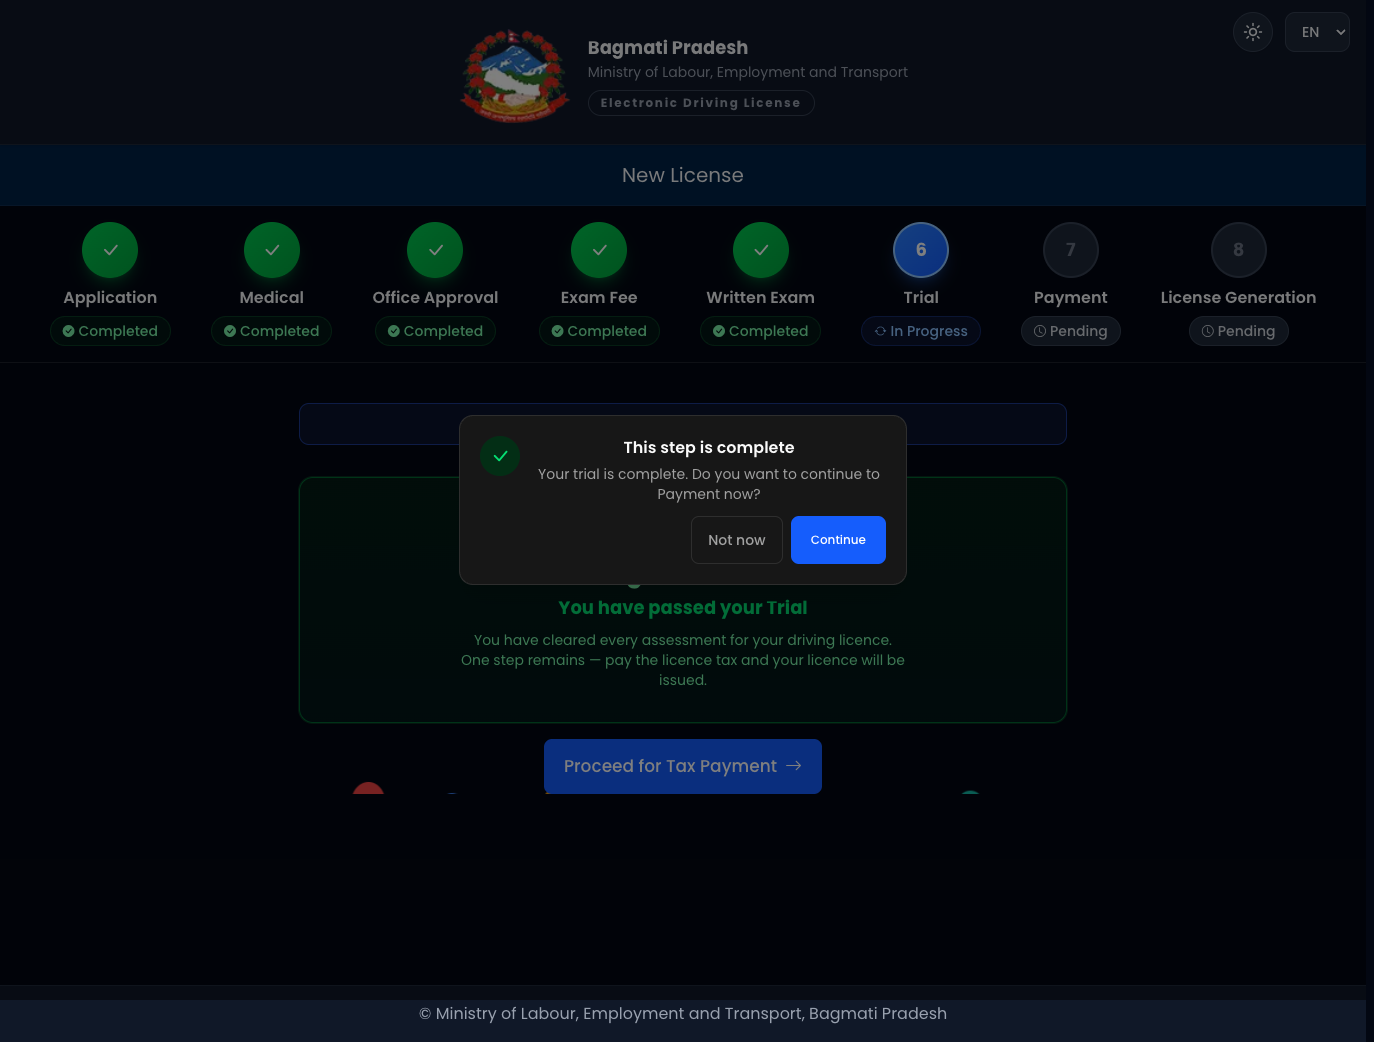
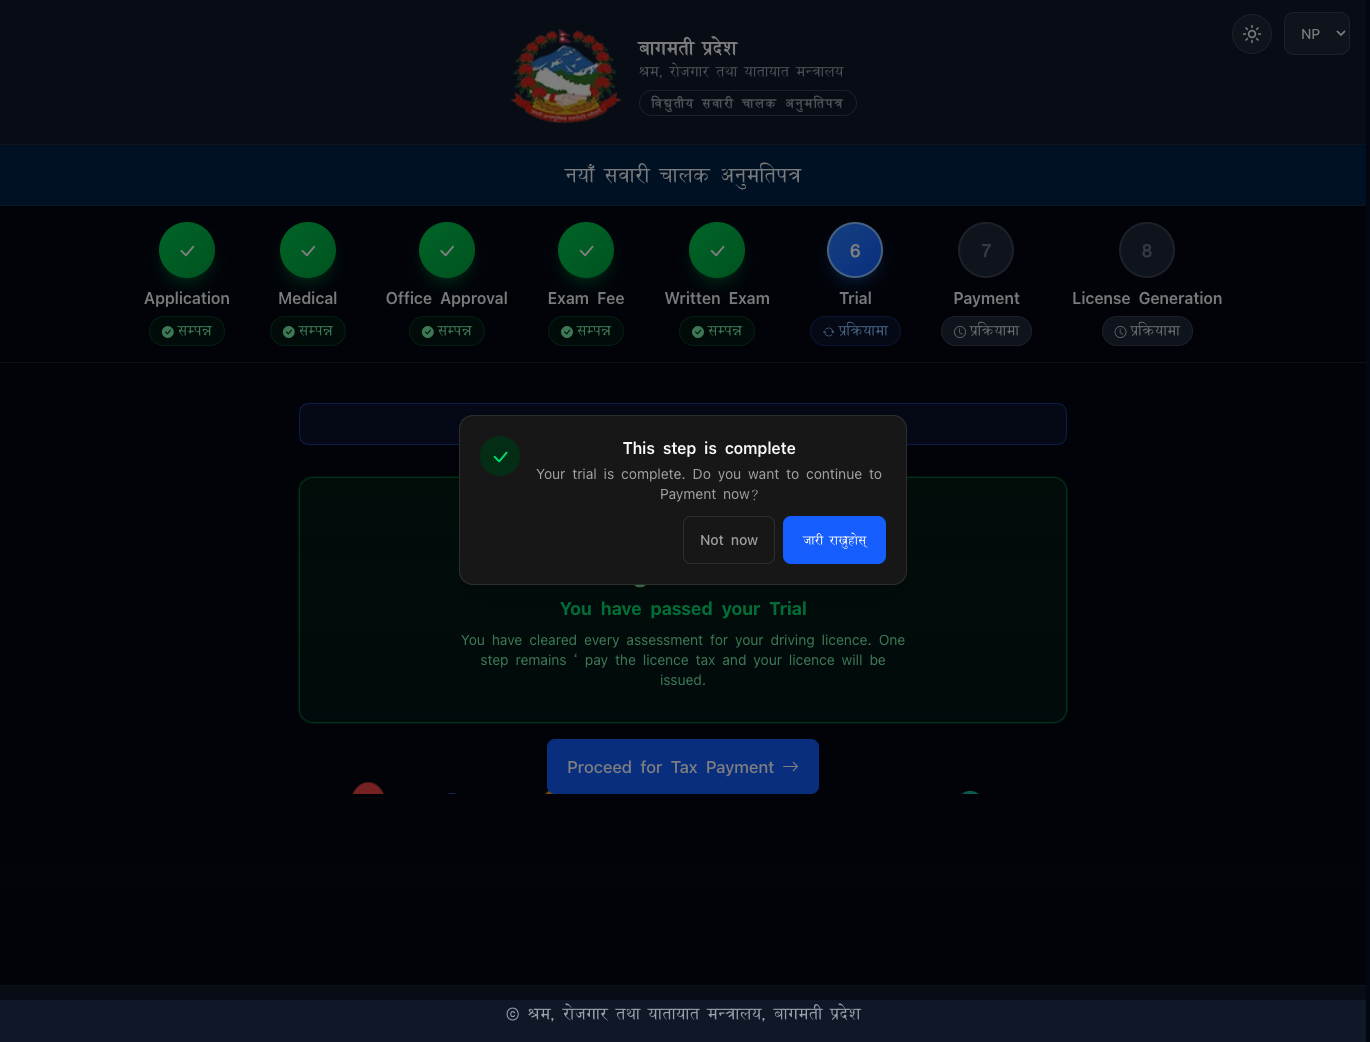
After passing the trial examination, click Proceed to Tax Payment / Licence Fee.
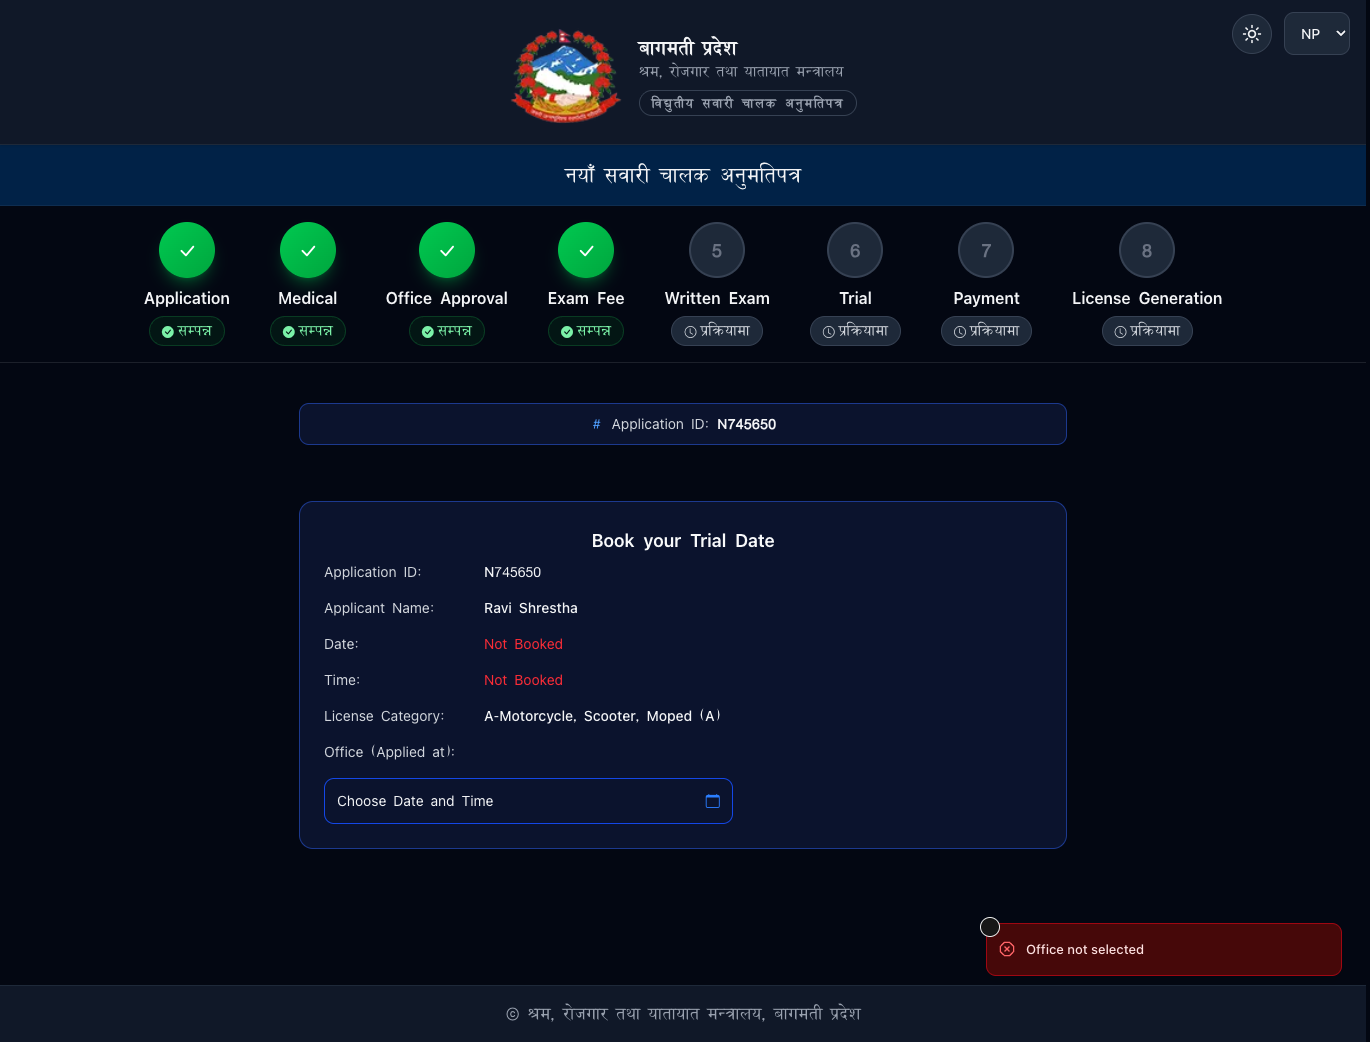
लिखित परीक्षा उत्तीर्ण भएपछि प्रणालीमा उपलब्ध मितिमध्ये आफूलाई पायक पर्ने प्रयोगात्मक परीक्षाको मिति तथा समय छनोट गर्नुहोस्।
आफूले छनोट गरेको मिति र समयमा तोकिएको प्रयोगात्मक परीक्षा केन्द्रमा उपस्थित भई परीक्षा दिनुपर्नेछ।
प्रयोगात्मक परीक्षाको नतिजा सम्बन्धित कार्यालय वा अधिकार प्राप्त परीक्षकले प्रणालीमा प्रविष्ट गर्नेछ।
Download Admit Card मा क्लिक गरी प्रयोगात्मक परीक्षाको प्रवेशपत्र डाउनलोड गर्नुहोस् र आवश्यक परे प्रिन्ट गरी राख्नुहोस्।
प्रयोगात्मक परीक्षामा सहभागी हुँदा प्रवेशपत्रसँगै राष्ट्रिय परिचयपत्र वा नागरिकताको प्रमाणपत्र जस्ता आवश्यक सक्कल परिचयपत्र साथमा लैजानुहोस्।
प्रयोगात्मक परीक्षा उत्तीर्ण भएपछि Proceed to Tax Payment / Licence Fee मा क्लिक गर्नुहोस्।
Step 10 · चरण १०
Licence Fee Payment · अनुमतिपत्र शुल्क भुक्तानी
After passing the trial examination, the applicant must pay the final driving licence fee according to the prevailing law and the fee determined by the concerned Provincial Government.
Click Generate Payment Voucher to generate the licence fee voucher.
Review the amount and payment deadline.
Click Pay Now and make the payment using an available electronic payment method such as:
QR Code, eSewa, Khalti, connectIPS, Mobile Banking, or another payment method supported by the system.
After completing the payment, click Verify Payment to confirm the payment.
प्रयोगात्मक परीक्षा उत्तीर्ण भएपछि प्रचलित कानून तथा सम्बन्धित प्रदेश सरकारले तोकेबमोजिमको अन्तिम सवारी चालक अनुमतिपत्र शुल्क भुक्तानी गर्नुपर्नेछ।
Generate Payment Voucher मा क्लिक गरी अनुमतिपत्र शुल्कको भौचर तयार गर्नुहोस्।
प्रणालीमा देखाइएको रकम तथा भुक्तानी म्याद जाँच गर्नुहोस्।
त्यसपछि Pay Now मा क्लिक गरी QR Code, eSewa, Khalti, connectIPS, Mobile Banking वा प्रणालीले उपलब्ध गराएको अन्य विद्युतीय भुक्तानी माध्यम प्रयोग गरी तोकिएको शुल्क भुक्तानी गर्नुहोस्।
भुक्तानी पूरा भएपछि Verify Payment मा क्लिक गरी भुक्तानी सफलतापूर्वक अभिलेख भएको सुनिश्चित गर्नुहोस्।
Step 11 · चरण ११
Licence Generation and Issuance · अनुमतिपत्र तयार तथा जारी
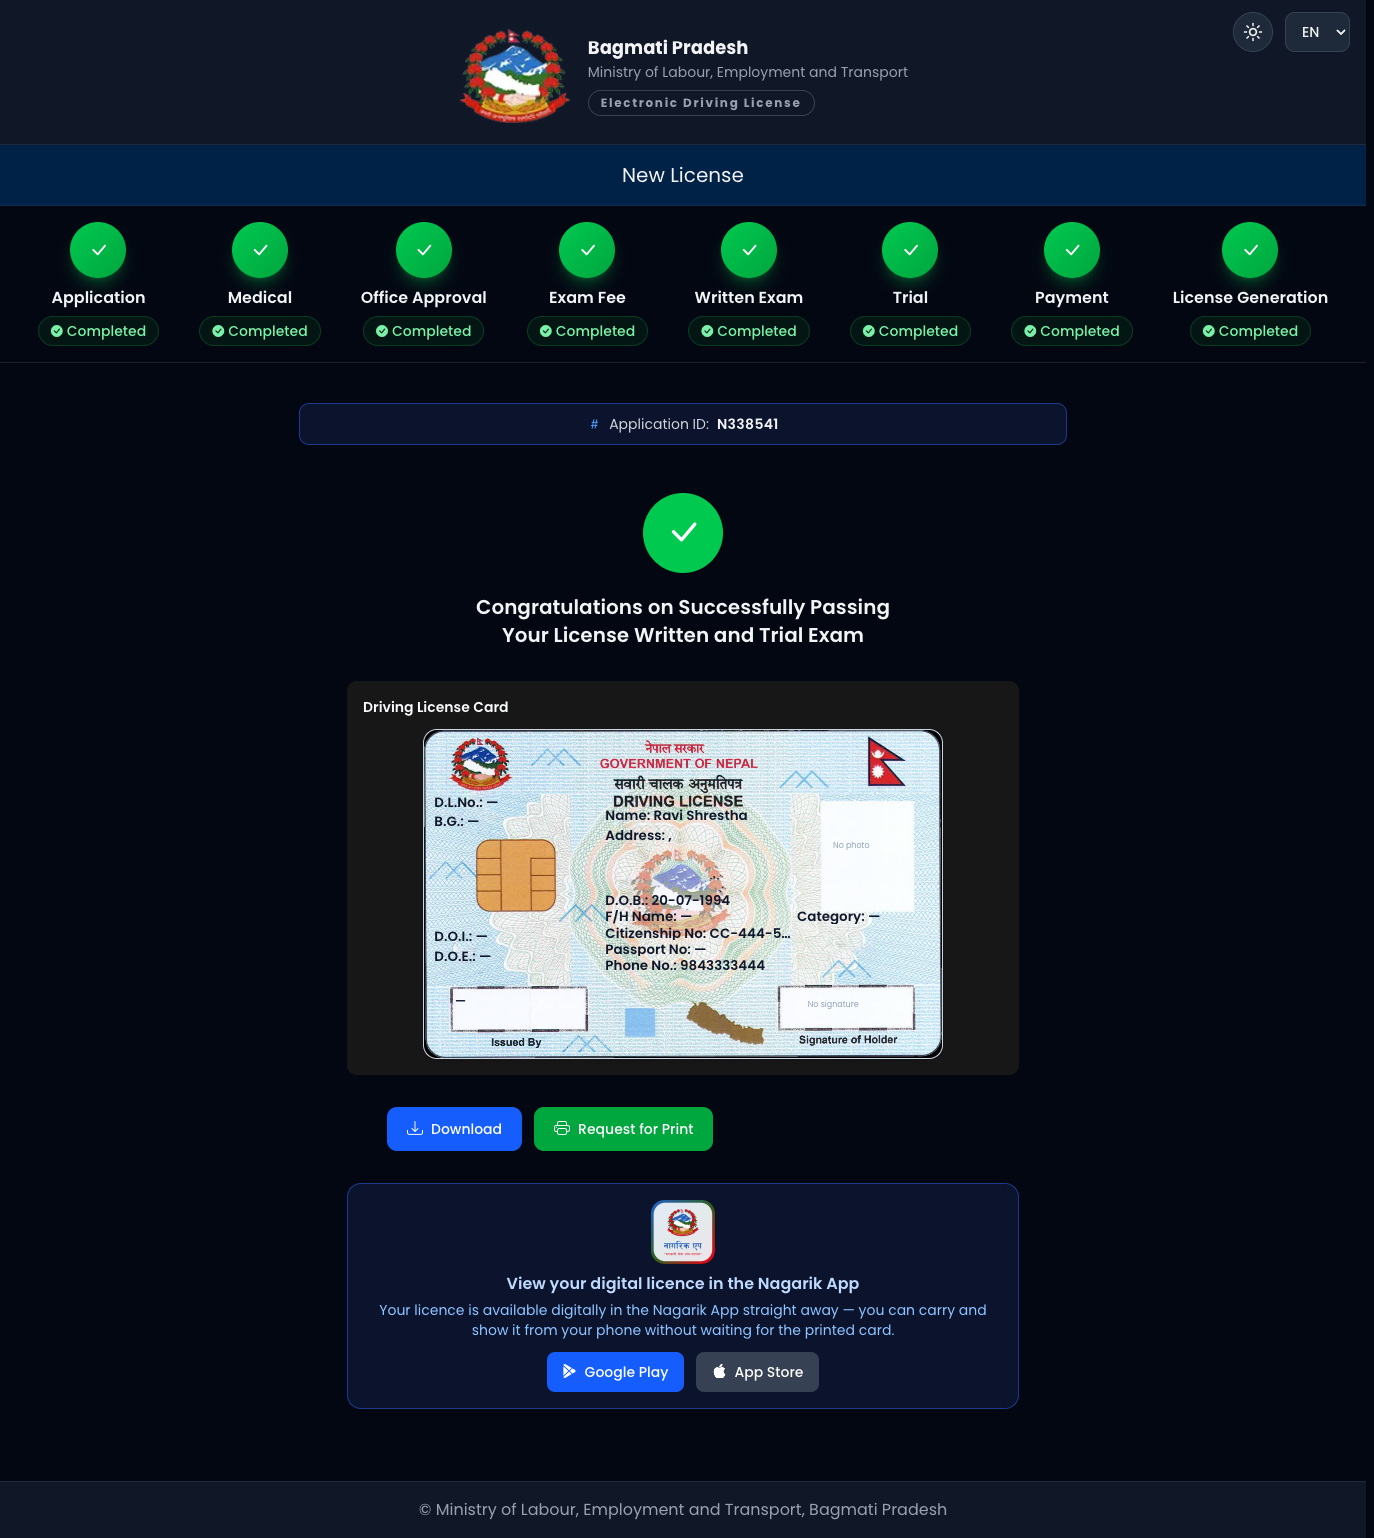
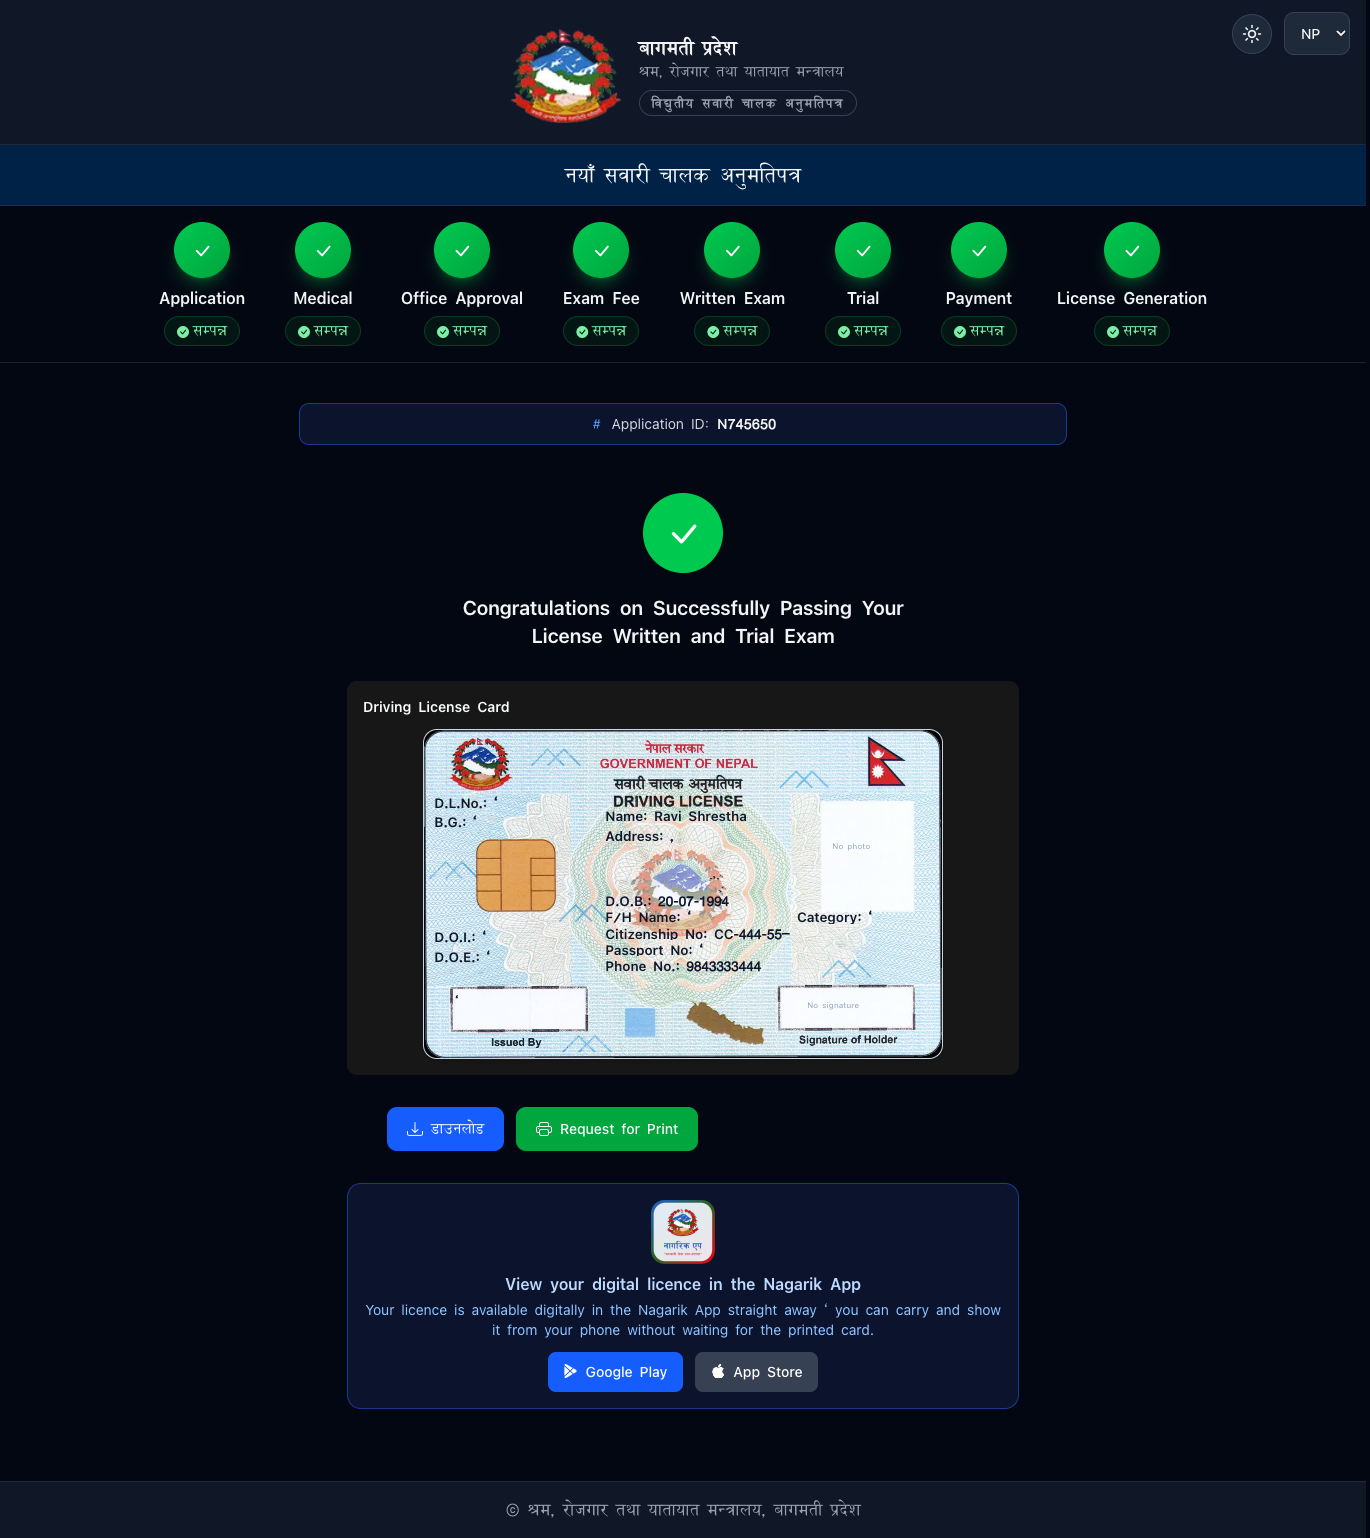
After successful completion of all required stages and payment verification, the driving licence will be generated in the system.
The licence information can be viewed or downloaded where the service is available.
The issued driving licence will also be available through the Nagarik App after successful integration and synchronisation with the system.
आवश्यक सबै चरण पूरा भई अन्तिम शुल्कसमेत सफलतापूर्वक प्रमाणीकरण भएपछि प्रणालीबाट सवारी चालक अनुमतिपत्र तयार हुनेछ।
प्रणालीमा उपलब्ध सुविधाअनुसार अनुमतिपत्रको विवरण हेर्न वा डाउनलोड गर्न सकिनेछ।
प्रणालीसँग सफलतापूर्वक समन्वय भएपछि जारी भएको सवारी चालक अनुमतिपत्र नागरिक एप मा समेत उपलब्ध हुनेछ।
Important Notes · महत्वपूर्ण जानकारी
Mobile Number and Email · मोबाइल नम्बर तथा इमेल
The mobile number and email address used for registration must belong to the applicant.
The mobile number must be registered in the applicant's own name.
दर्ताका लागि प्रयोग गरिएको मोबाइल नम्बर तथा इमेल ठेगाना आवेदक स्वयंको हुनुपर्नेछ।
मोबाइल नम्बर आवेदककै नाममा दर्ता भएको हुनुपर्नेछ।
If You Fail the Written Examination · लिखित परीक्षामा अनुत्तीर्ण भएमा
If an applicant fails the written examination, a new application for a driving licence may be submitted after 90 days.
The applicant must restart the New Driving Licence process from the beginning and complete all applicable stages again.
लिखित परीक्षामा अनुत्तीर्ण भएको अवस्थामा ९० दिनपछि पुनः नयाँ सवारी चालक अनुमतिपत्रका लागि आवेदन दिन सकिनेछ।
नयाँ आवेदन पेश गर्दा नयाँ सवारी चालक अनुमतिपत्रको प्रक्रिया सुरुदेखि पुनः पूरा गर्नुपर्नेछ।
If You Fail the Trial Examination · प्रयोगात्मक परीक्षामा अनुत्तीर्ण भएमा
An applicant who fails the first trial examination may take the trial examination two additional times within 90 days, allowing a maximum of three trial attempts under the same eligible application process.
The applicable trial examination fee must be paid for each additional trial attempt.
A retrial application can be initiated through Application Tracking or Retrial (New Licence) in the system.
पहिलो प्रयोगात्मक परीक्षामा अनुत्तीर्ण भएको अवस्थामा ९० दिनभित्र थप दुई पटकसम्म पुनः प्रयोगात्मक परीक्षा दिन सकिनेछ। यसरी एउटै योग्य आवेदन प्रक्रियाअन्तर्गत बढीमा तीन पटकसम्म प्रयोगात्मक परीक्षा दिन पाइनेछ।
प्रत्येक पुनः प्रयोगात्मक परीक्षाका लागि तोकिएको प्रयोगात्मक परीक्षा शुल्क भुक्तानी गर्नुपर्नेछ।
पुनः प्रयोगात्मक परीक्षाका लागि प्रणालीको Application Tracking वा Retrial (New Licence) विकल्पबाट प्रक्रिया सुरु गर्न सकिनेछ।
2. Renew Licence · नवीकरण
Renew an existing licence. भइरहेको अनुमतिपत्र नवीकरण गर्नुहोस्।
Journey · प्रक्रिया: Application → Medical → Office Approval → Renewal Fee →
Licence Renewed (5 stages · ५ चरण)
Step 1 — Choose Renew License. · चरण १ — नवीकरण छान्नुहोस्।
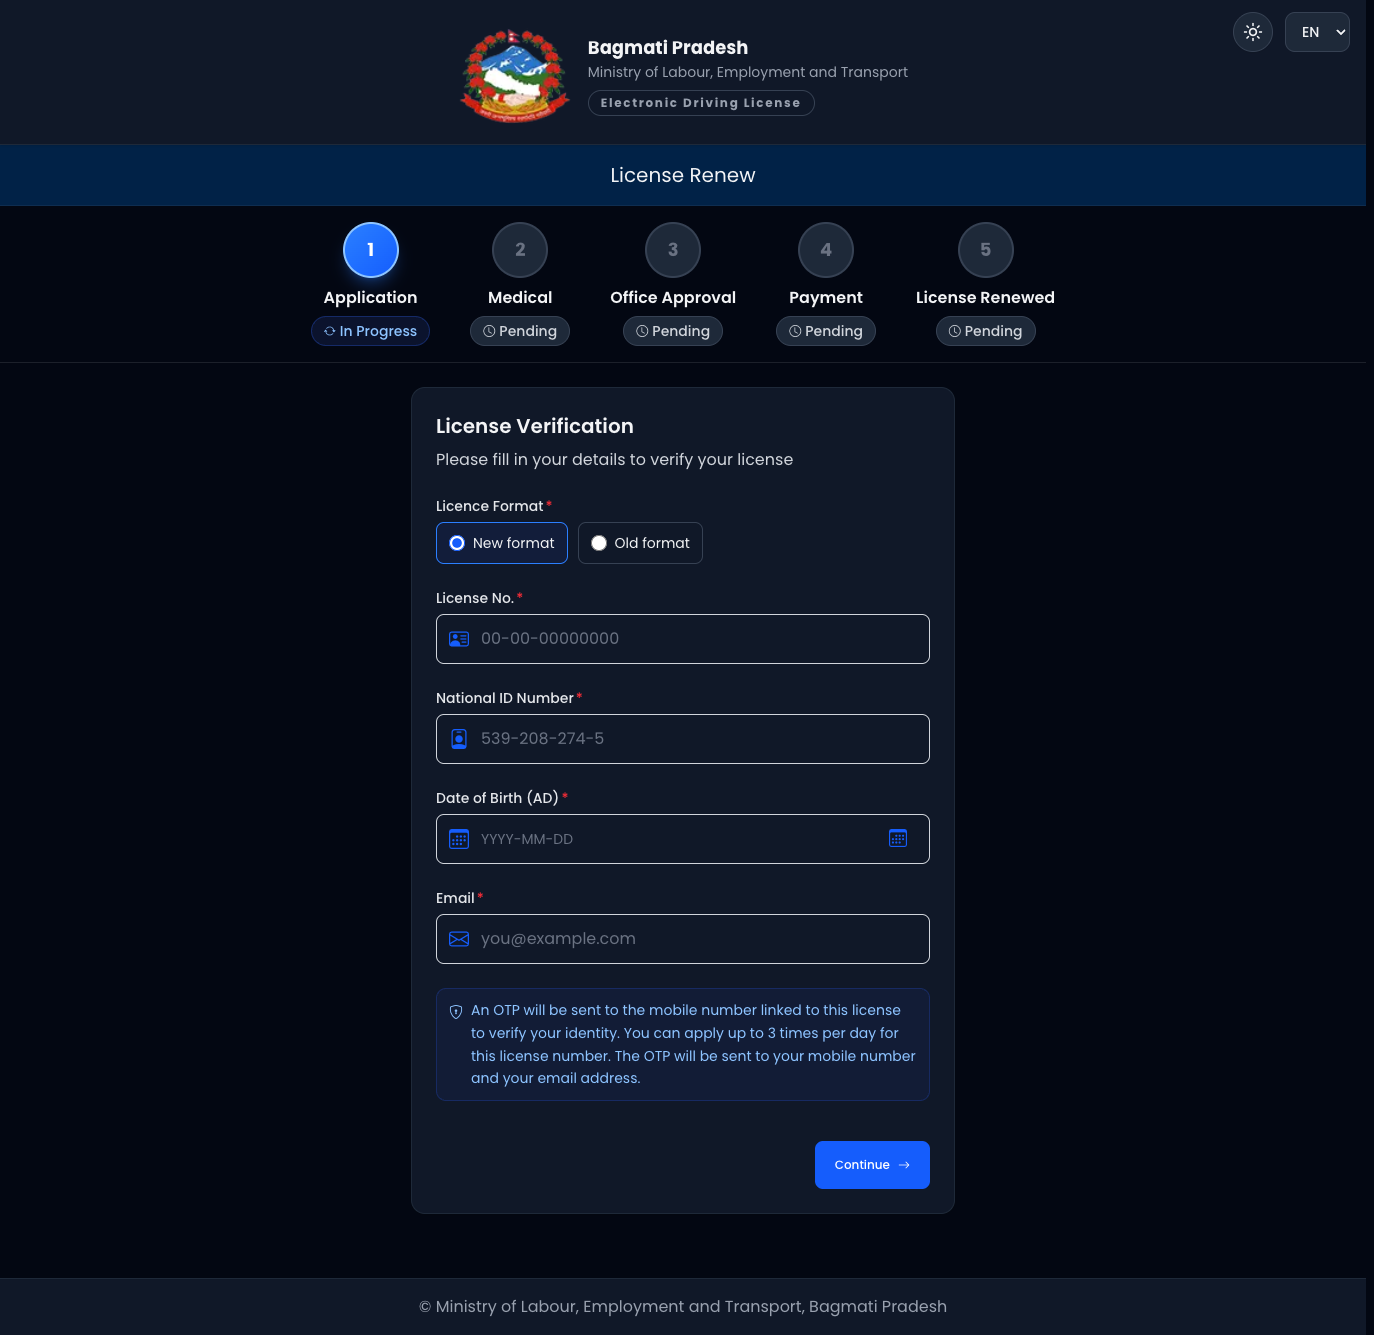
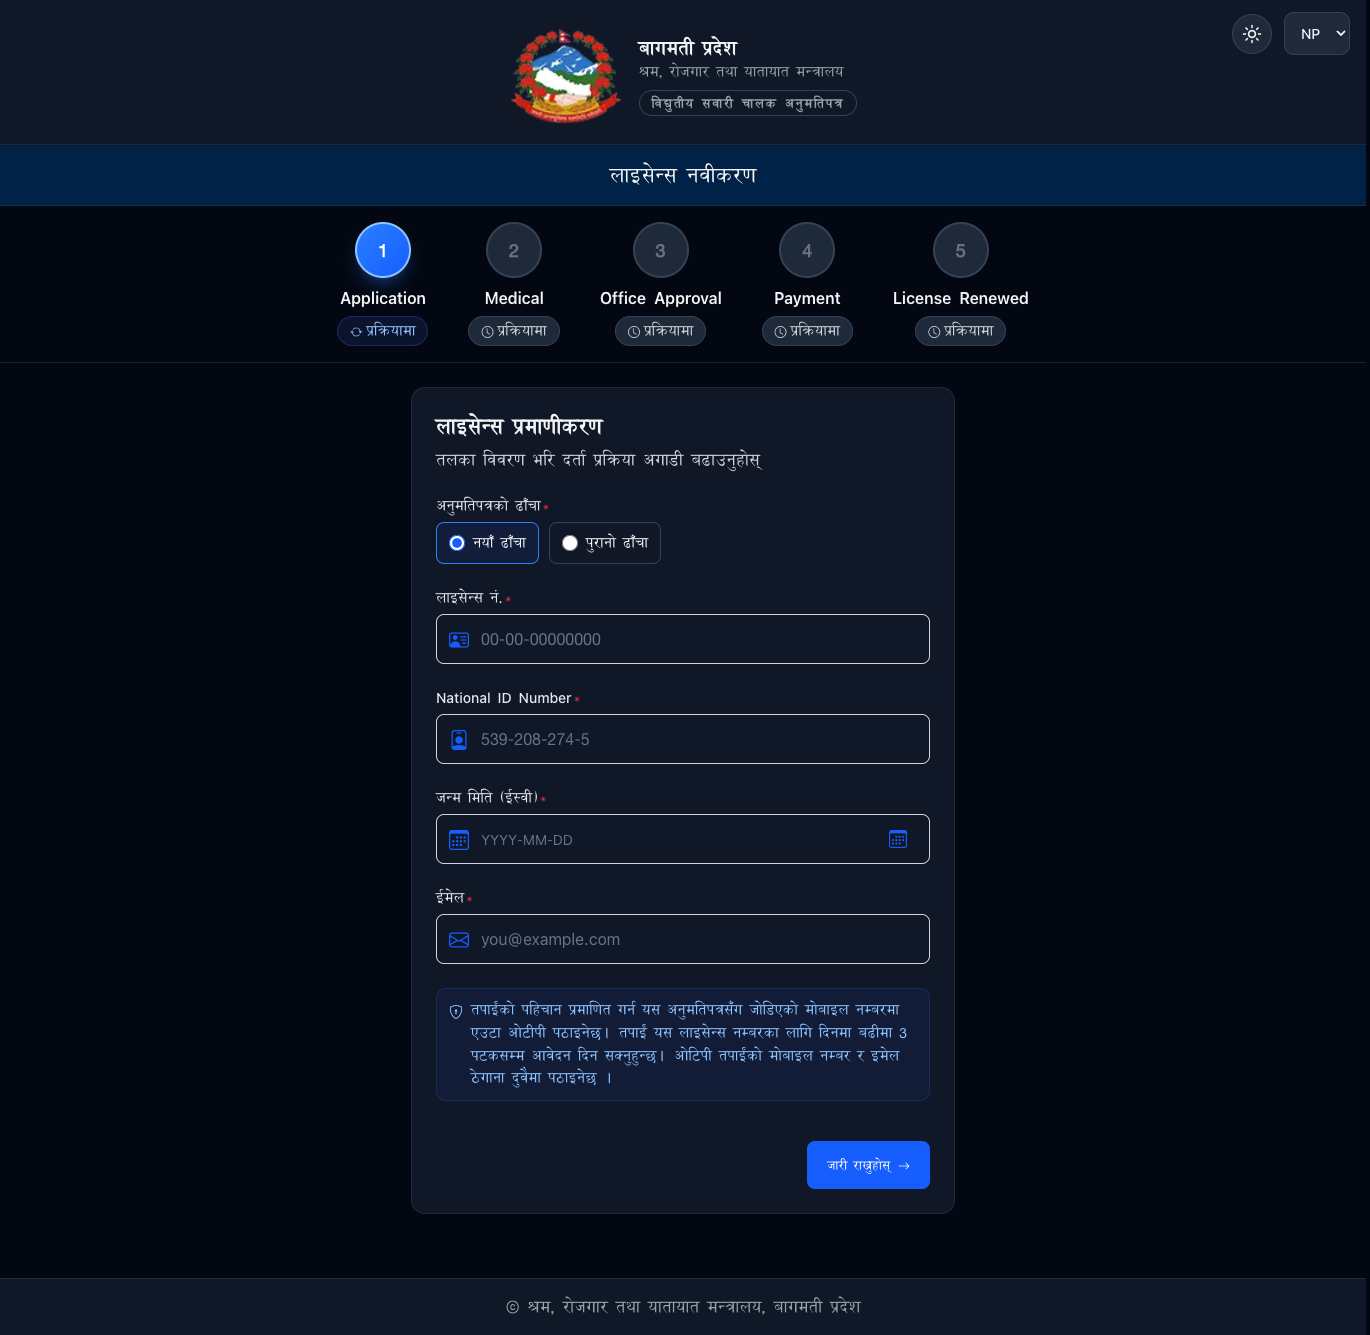
Step 2 — Verify your licence. Select New or Old format, then enter your
Licence No., National ID number, Date of Birth (AD) and email; verify by OTP sent
to the mobile linked to the licence. You may apply up to 3 times per day. · चरण
२ — अनुमतिपत्र प्रमाणीकरण। नयाँ/पुरानो ढाँचा छानी अनुमतिपत्र नं., NID नं., जन्म
मिति र इमेल भरी OTP ले प्रमाणित गर्नुहोस्। दिनमा ३ पटकसम्म आवेदन गर्न सकिन्छ।
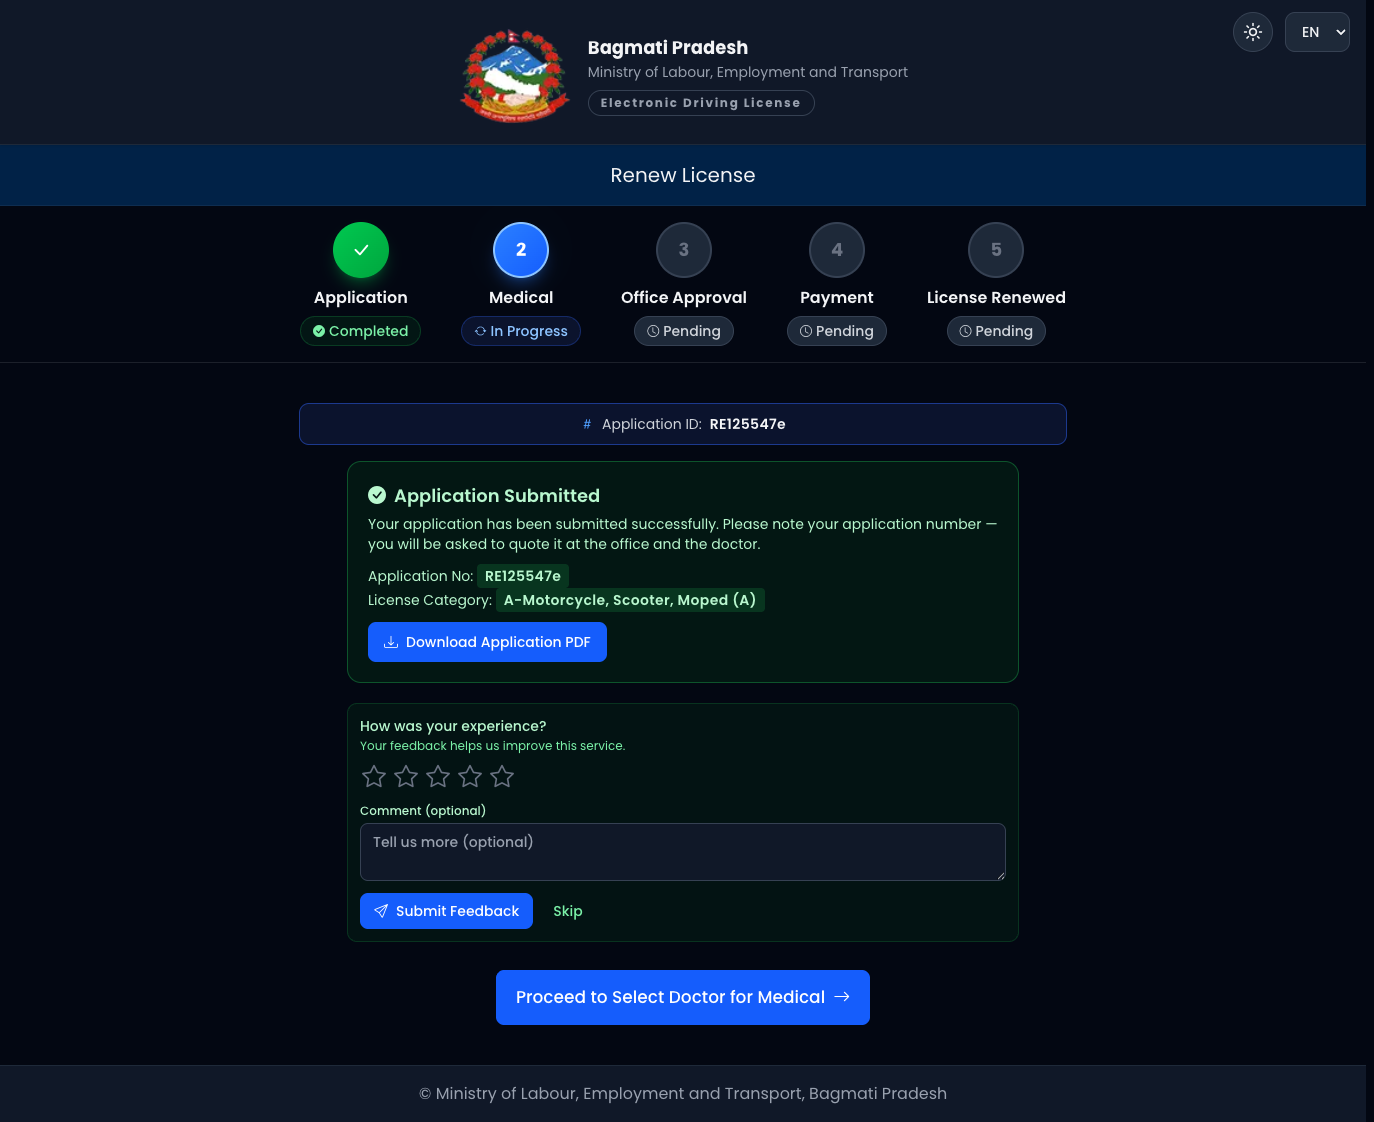
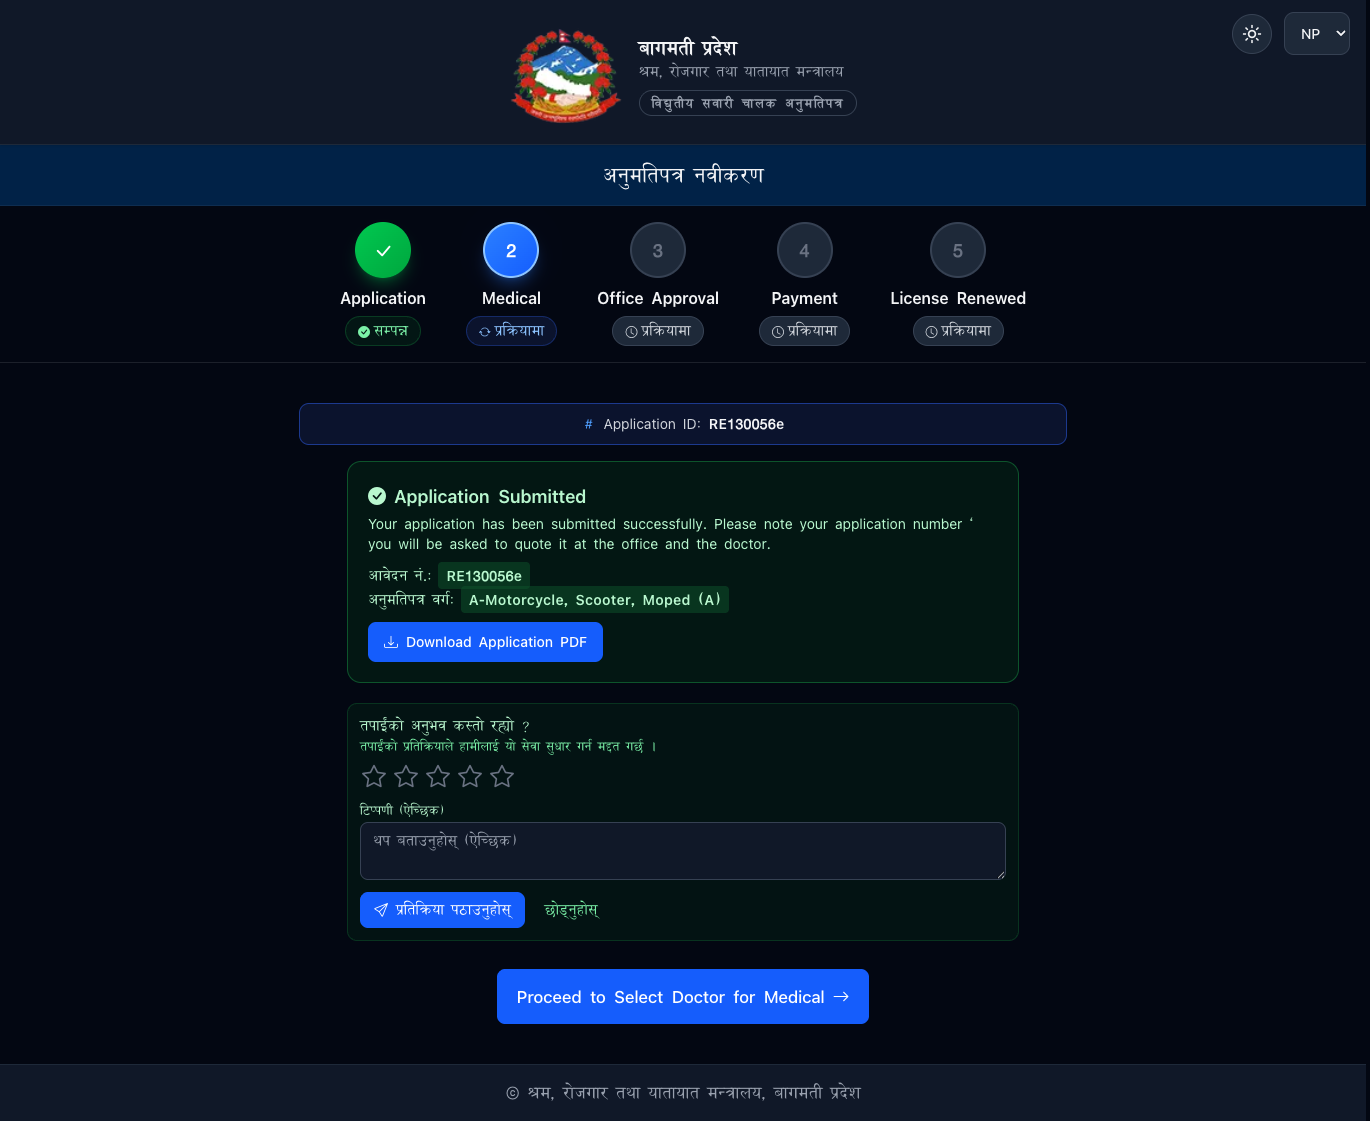
Step 3 — Application submitted. Note your Application No. · चरण ३ — आवेदन
पेश। आवेदन नं. टिपेर राख्नुहोस्।
Step 4 — Medical. Select a doctor and complete the medical; submit the report
once fit. · चरण ४ — स्वास्थ्य परीक्षण। चिकित्सक छानी परीक्षण पूरा गर्नुहोस्।
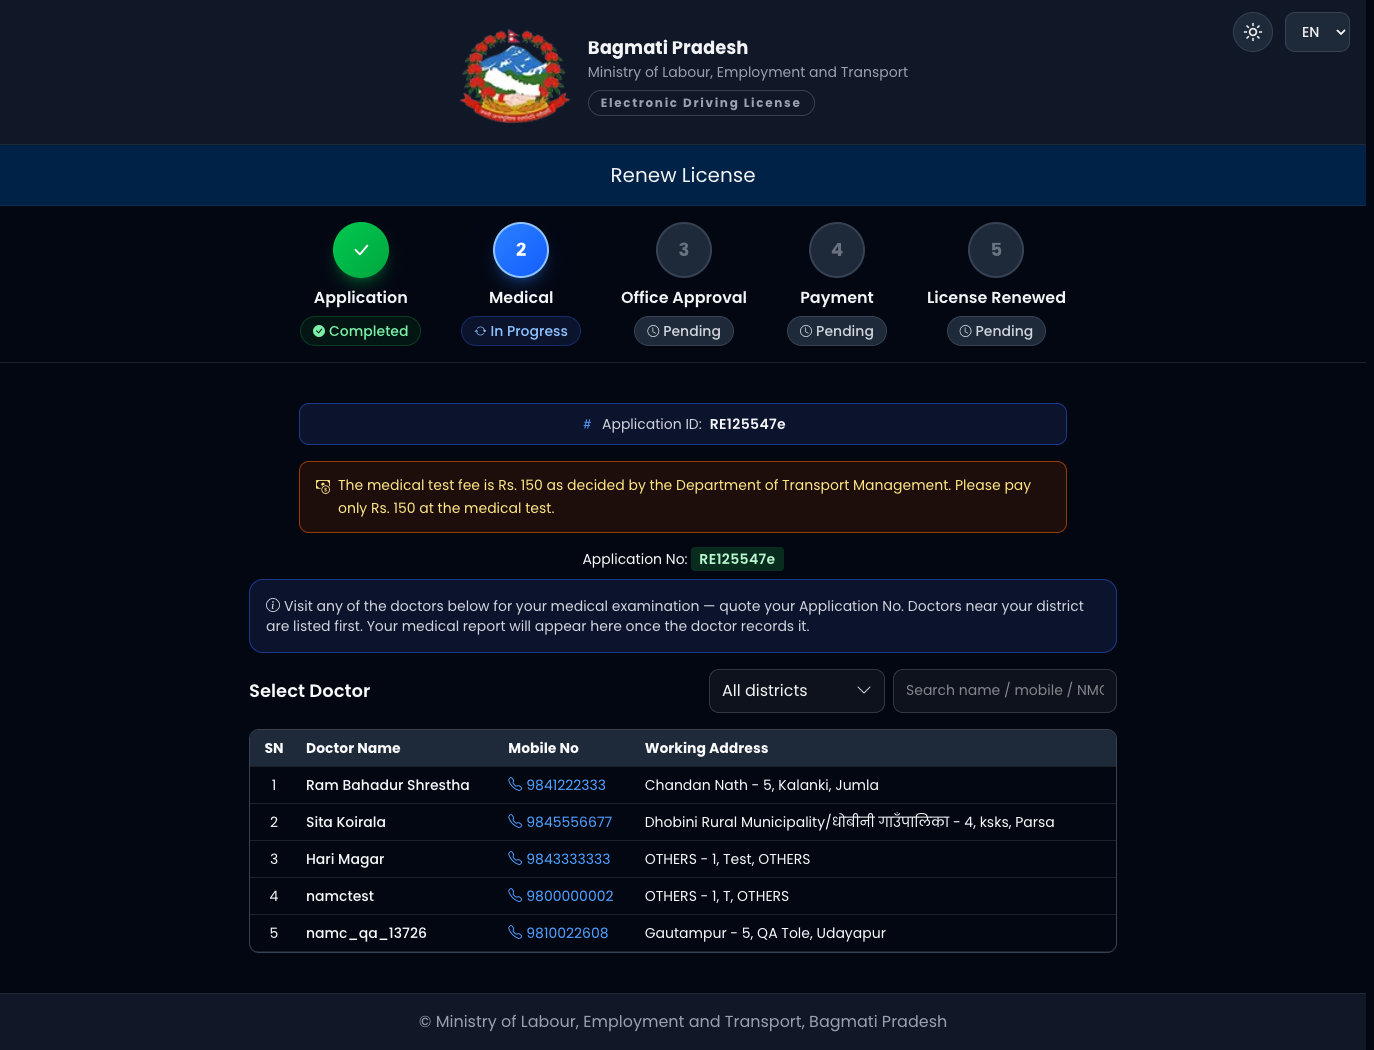
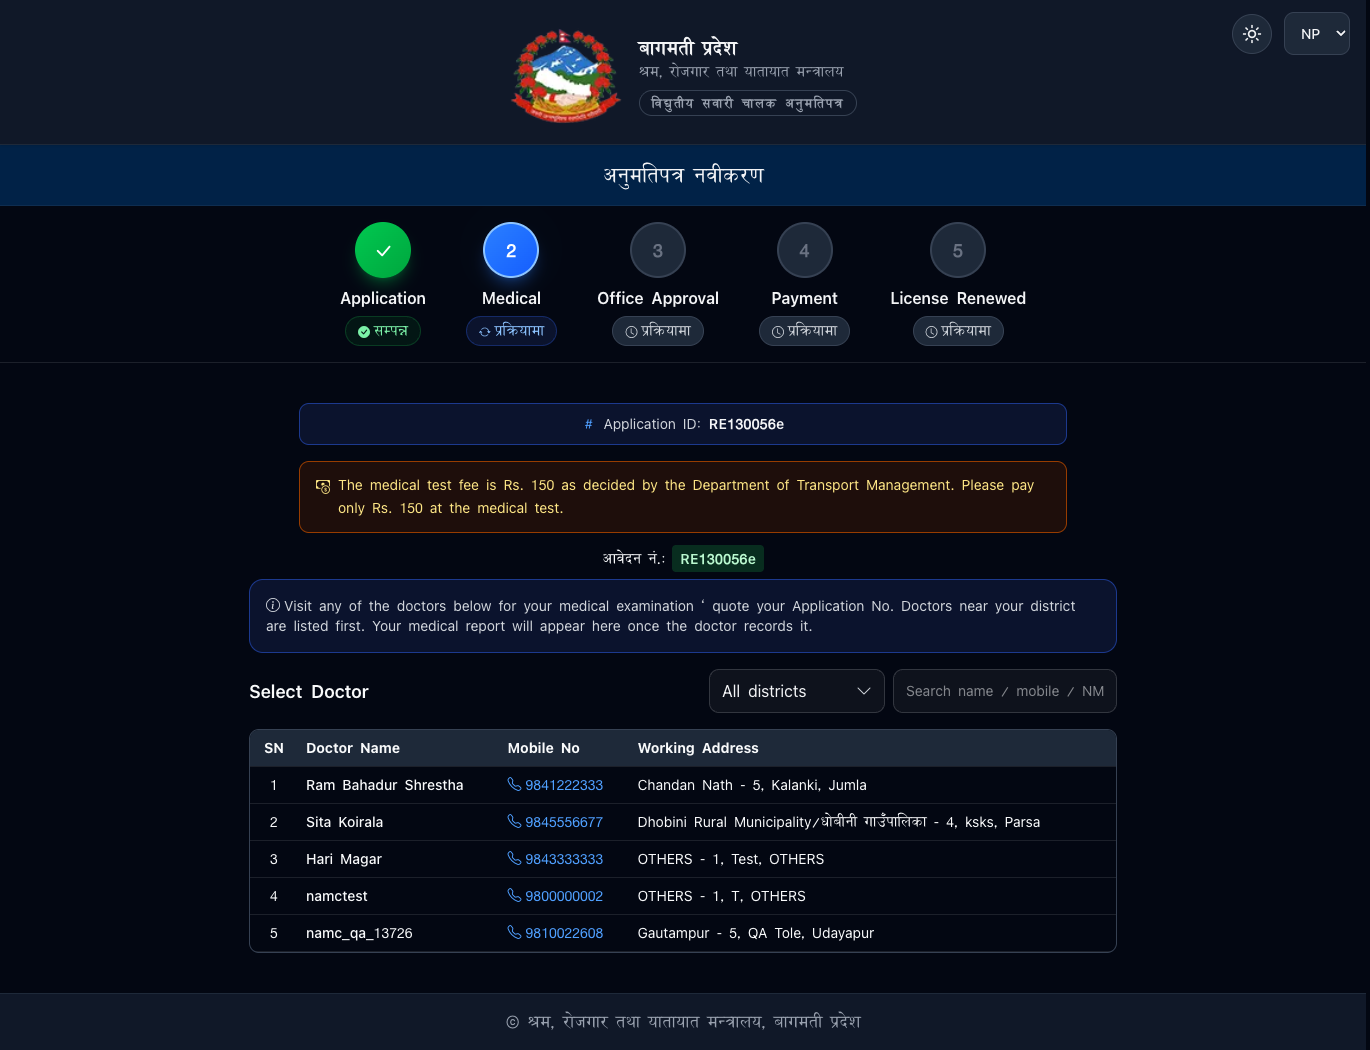
Step 5 — Office approval. Your licence's own office verifies and approves. ·
चरण ५ — कार्यालय स्वीकृति। अनुमतिपत्रकै कार्यालयले जाँची स्वीकृत गर्छ।
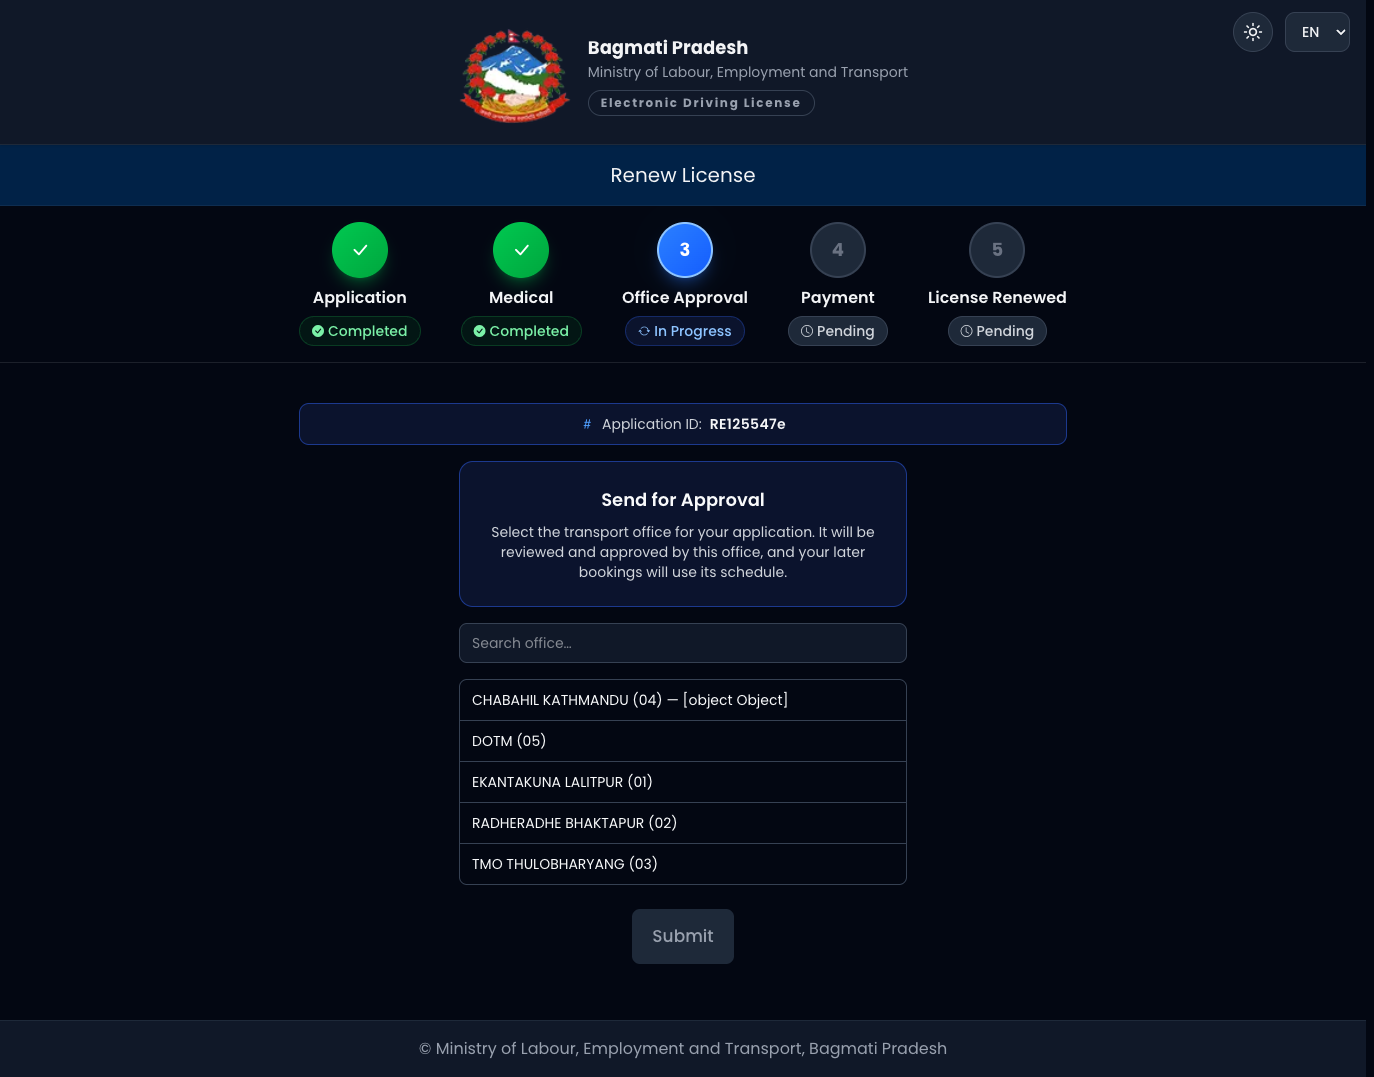
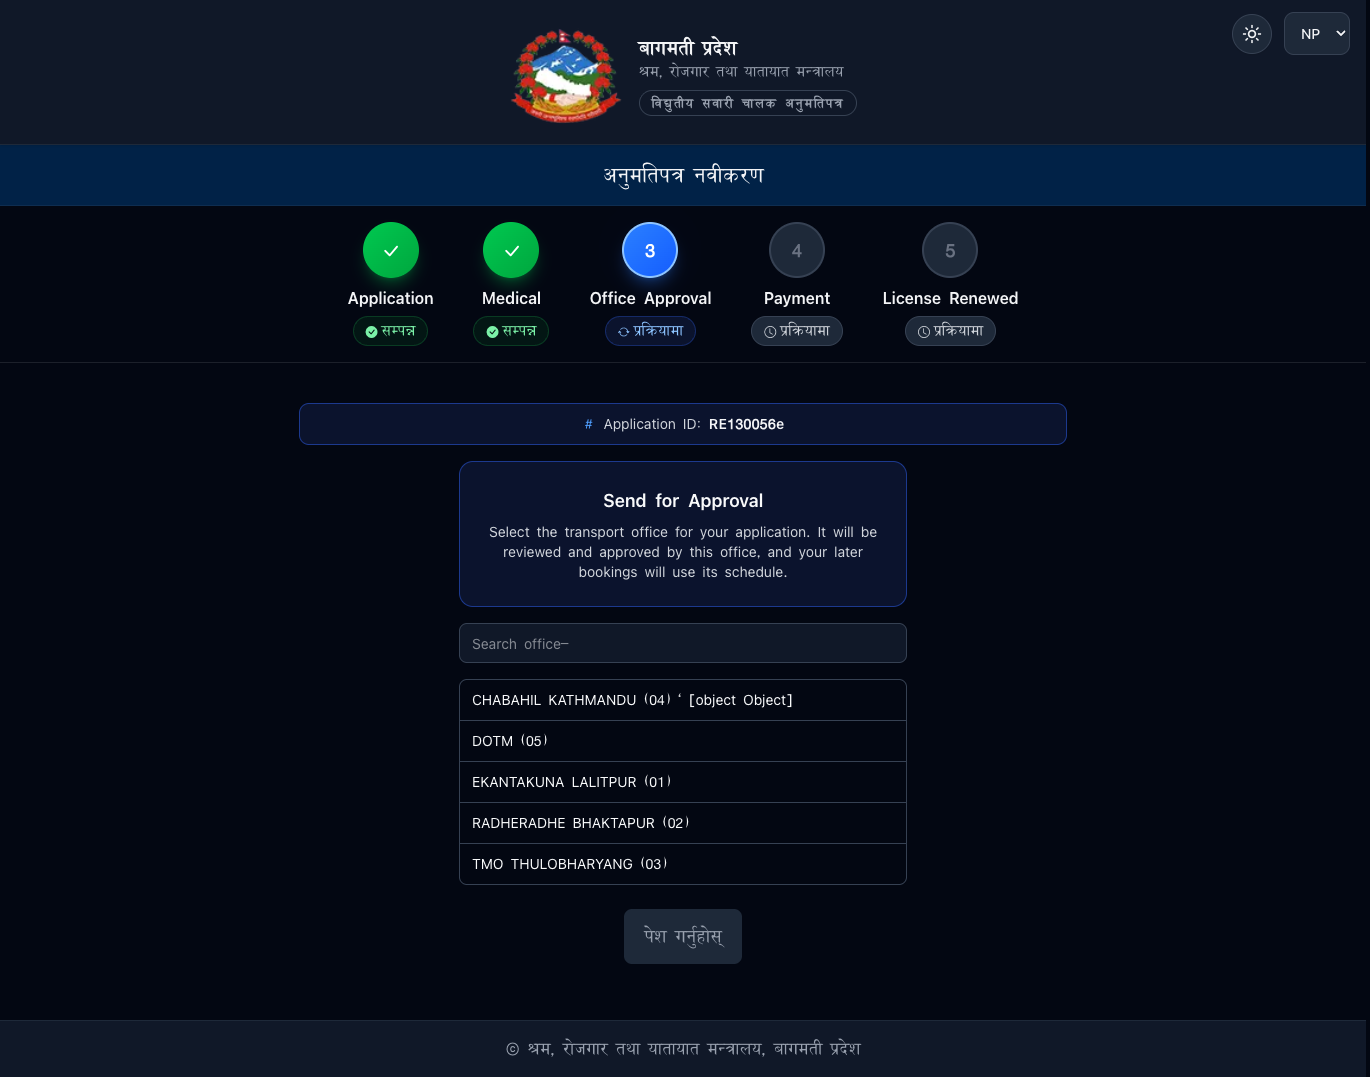
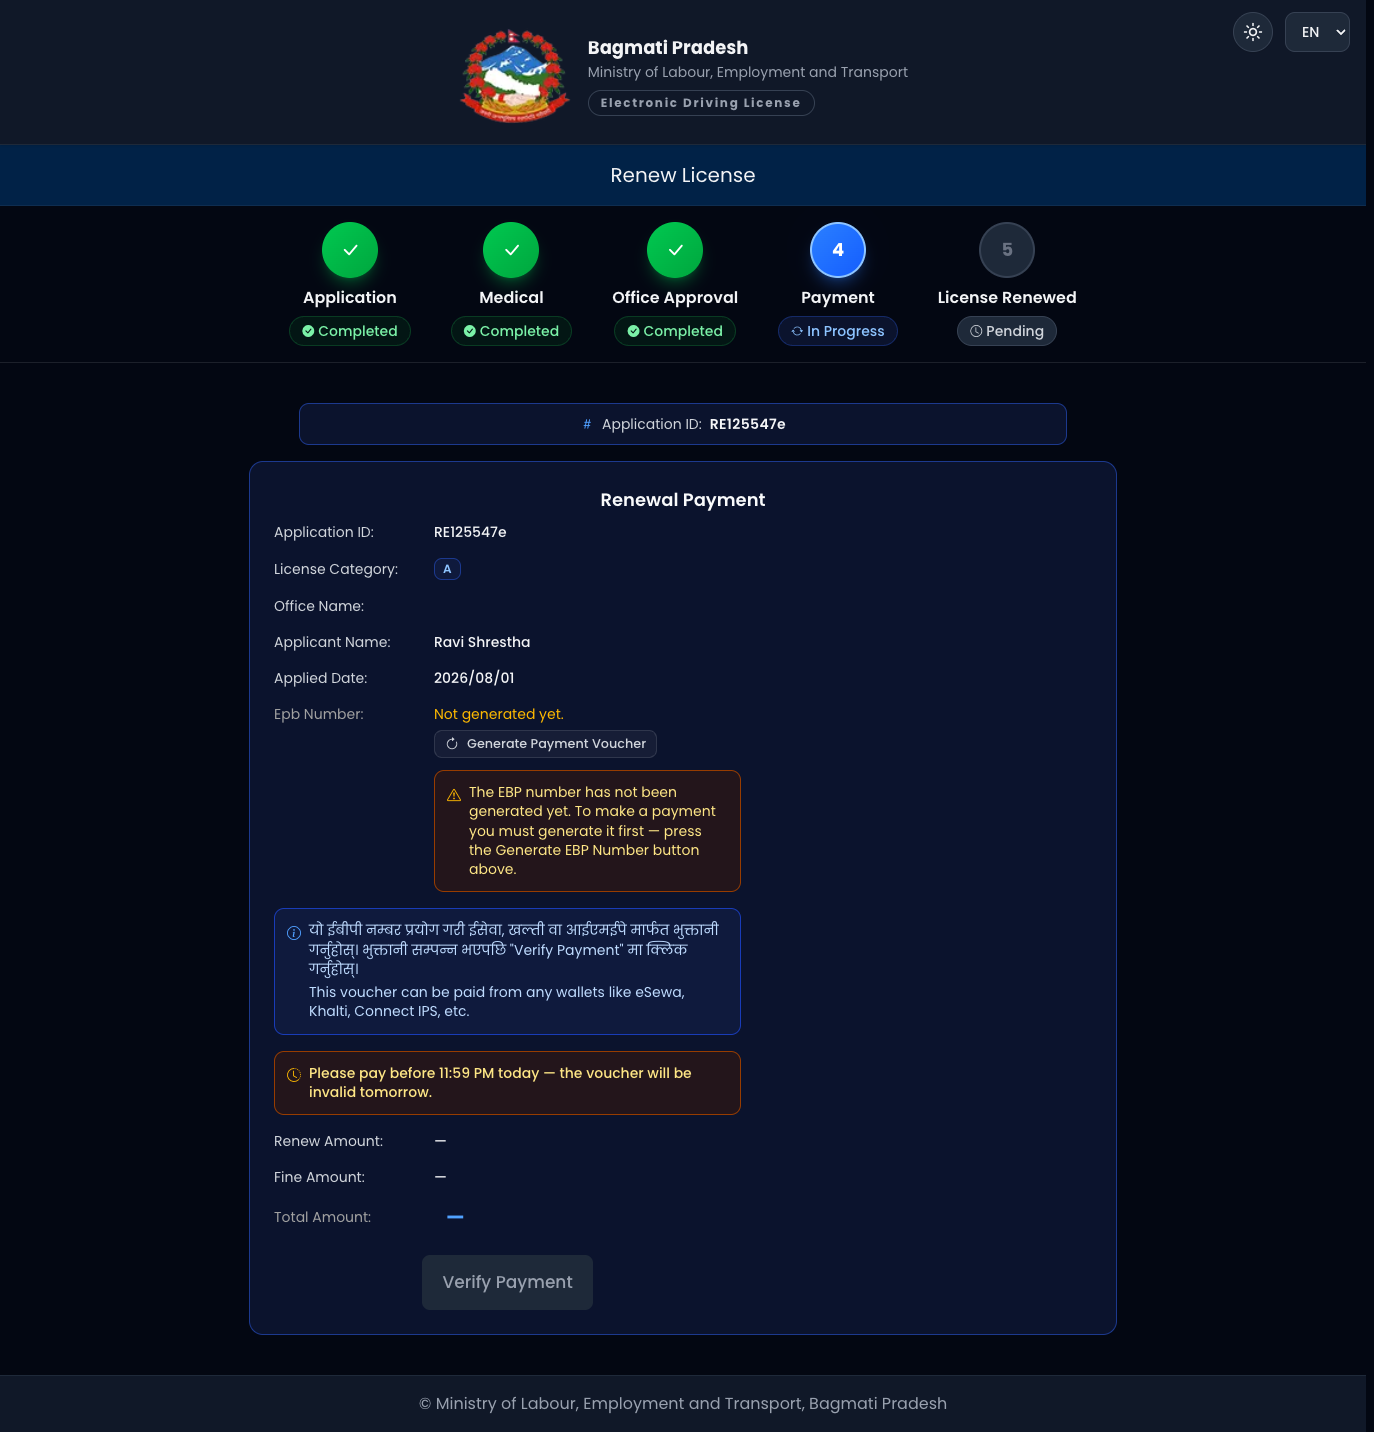
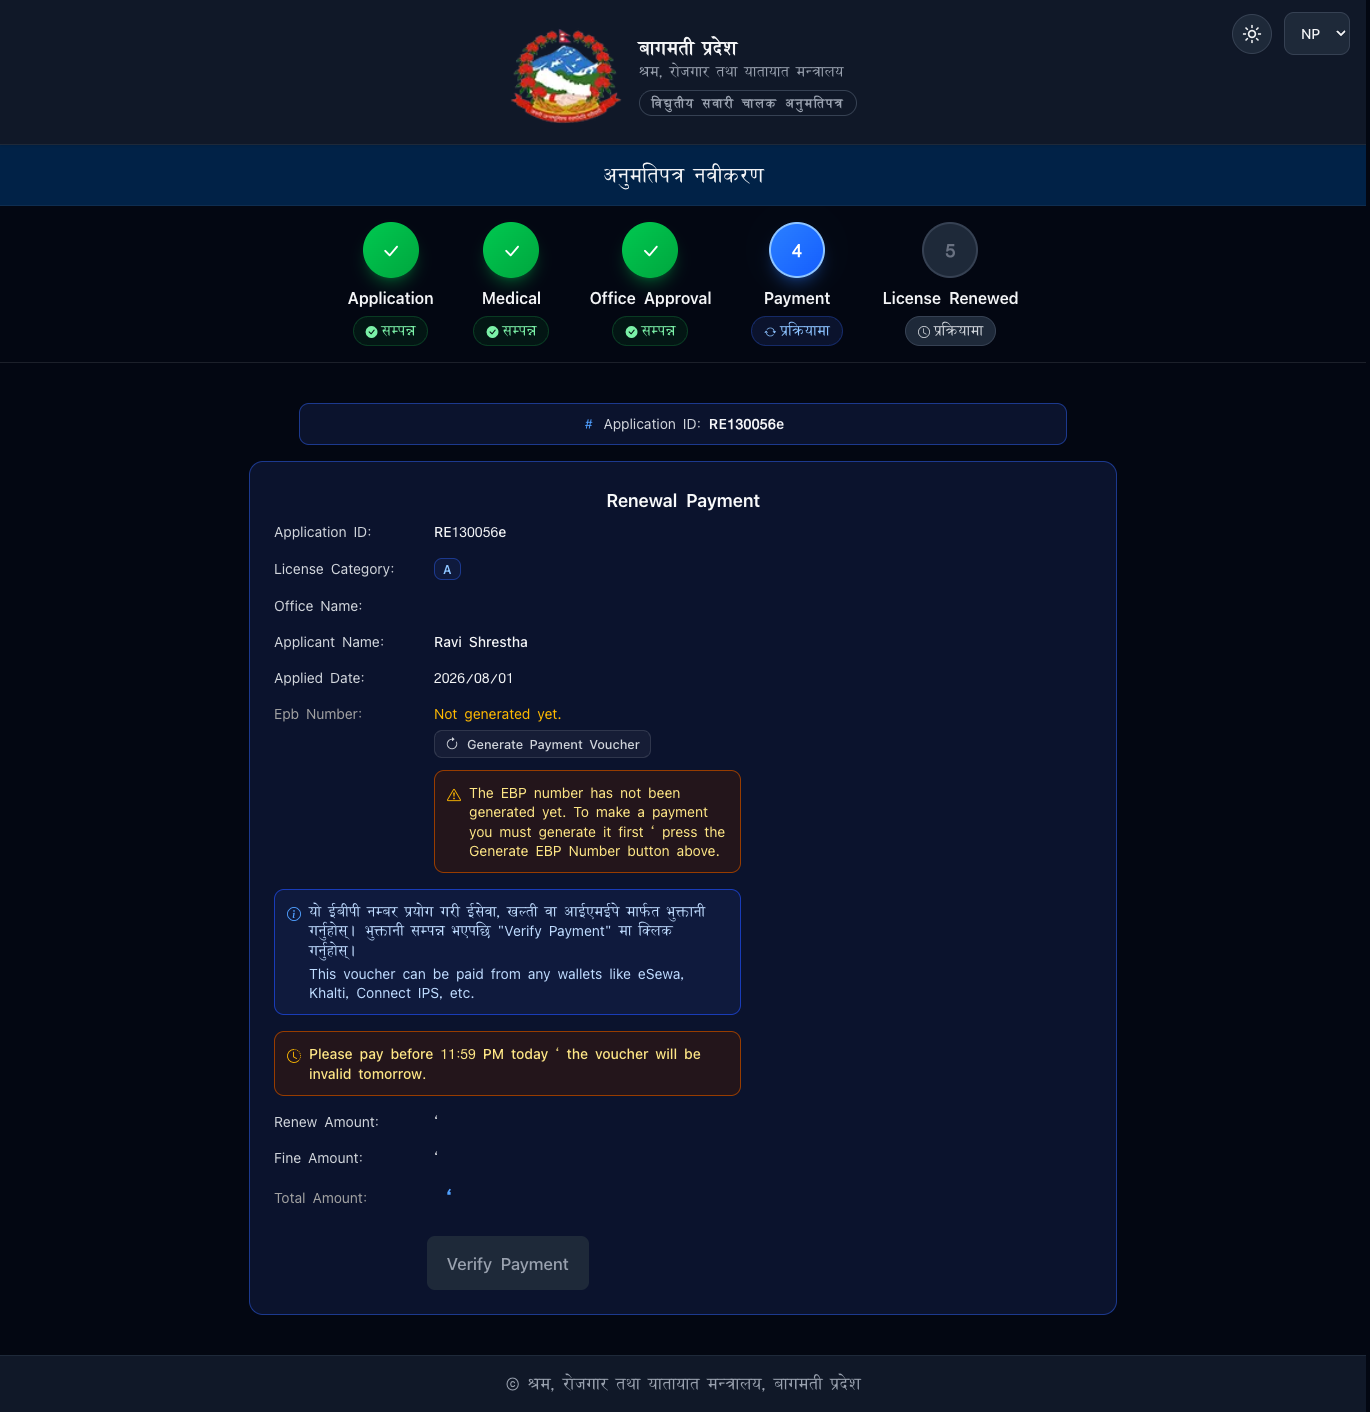
Step 6 — Renewal Fee. Generate the renewal-fee voucher and pay it. ·
चरण ६ — नवीकरण शुल्क। नवीकरण शुल्कको भौचर बनाई भुक्तानी गर्नुहोस्।
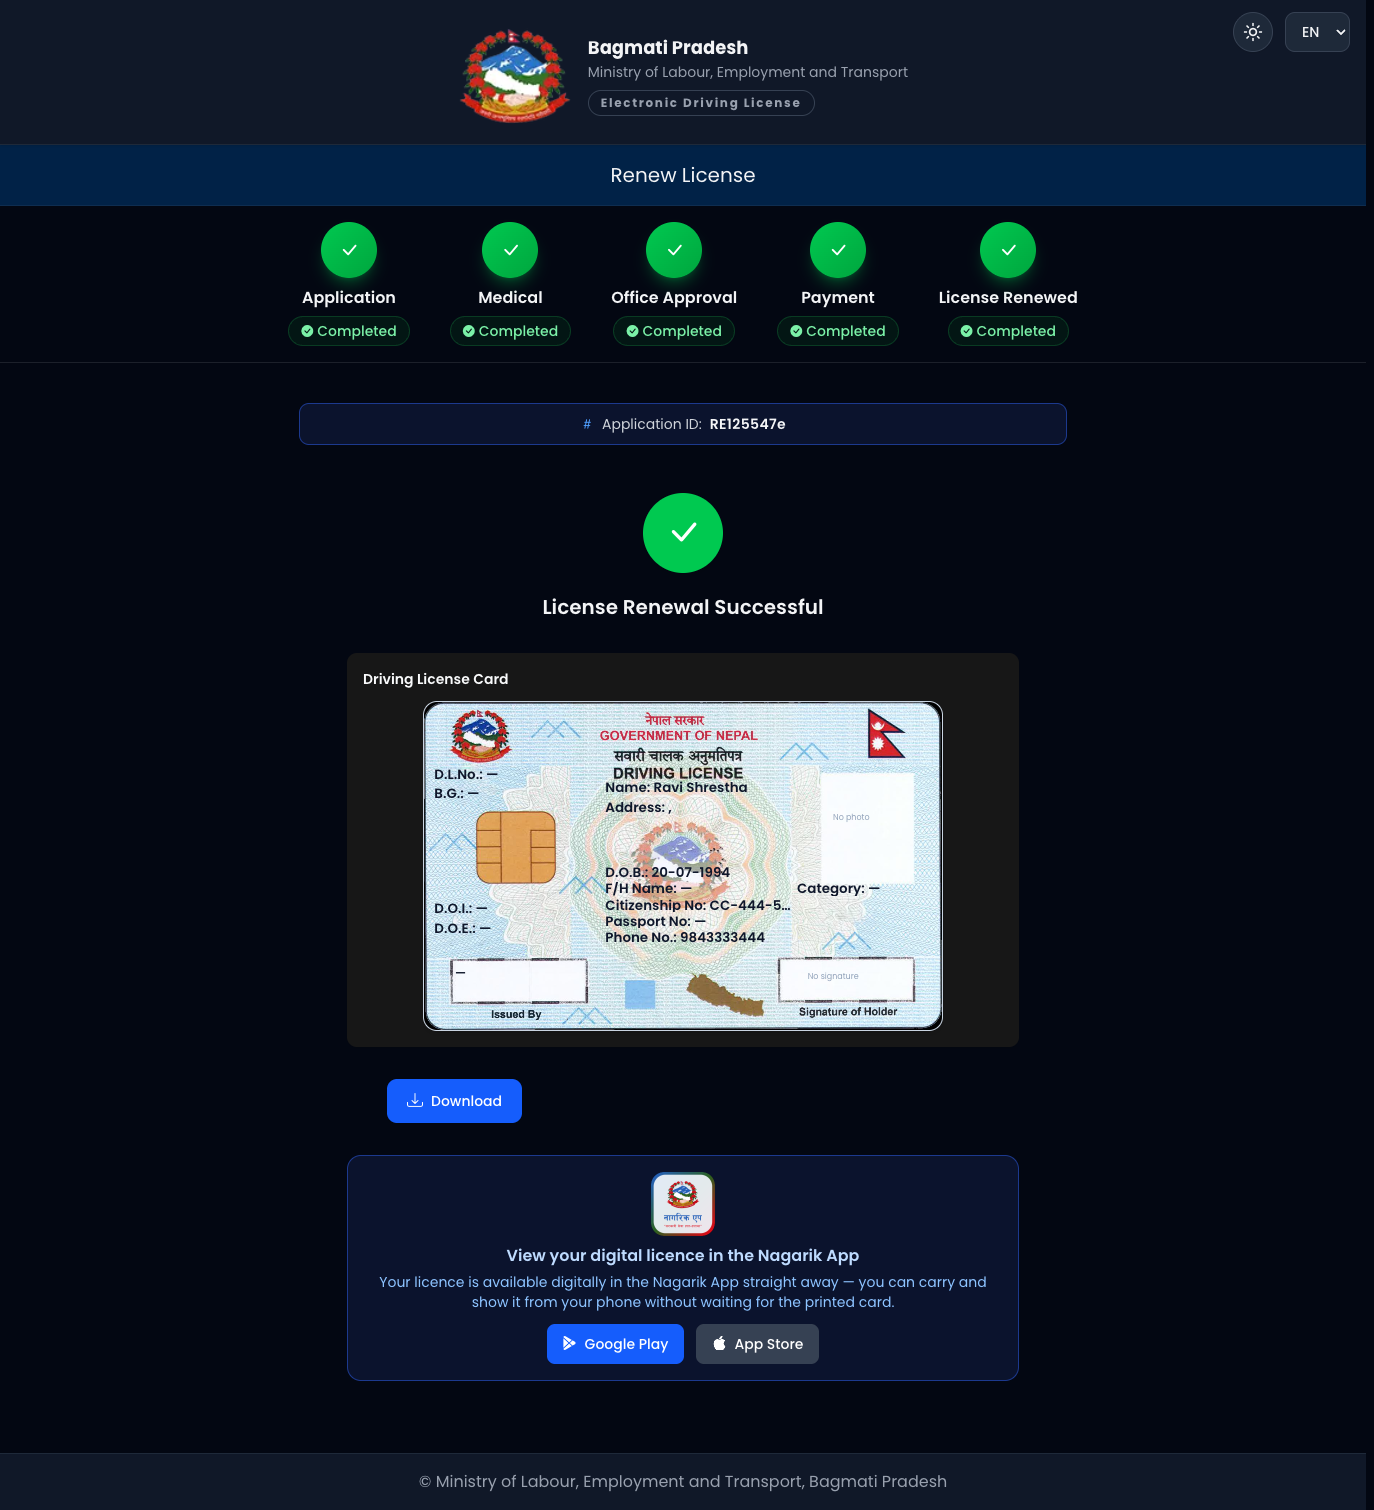
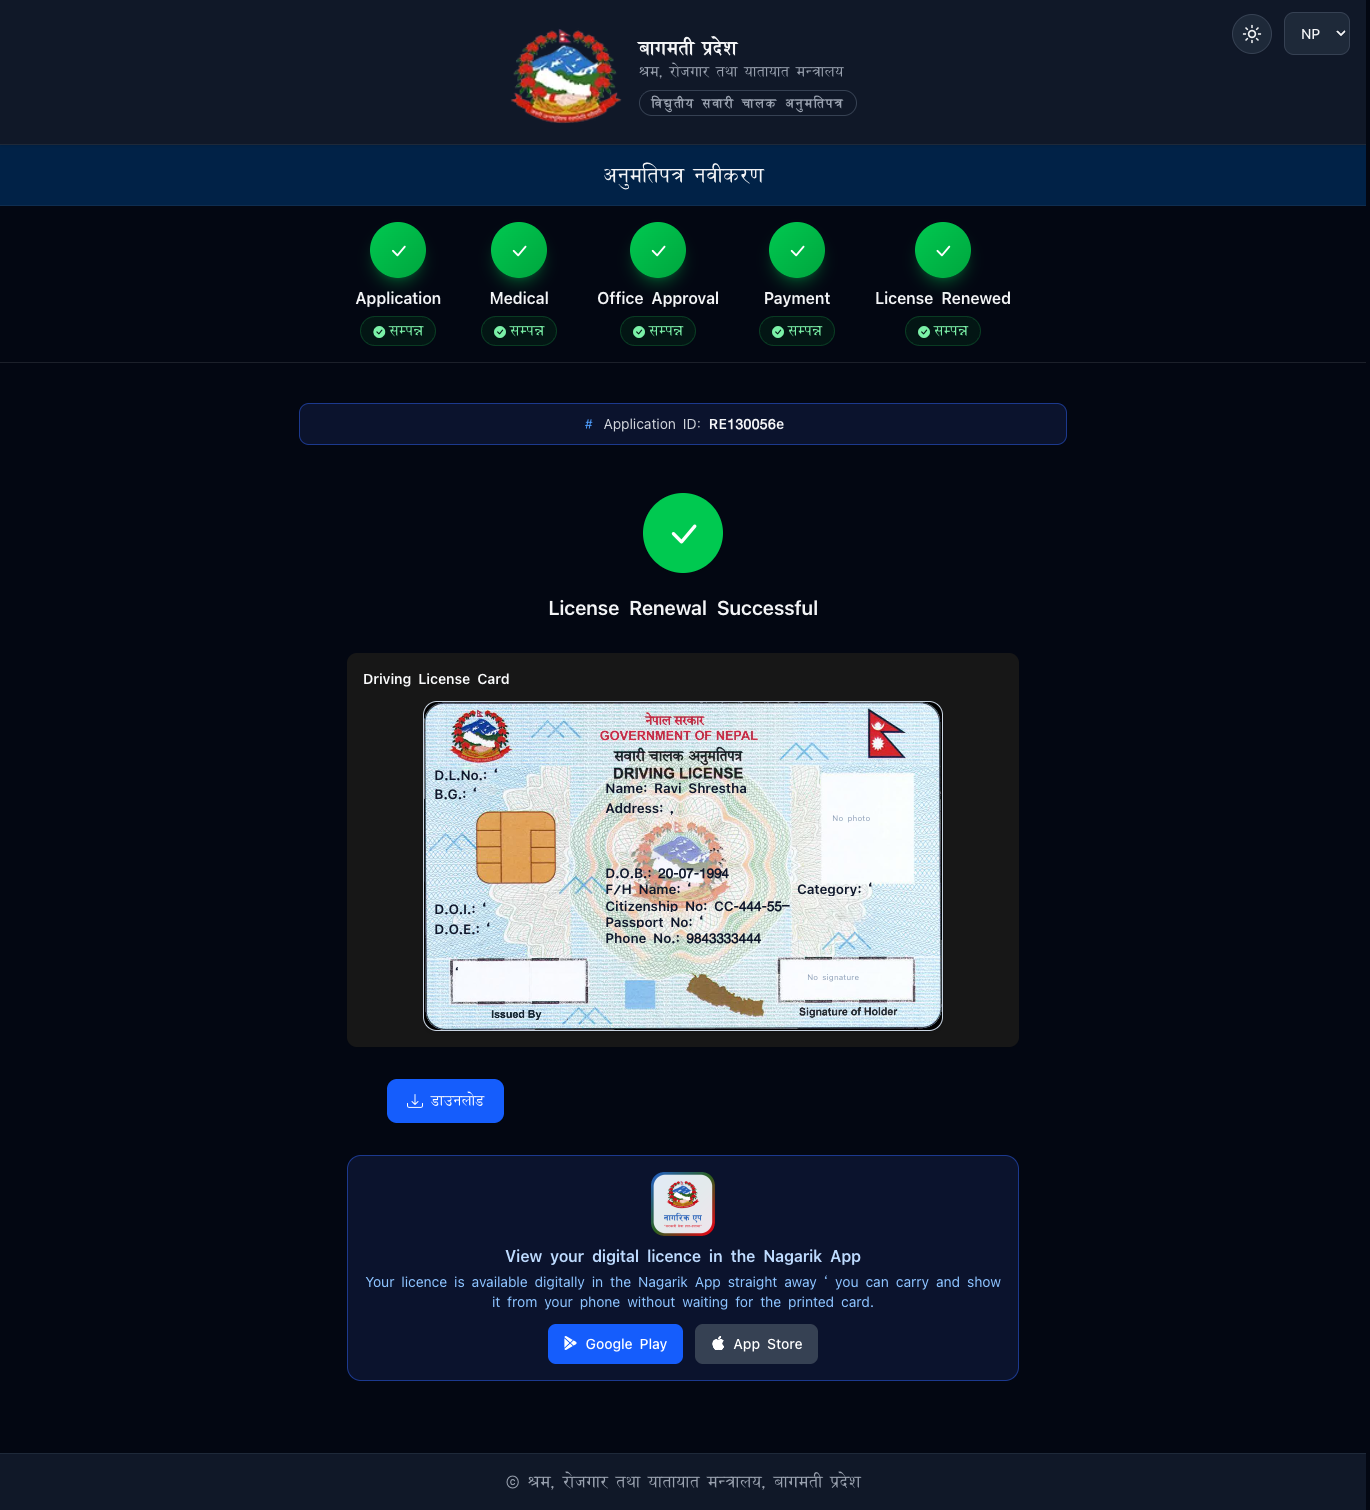
Step 7 — Licence renewed. Download your renewed licence; it also appears in
the Nagarik App. · चरण ७ — अनुमतिपत्र नवीकरण। नवीकृत अनुमतिपत्र डाउनलोड
गर्नुहोस्; नागरिक एपमा पनि देखिन्छ।
Renew with Copy · नवीकरण सहित प्रतिलिपि: if you also need a fresh printed copy
along with renewal, choose Renew with Copy on the service hub instead. It
follows the same steps as Renew above (Application → Medical → Office Approval →
Renewal Fee) and issues both the renewed licence and a copy together. · नवीकरणसँगै
नयाँ छापिएको प्रतिलिपि पनि चाहिन्छ भने सेवा सूचीबाट नवीकरण सहित प्रतिलिपि
छान्नुहोस्। यो माथिको नवीकरणकै प्रक्रिया अनुसरण गर्छ र नवीकृत अनुमतिपत्र तथा
प्रतिलिपि दुवै एकैसाथ दिन्छ।
3. Add Category · वर्ग थप
Add a new vehicle category to an existing licence. भइरहेको अनुमतिपत्रमा नयाँ सवारी
वर्ग थप्नुहोस्।
Journey · प्रक्रिया: Application → Medical → Office Approval → Exam Fee →
Trial → Add Fee → Category Added (7 stages · ७ चरण; no written exam · लिखित
परीक्षा हुँदैन)
Step 1 — Choose Add Category. · चरण १ — वर्ग थप छान्नुहोस्।
Step 2 — Verify your licence by Licence No., NID number, Date of Birth and
email (OTP). · चरण २ — अनुमतिपत्र नं., NID नं., जन्म मिति र इमेलले प्रमाणीकरण
(OTP)।
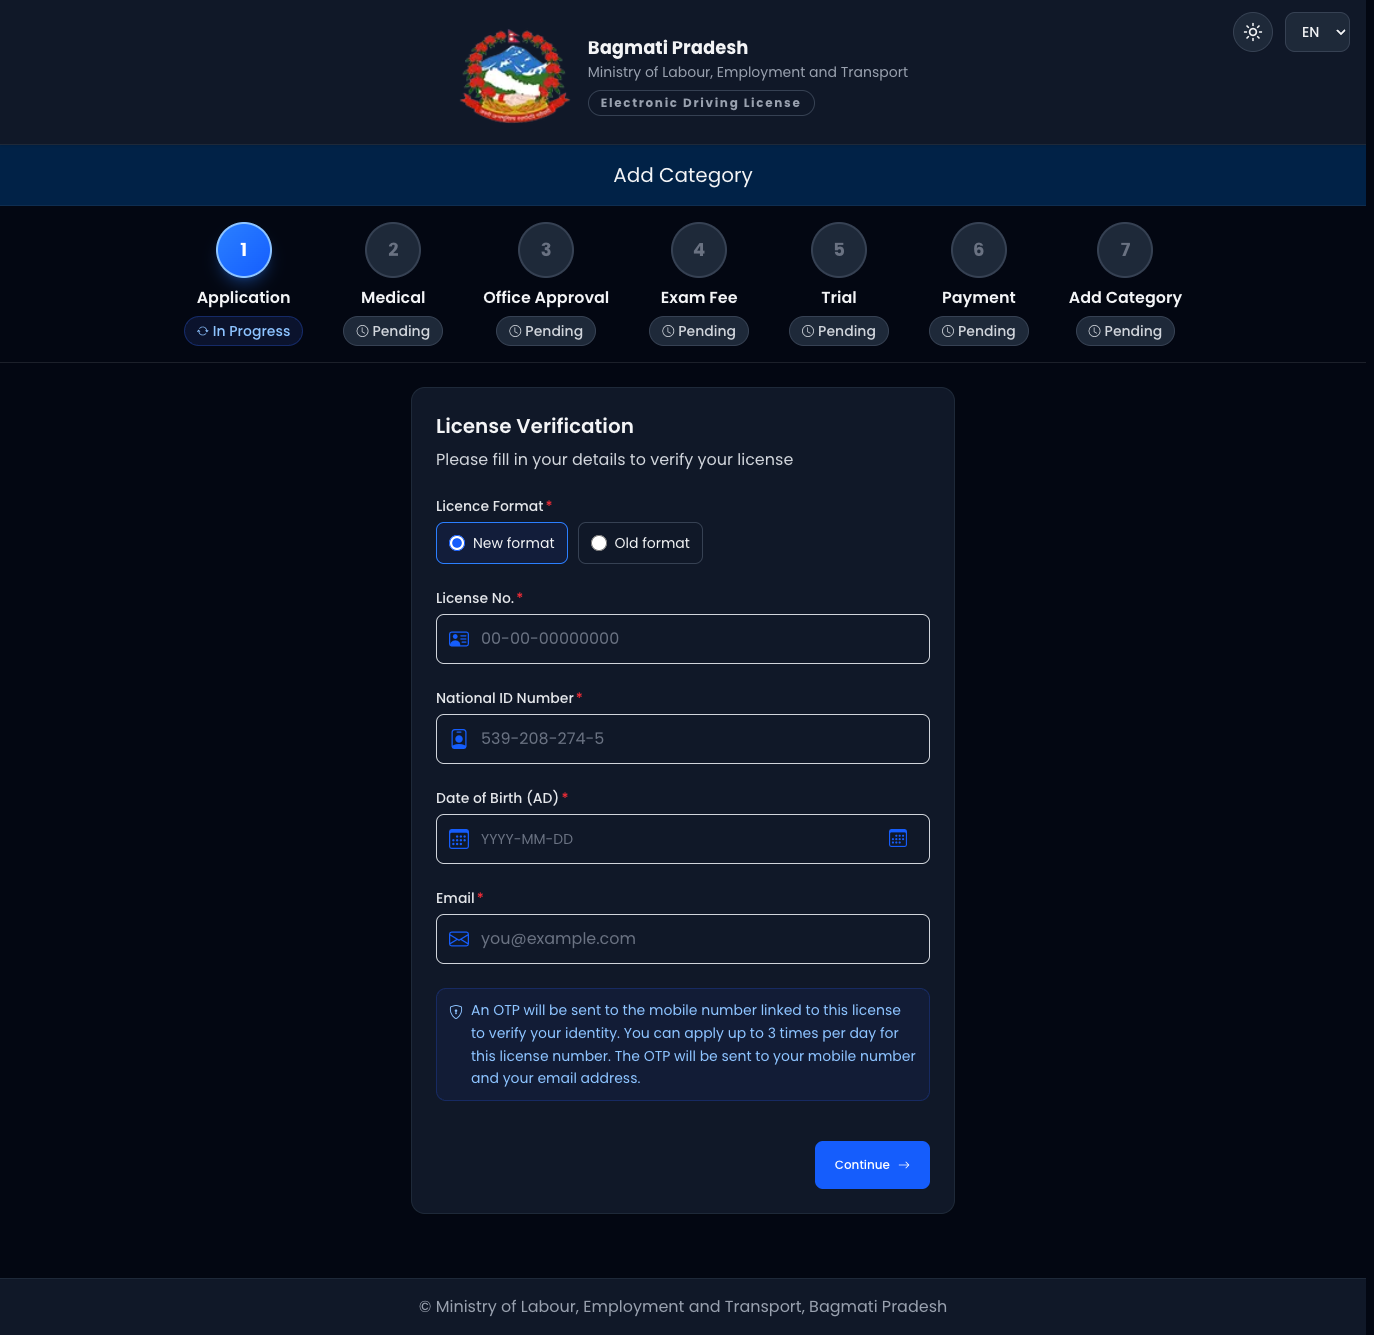
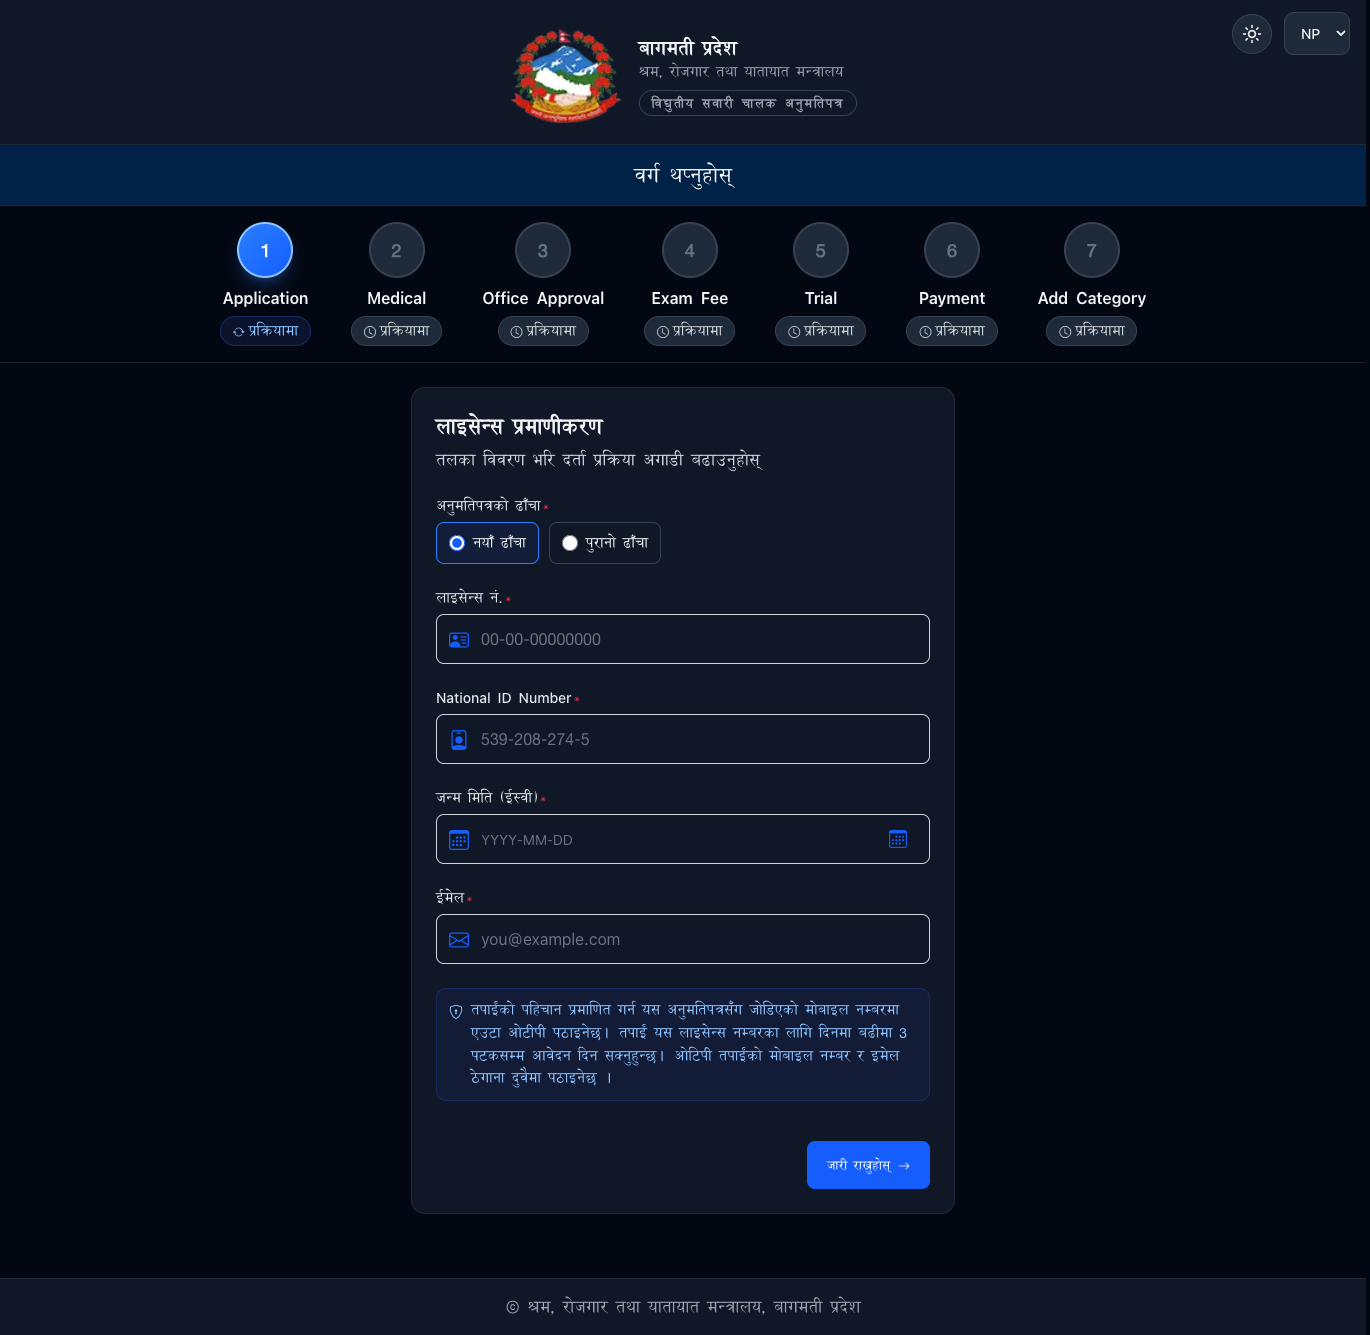
Step 3 — Application submitted. Choose the new category and submit; note your
Application No. · चरण ३ — आवेदन पेश। नयाँ वर्ग छानी पेश गर्नुहोस्।
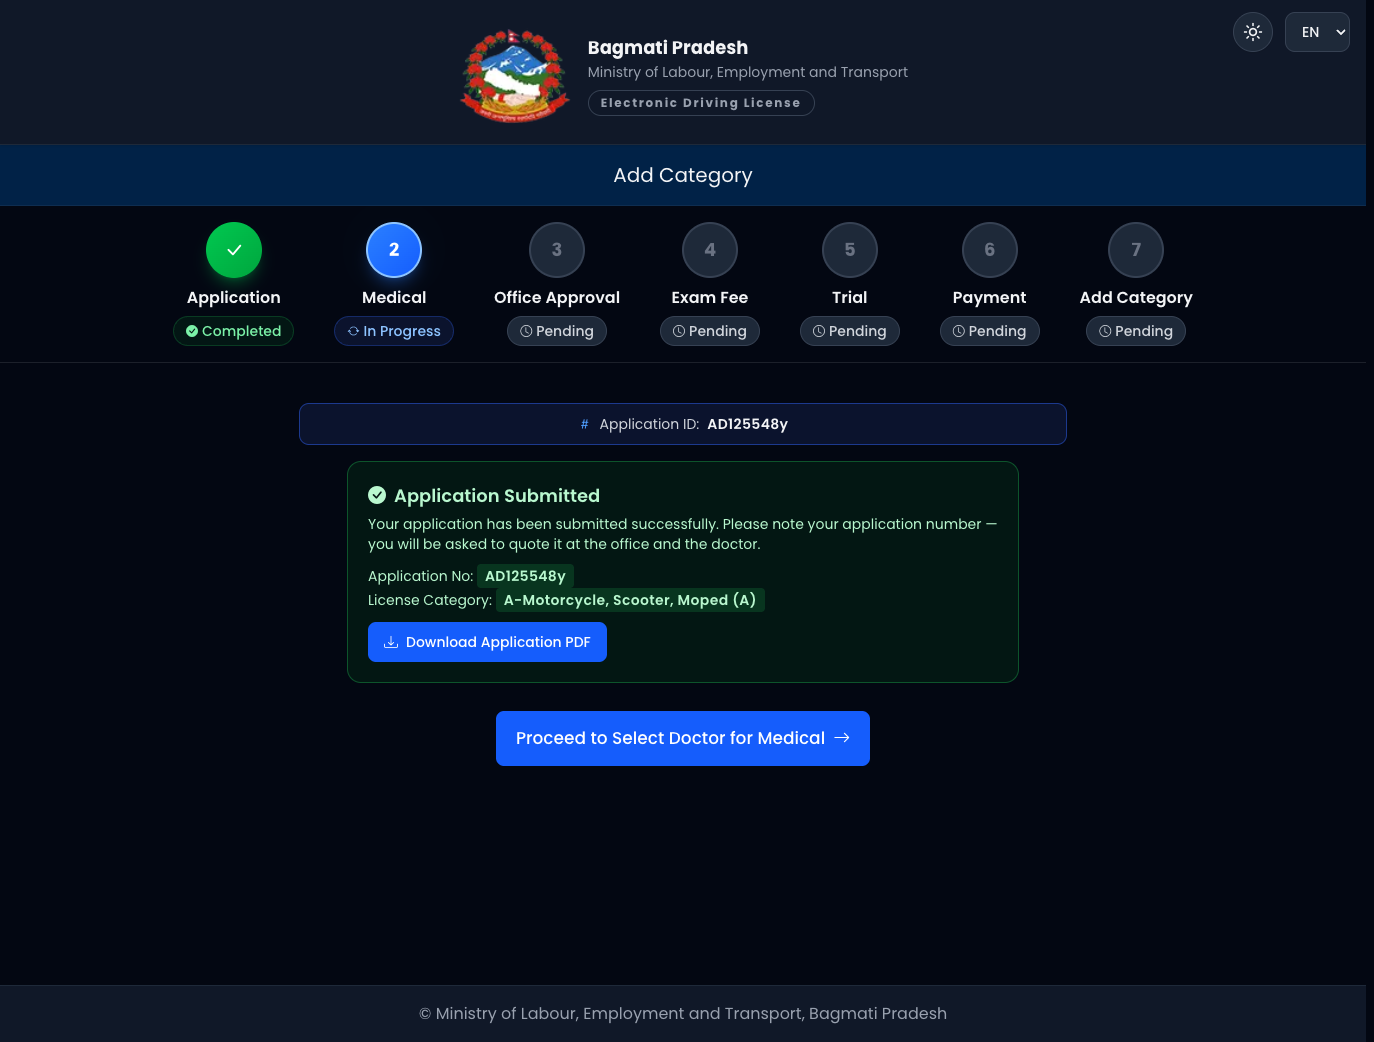
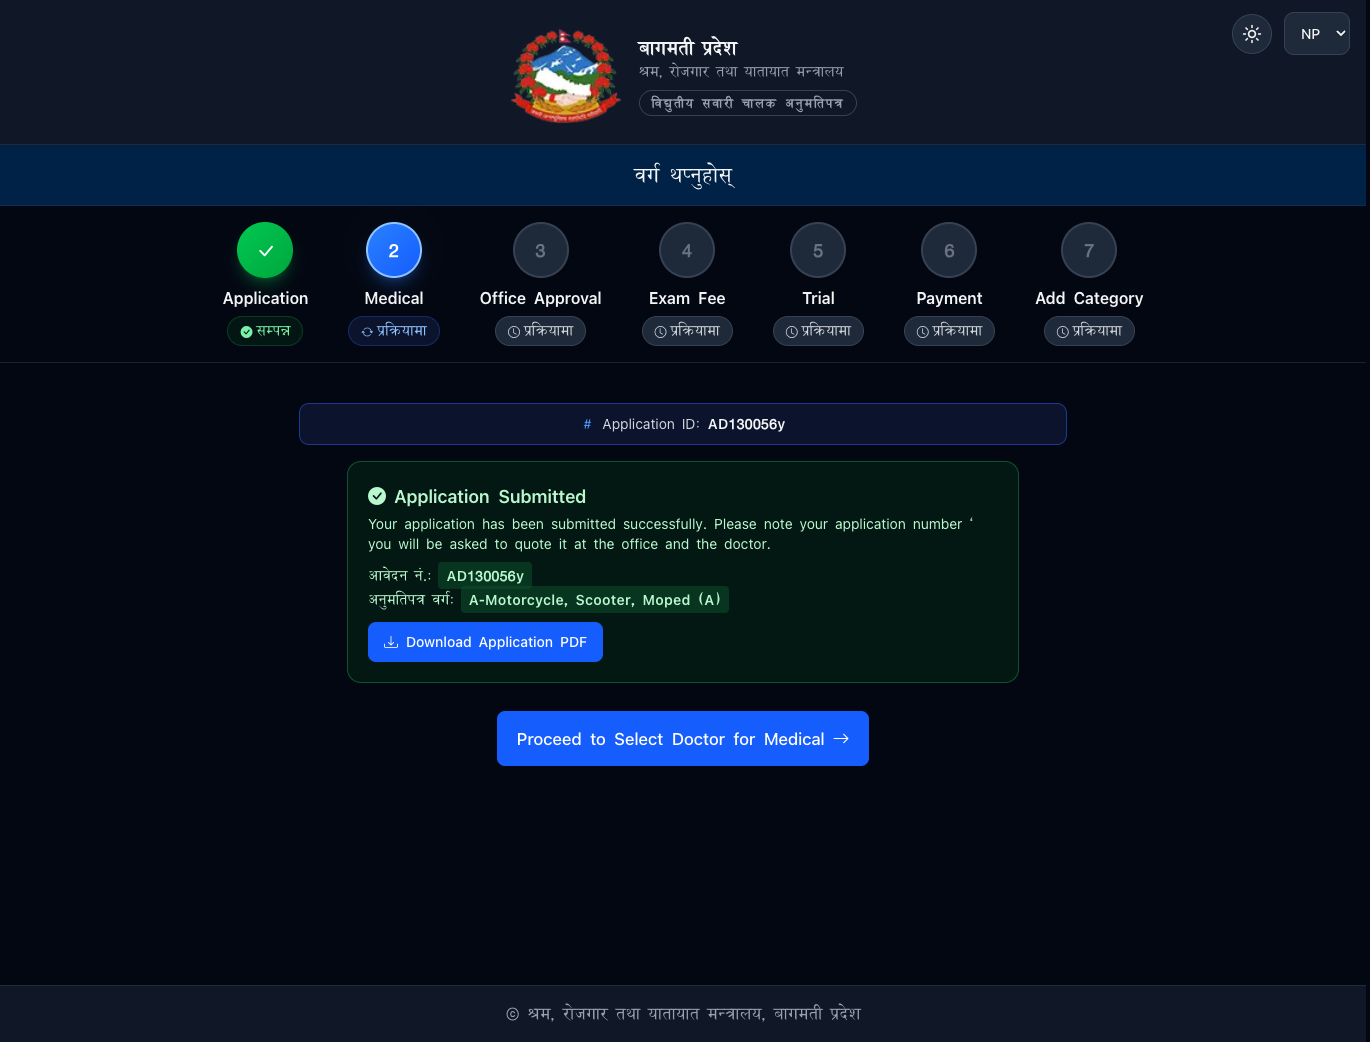
Step 4 — Medical. · चरण ४ — स्वास्थ्य परीक्षण।
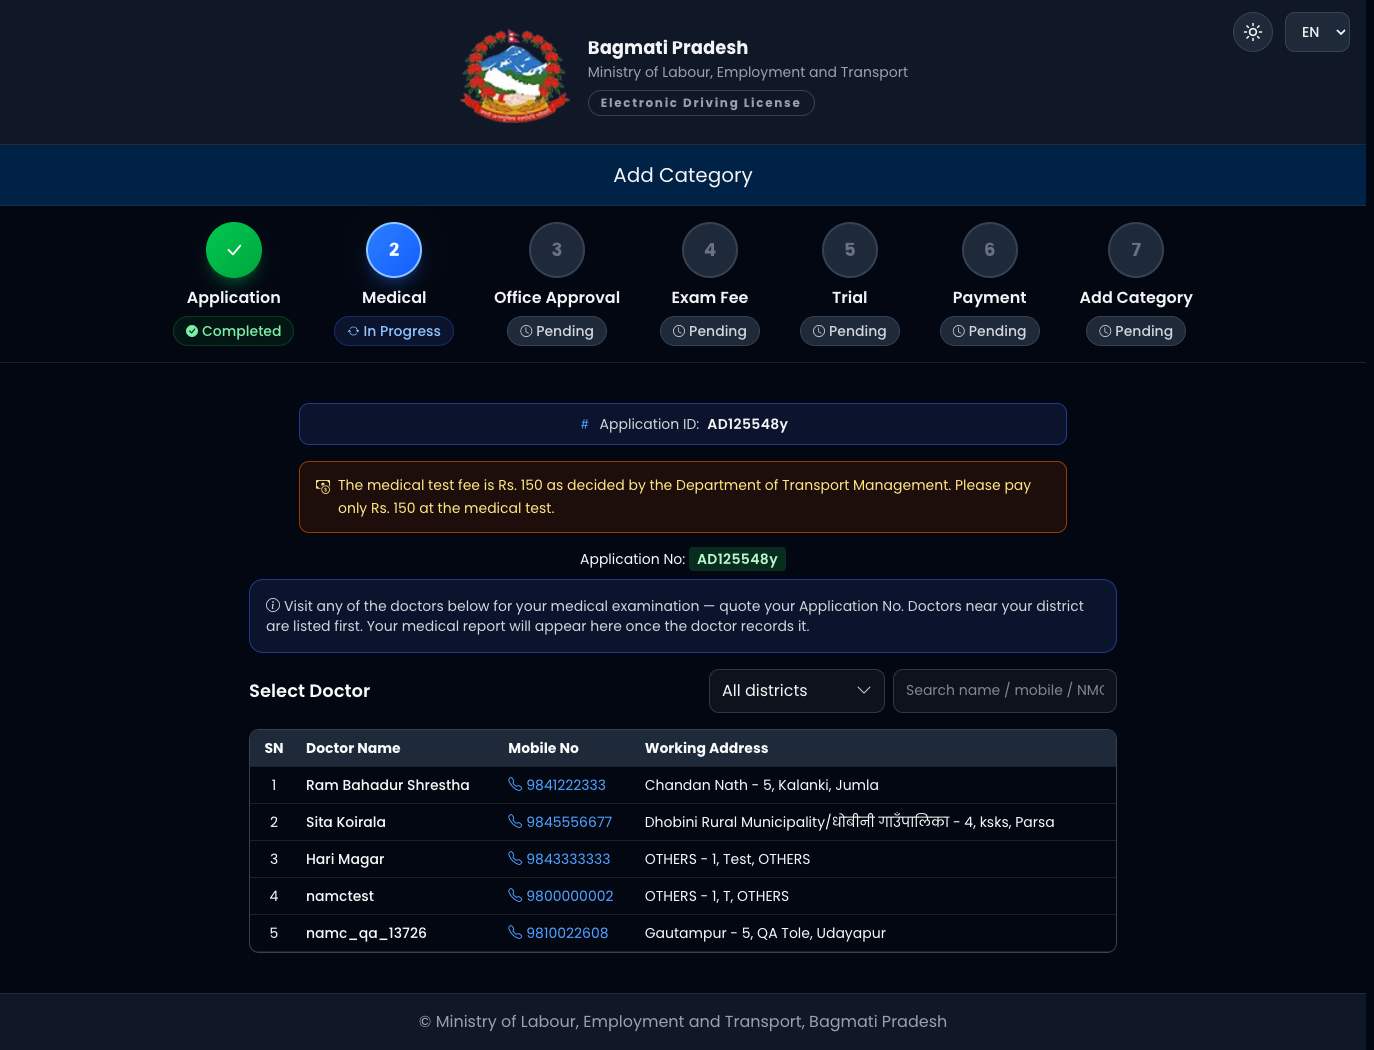
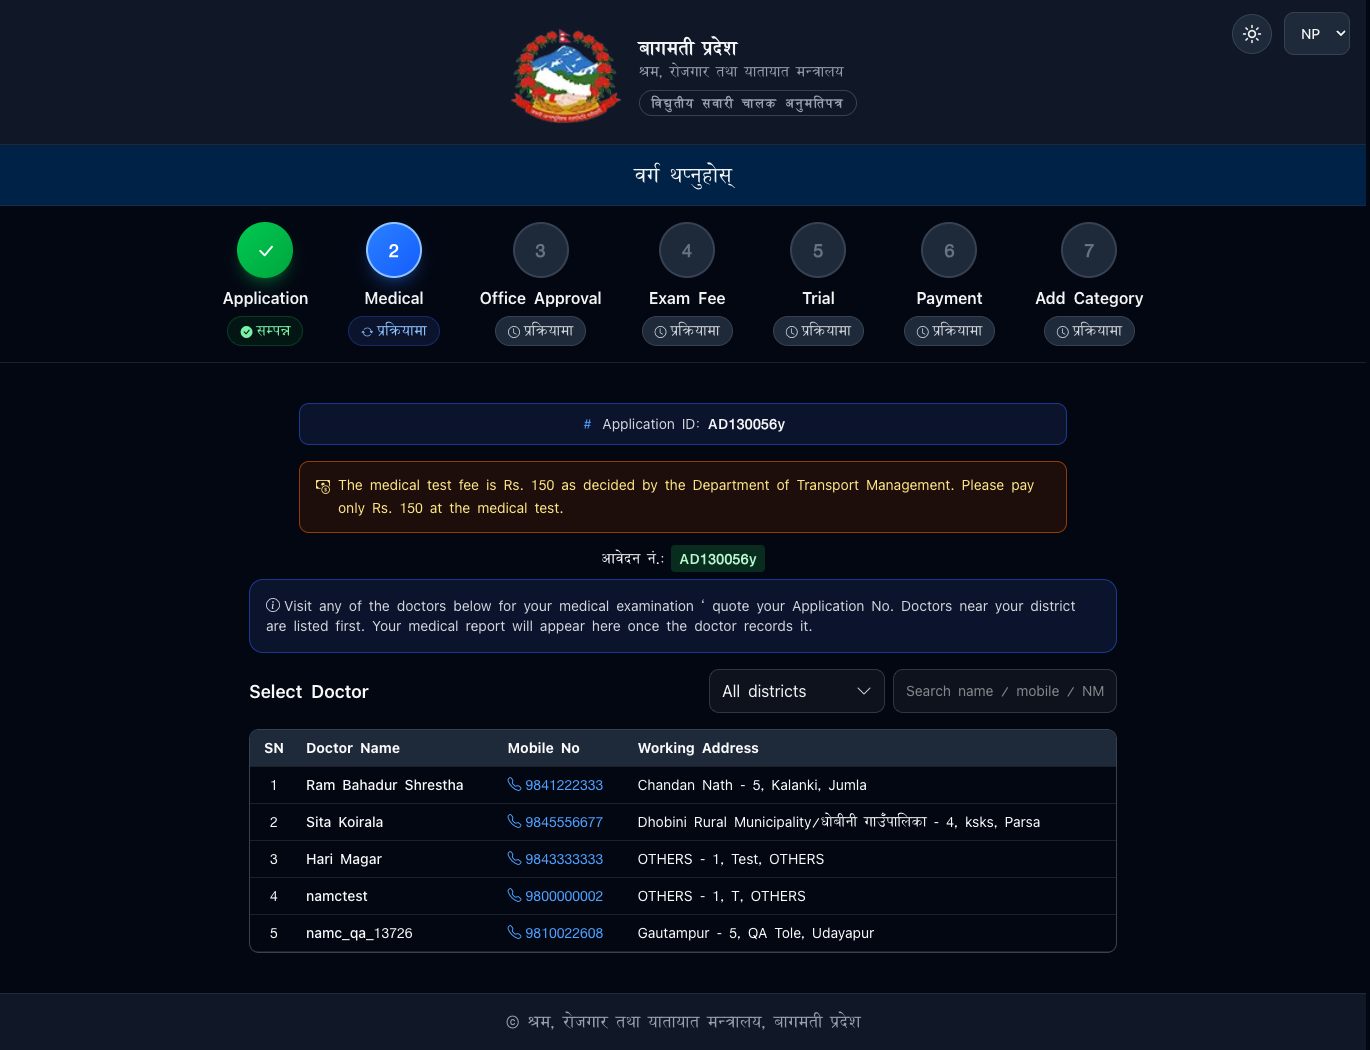
Step 5 — Office approval. · चरण ५ — कार्यालय स्वीकृति।
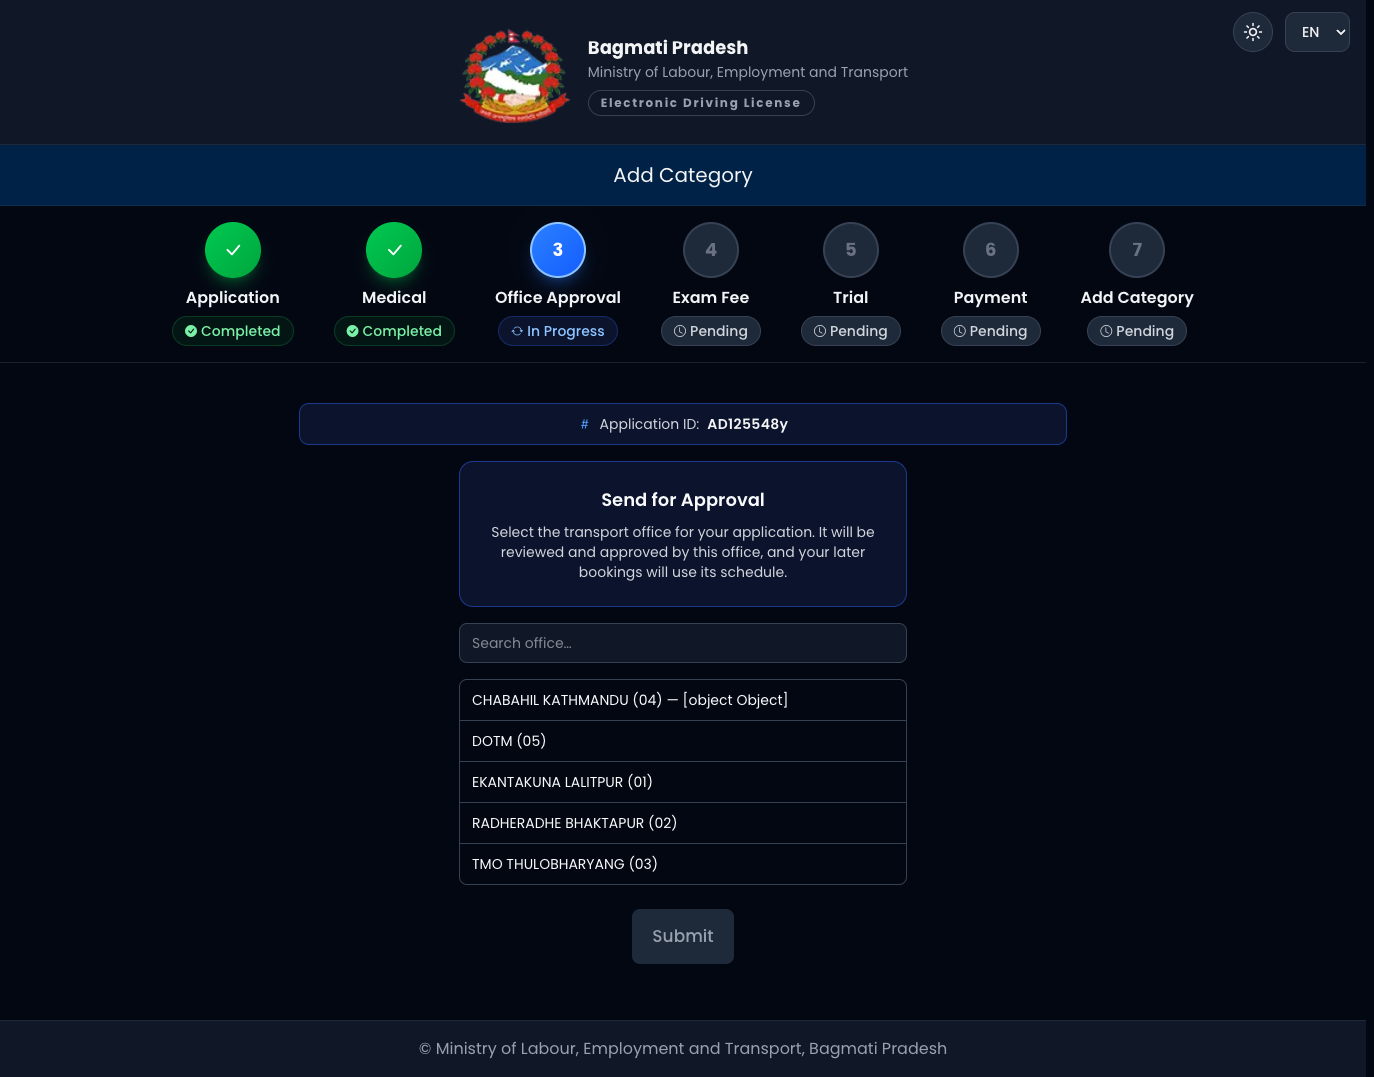
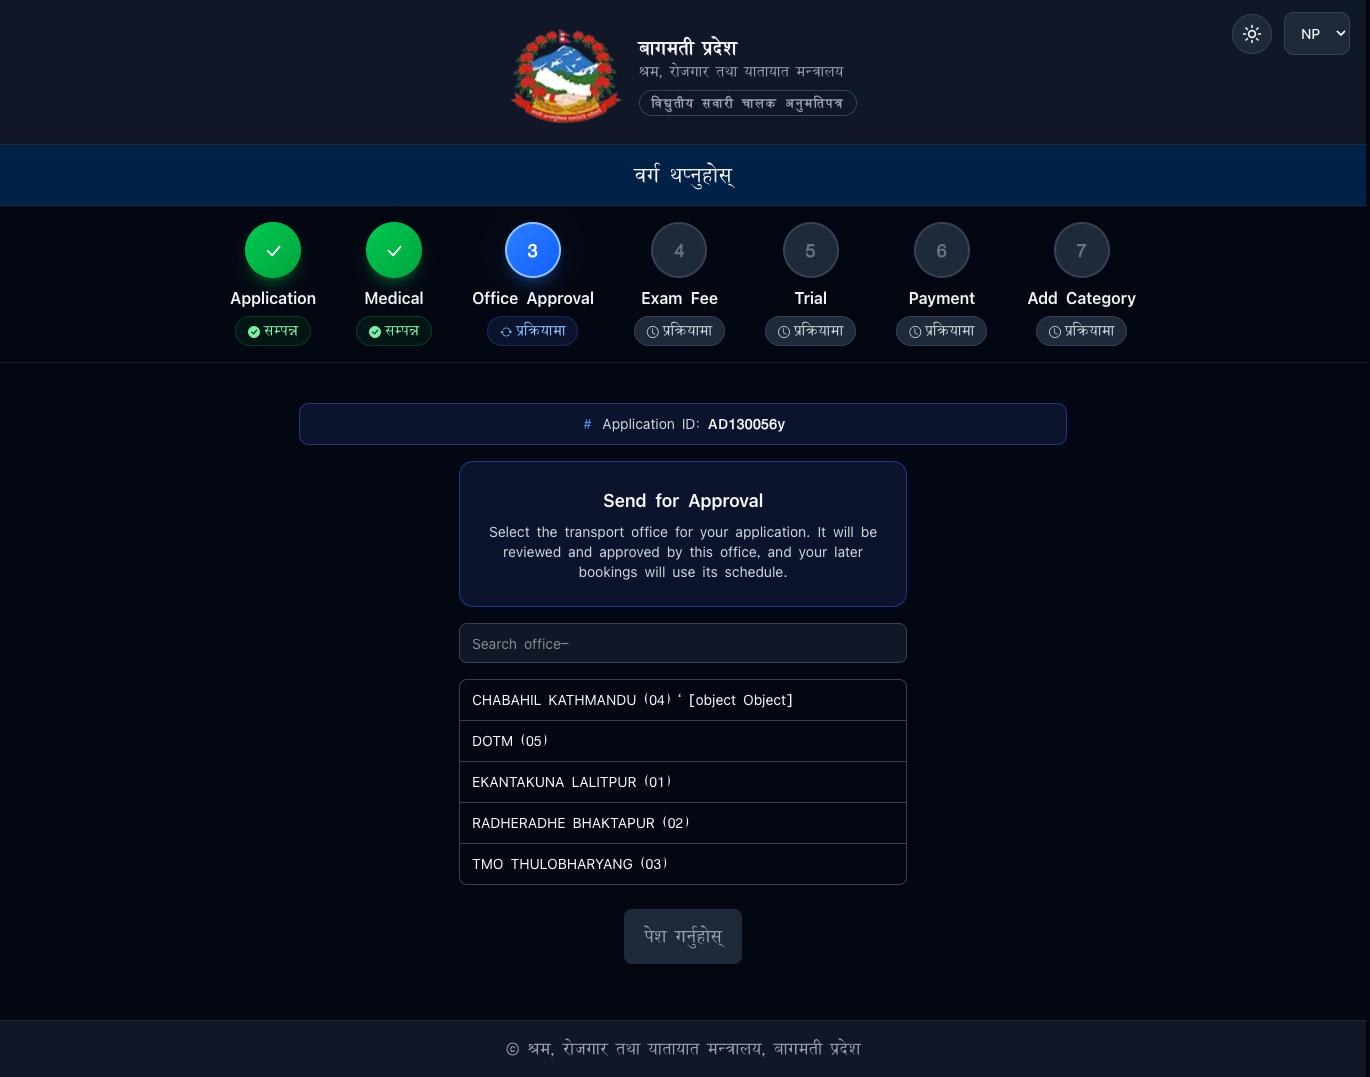
Step 6 — Exam fee. Generate and pay the exam-fee voucher. · चरण ६ — परीक्षा
शुल्क। भौचर बनाई भुक्तानी गर्नुहोस्।
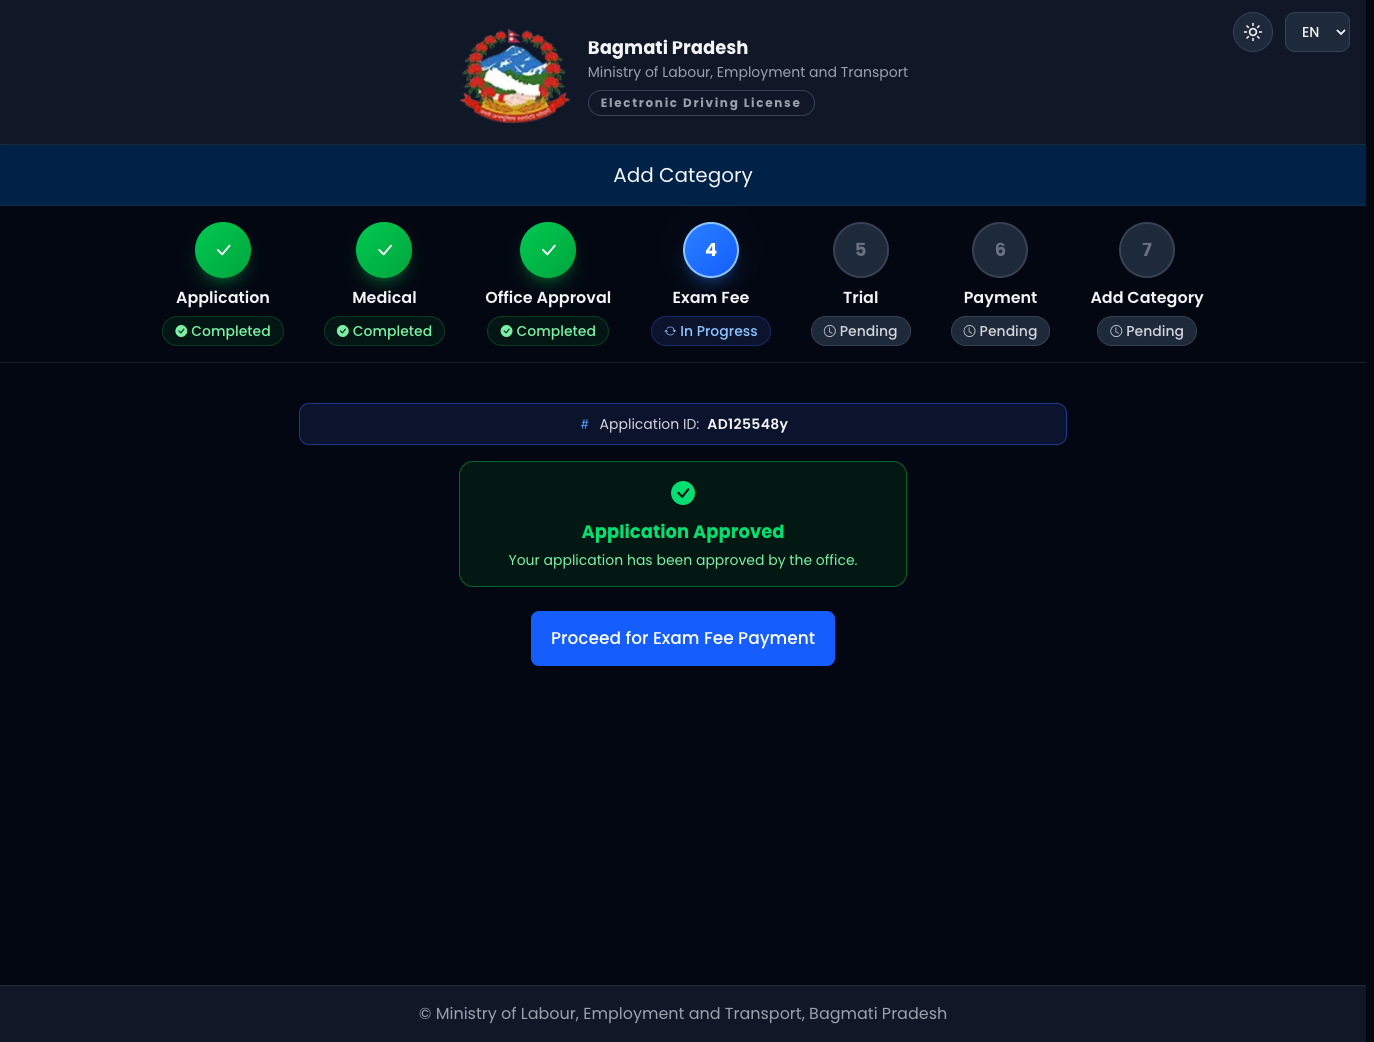
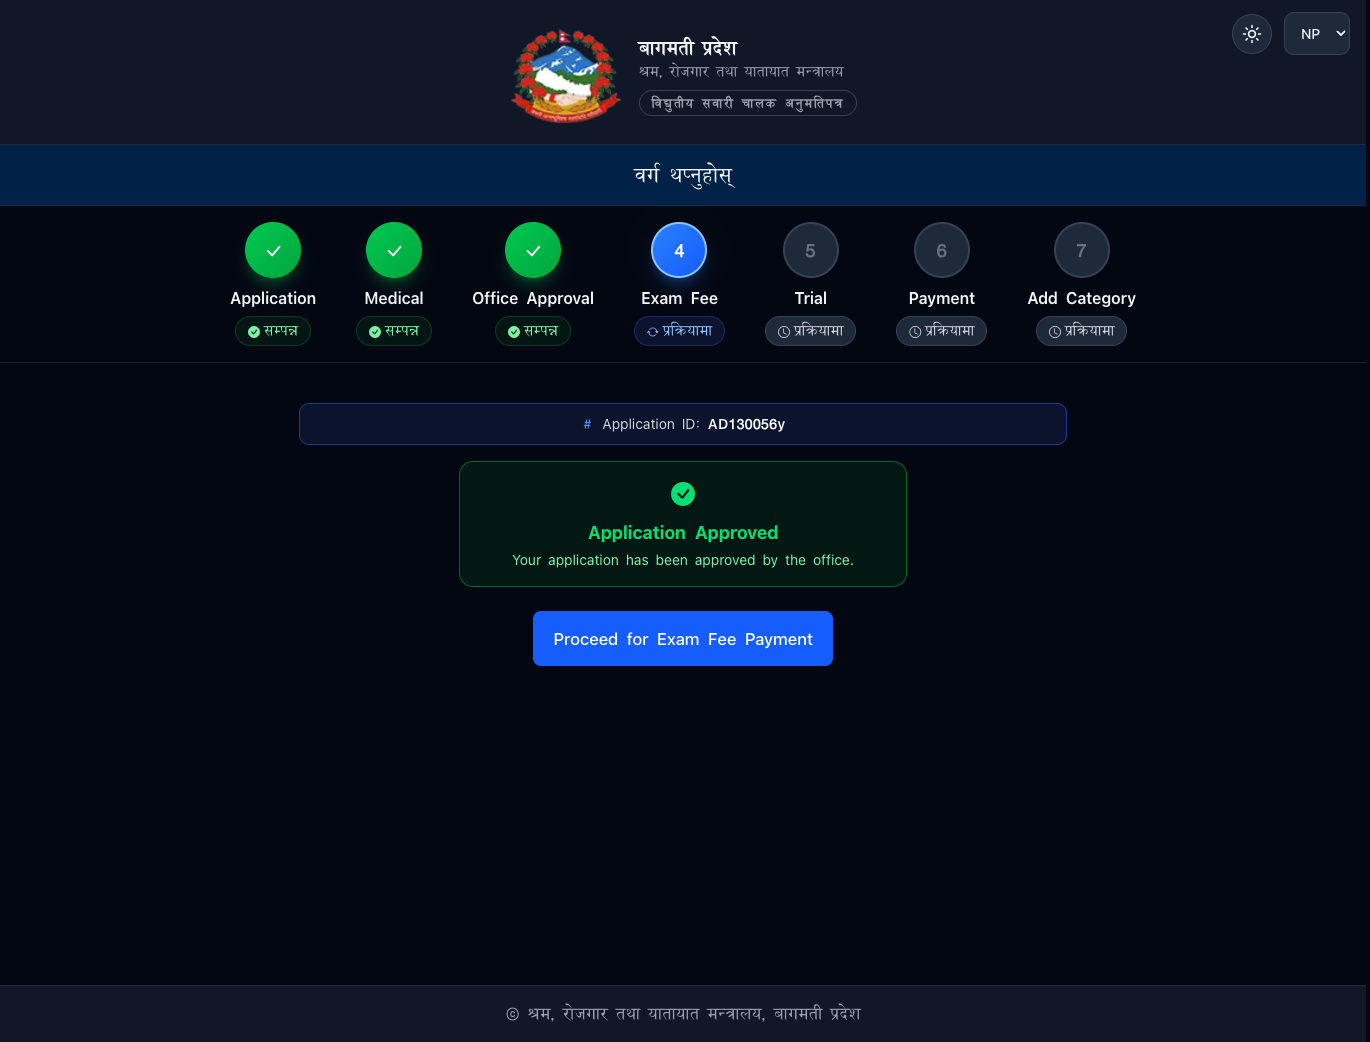
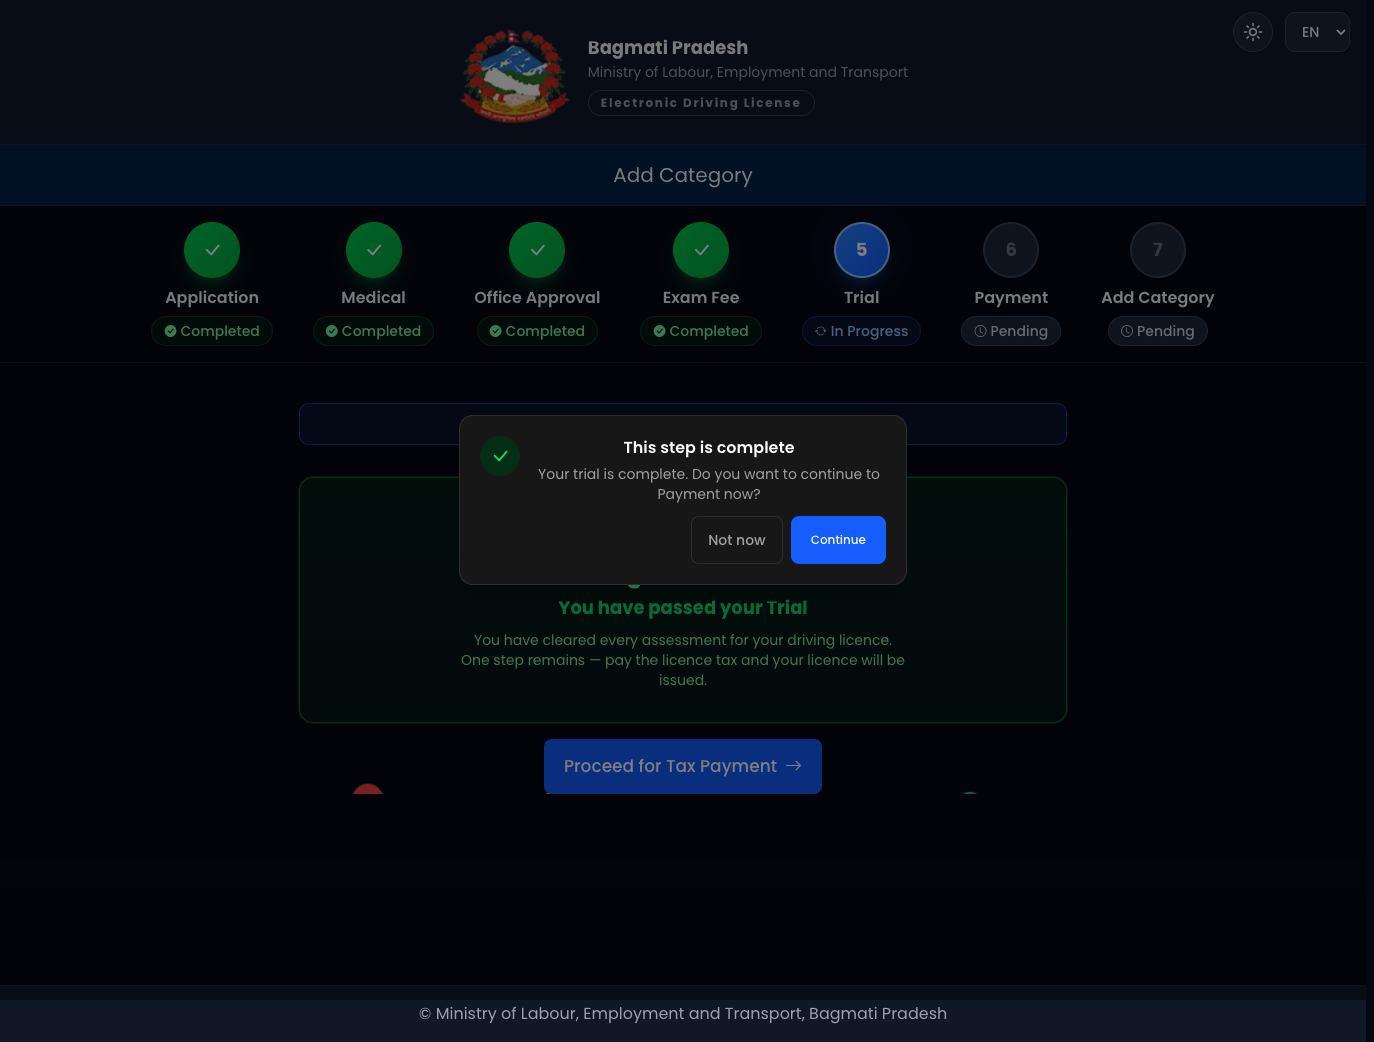
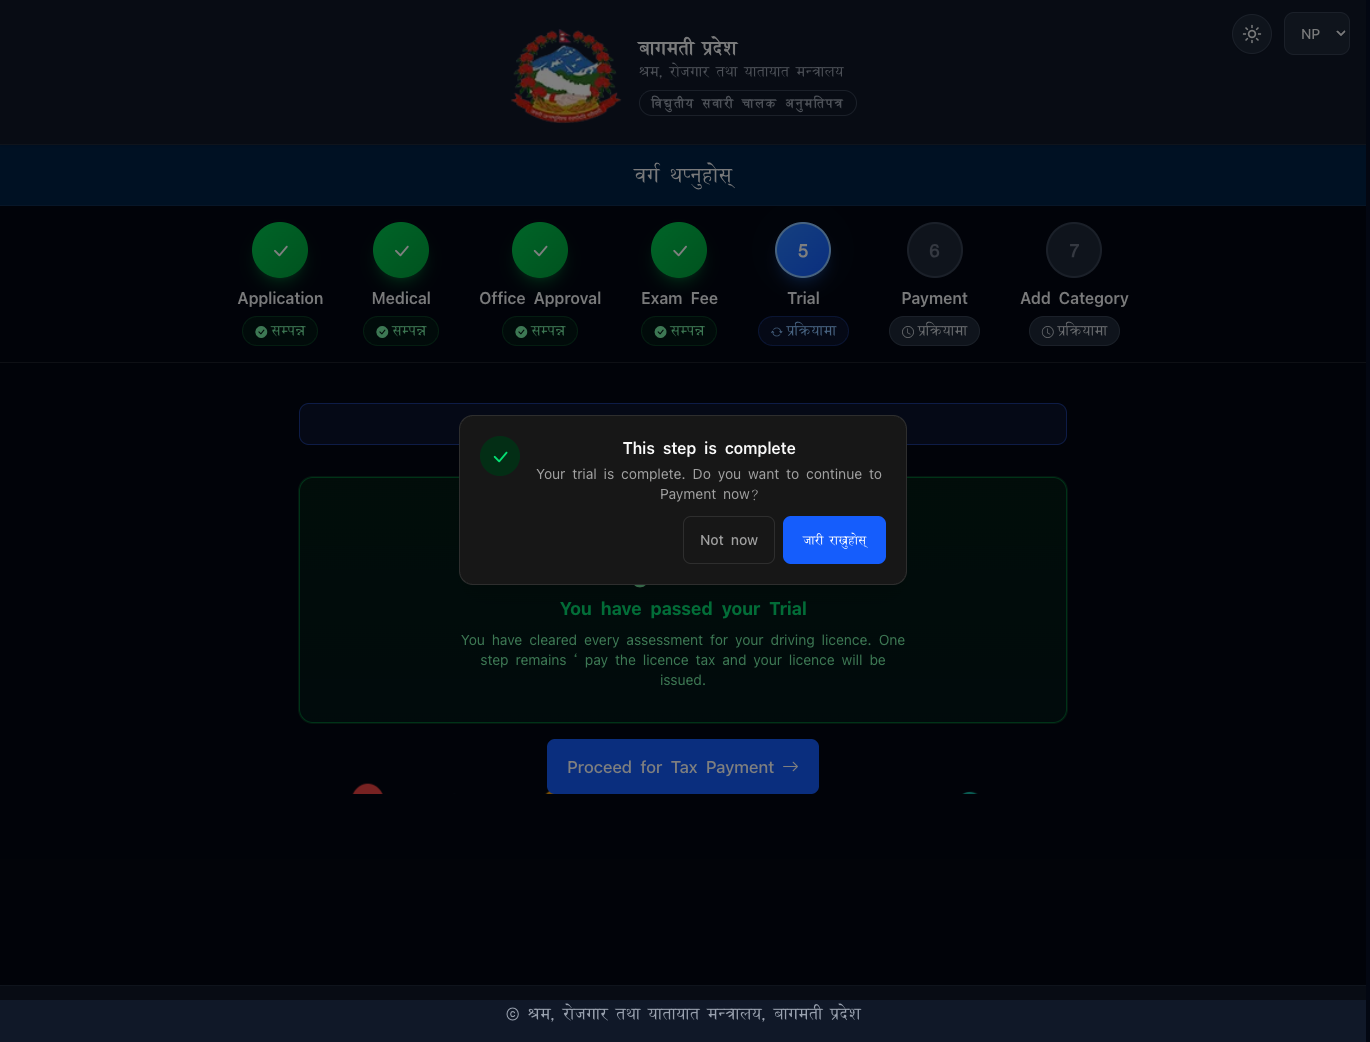
Step 7 — Trial. Book and take the trial for the new category (no written
exam). · चरण ७ — ट्रायल। नयाँ वर्गको ट्रायल दिनुहोस् (लिखित परीक्षा हुँदैन)।
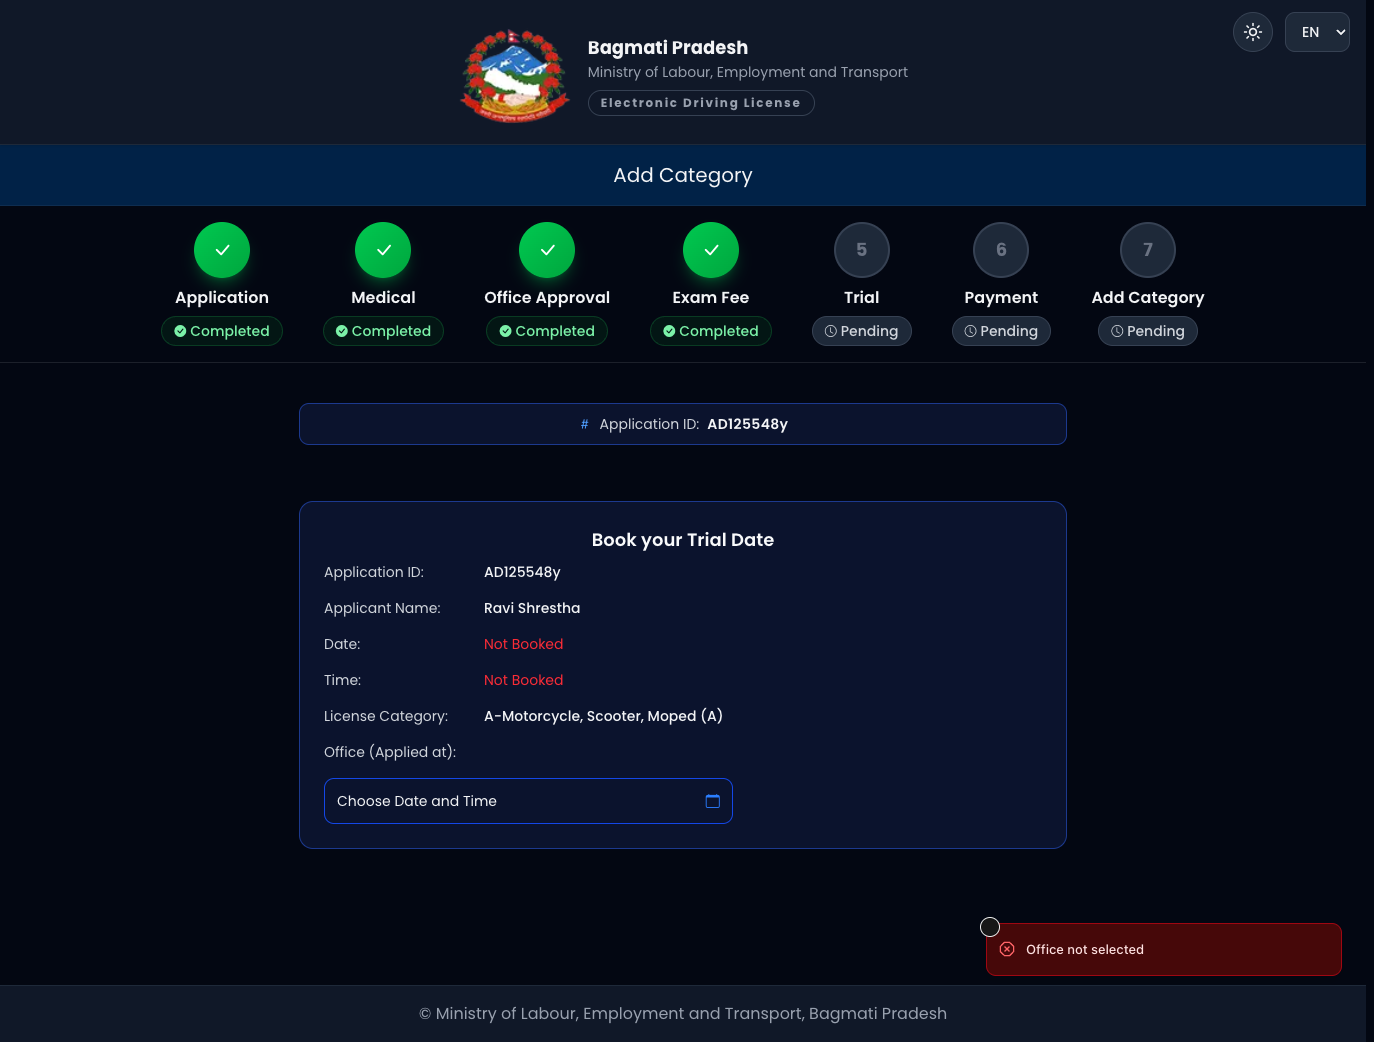
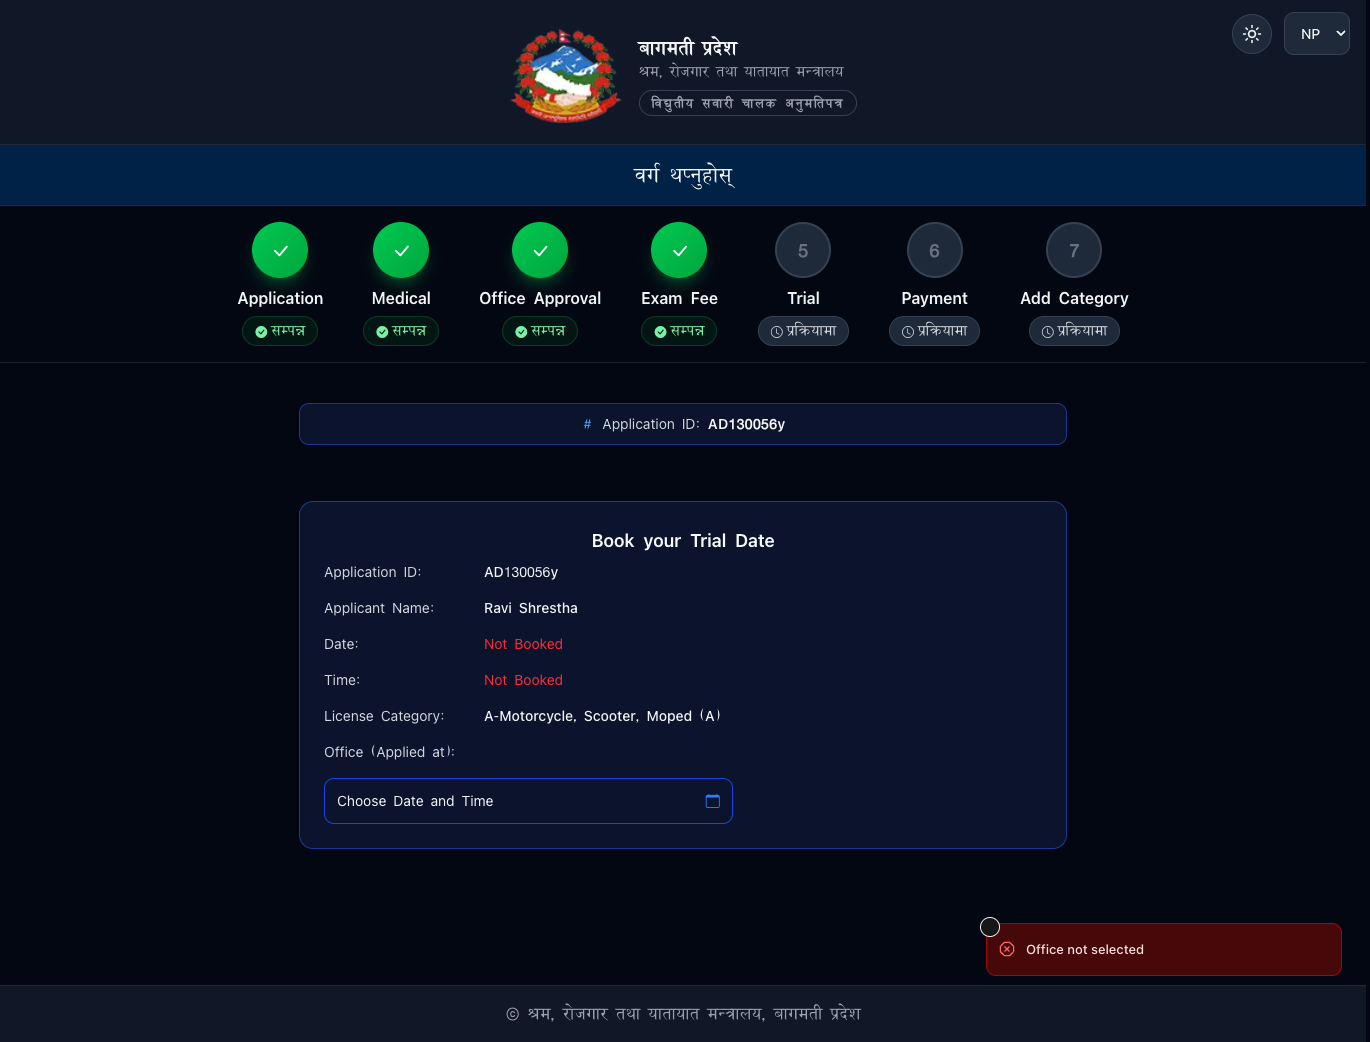
Step 8 — Add Fee. Generate the add-category fee voucher and pay it. ·
चरण ८ — थप शुल्क। वर्ग थप शुल्कको भौचर बनाई भुक्तानी गर्नुहोस्।
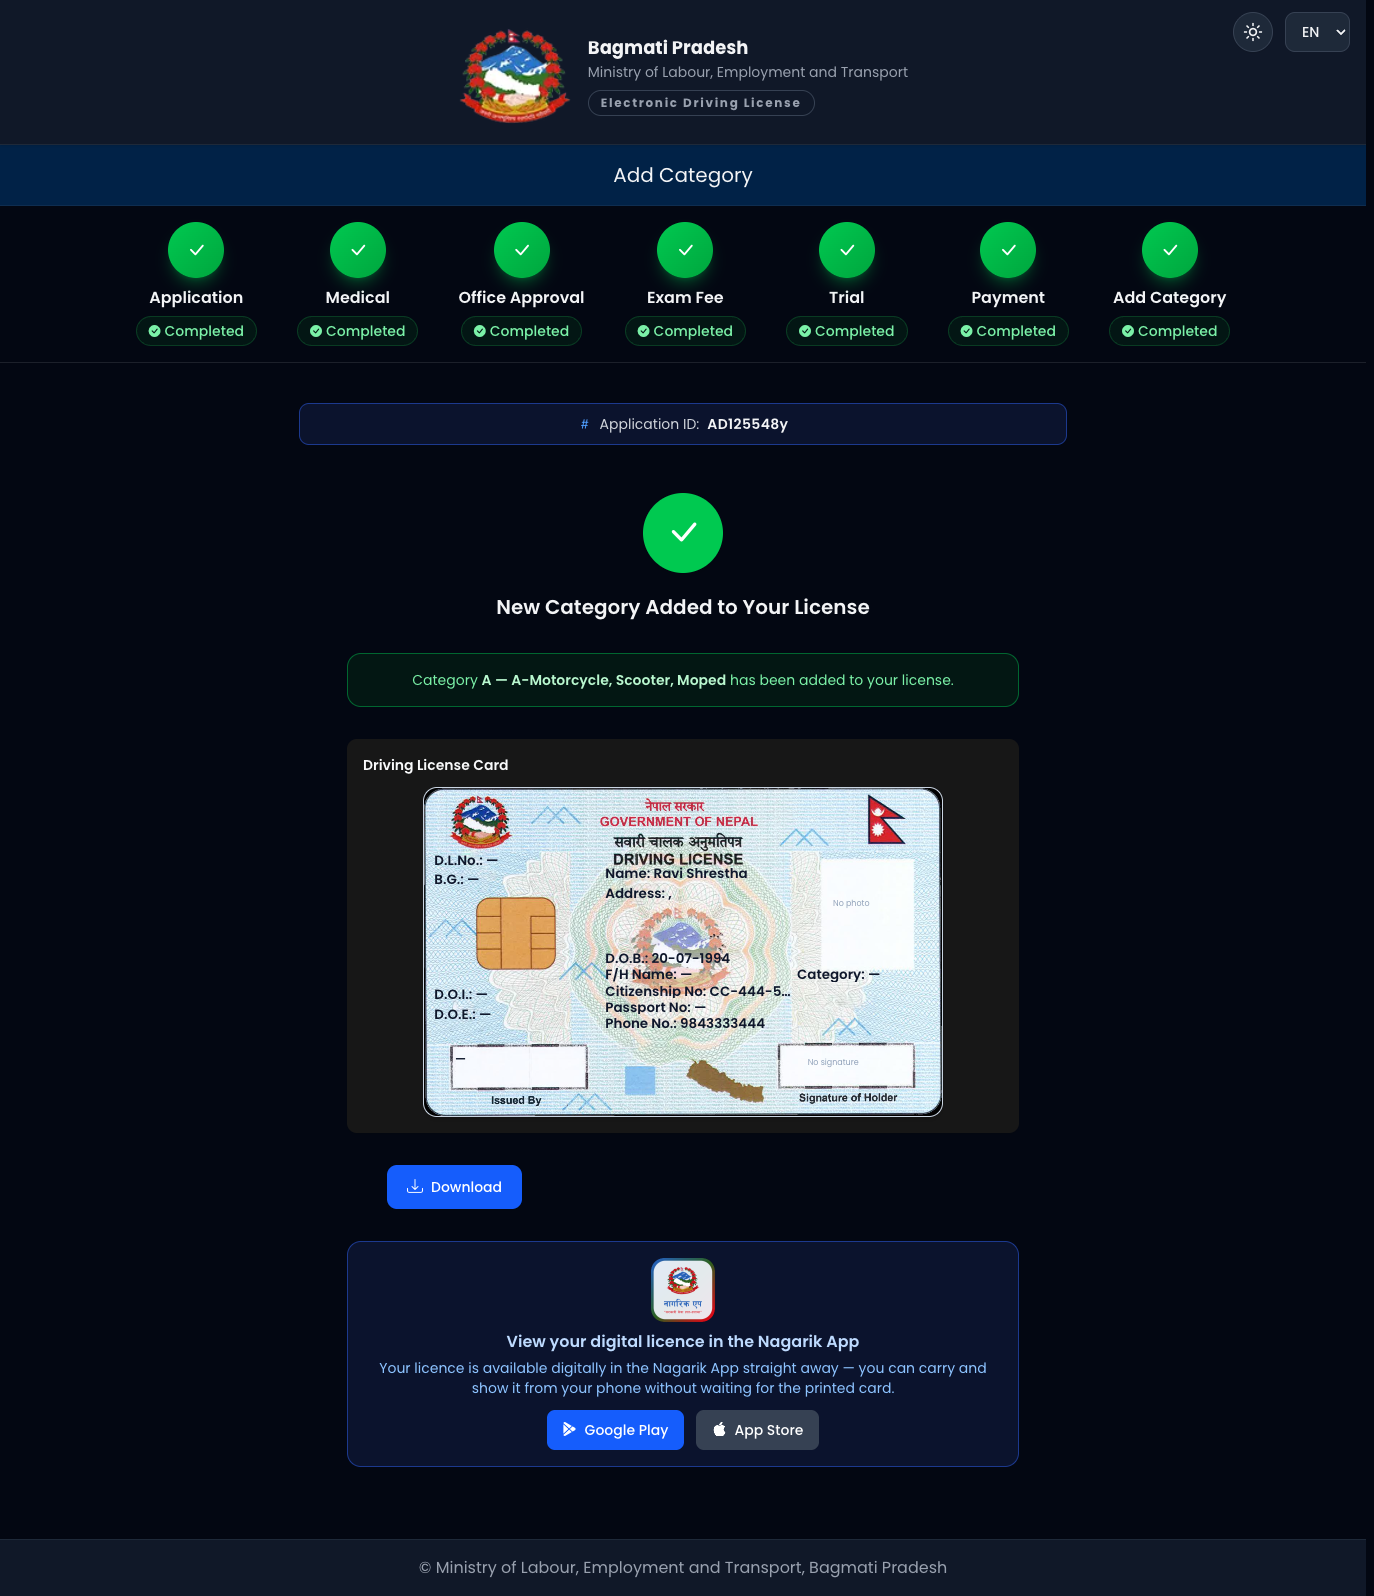
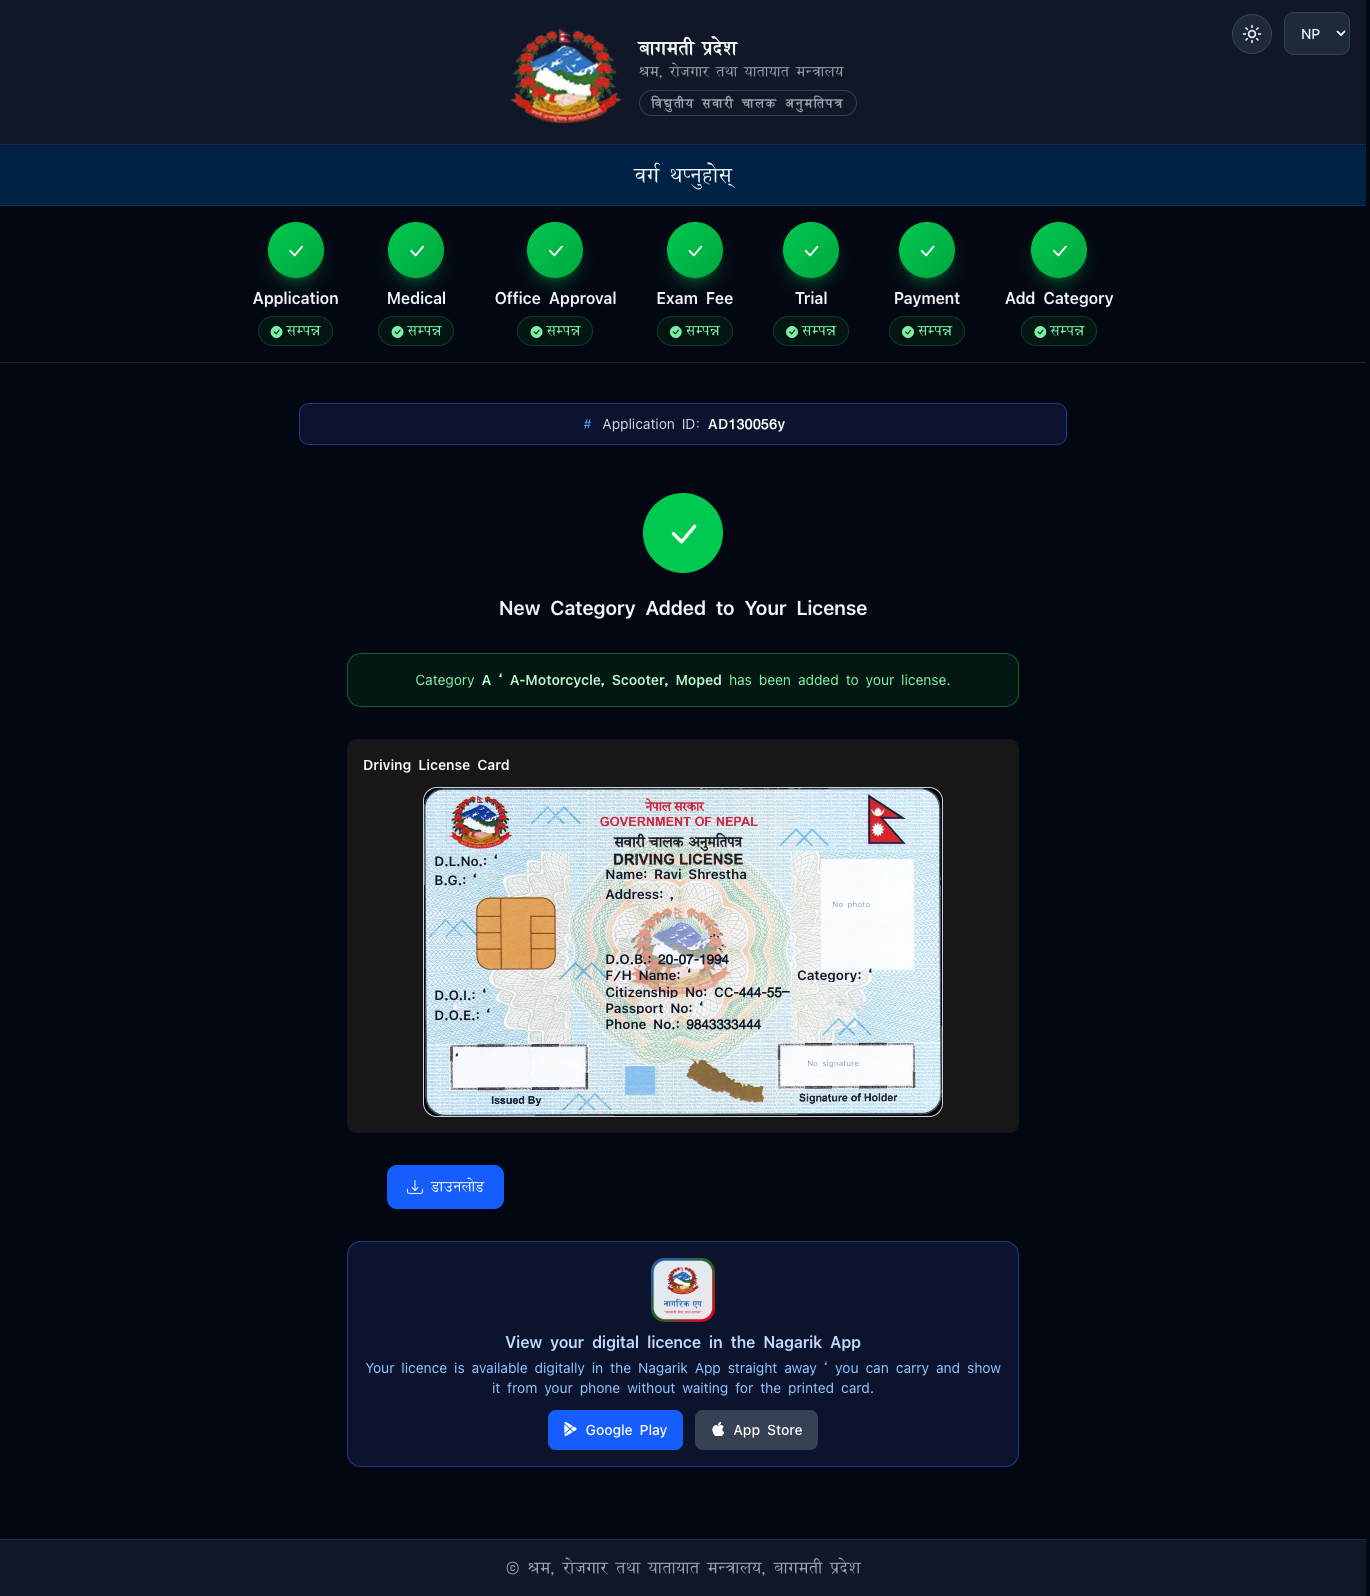
Step 9 — Category added. The new category is added to your licence. · चरण ९
— वर्ग थपियो। नयाँ वर्ग तपाईंको अनुमतिपत्रमा थपिन्छ।
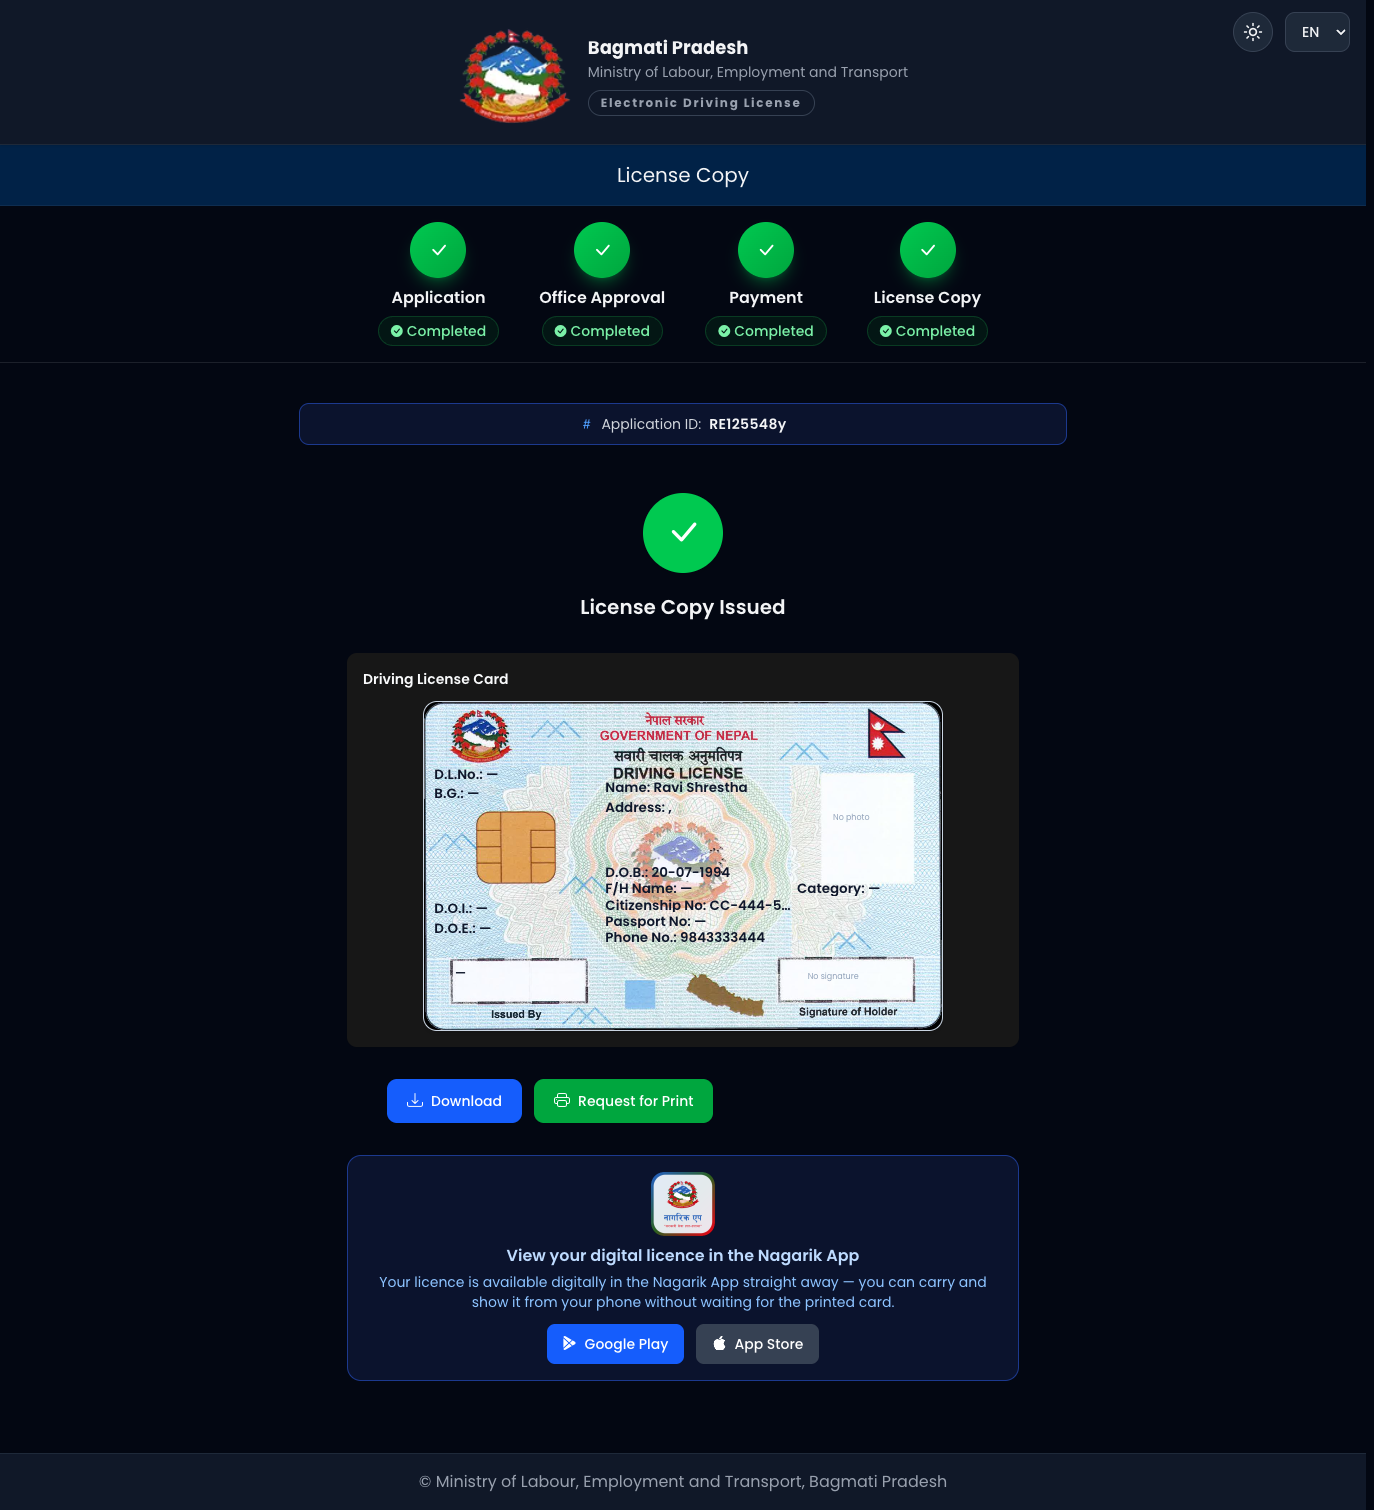
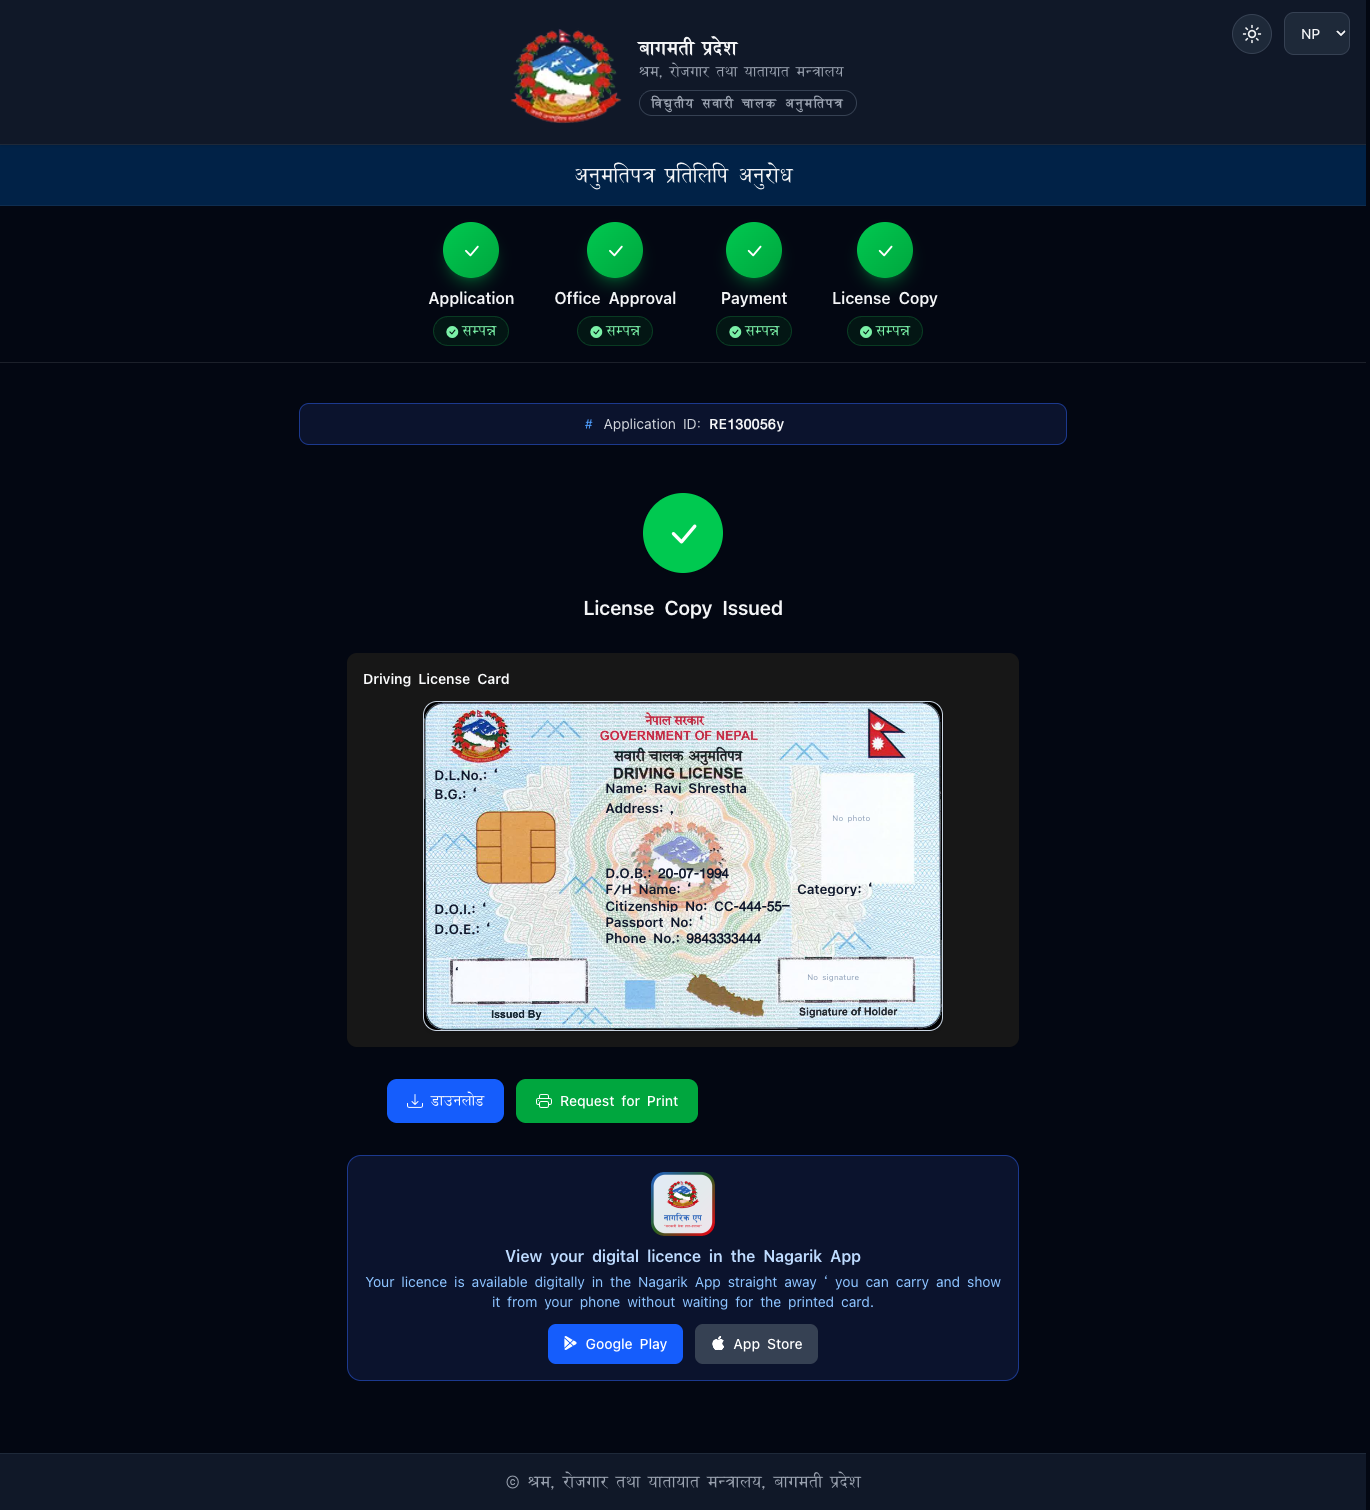
4. Licence Copy · प्रतिलिपि
Request a duplicate of a lost, stolen or damaged licence. हराएको, चोरी वा बिग्रेको
अनुमतिपत्रको प्रतिलिपि माग्नुहोस्।
Journey · प्रक्रिया: Application → Office Approval → Copy Fee → Copy Issued
(4 stages · ४ चरण; no medical or exam · स्वास्थ्य/परीक्षा हुँदैन)
Step 1 — Choose License Copy. · चरण १ — प्रतिलिपि छान्नुहोस्।
Step 2 — Verify your licence by Licence No., NID number, Date of Birth and
email (OTP). · चरण २ — अनुमतिपत्र नं., NID नं., जन्म मिति र इमेलले प्रमाणीकरण।
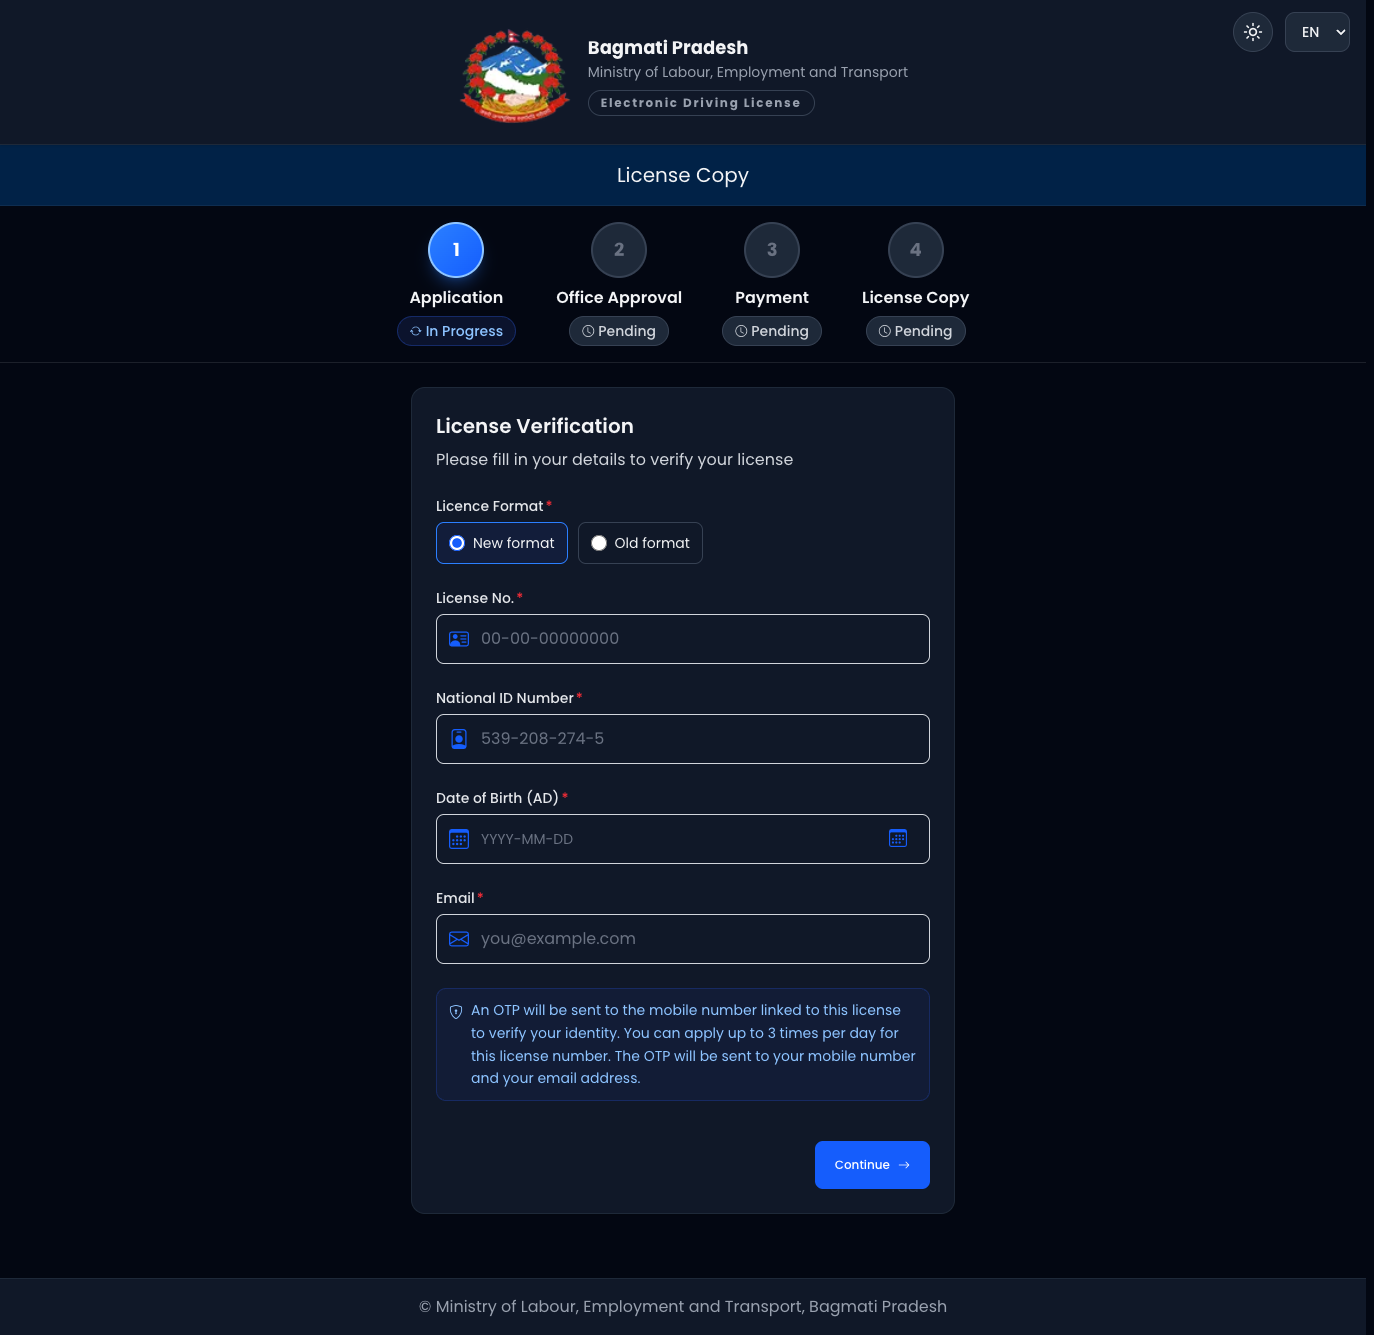
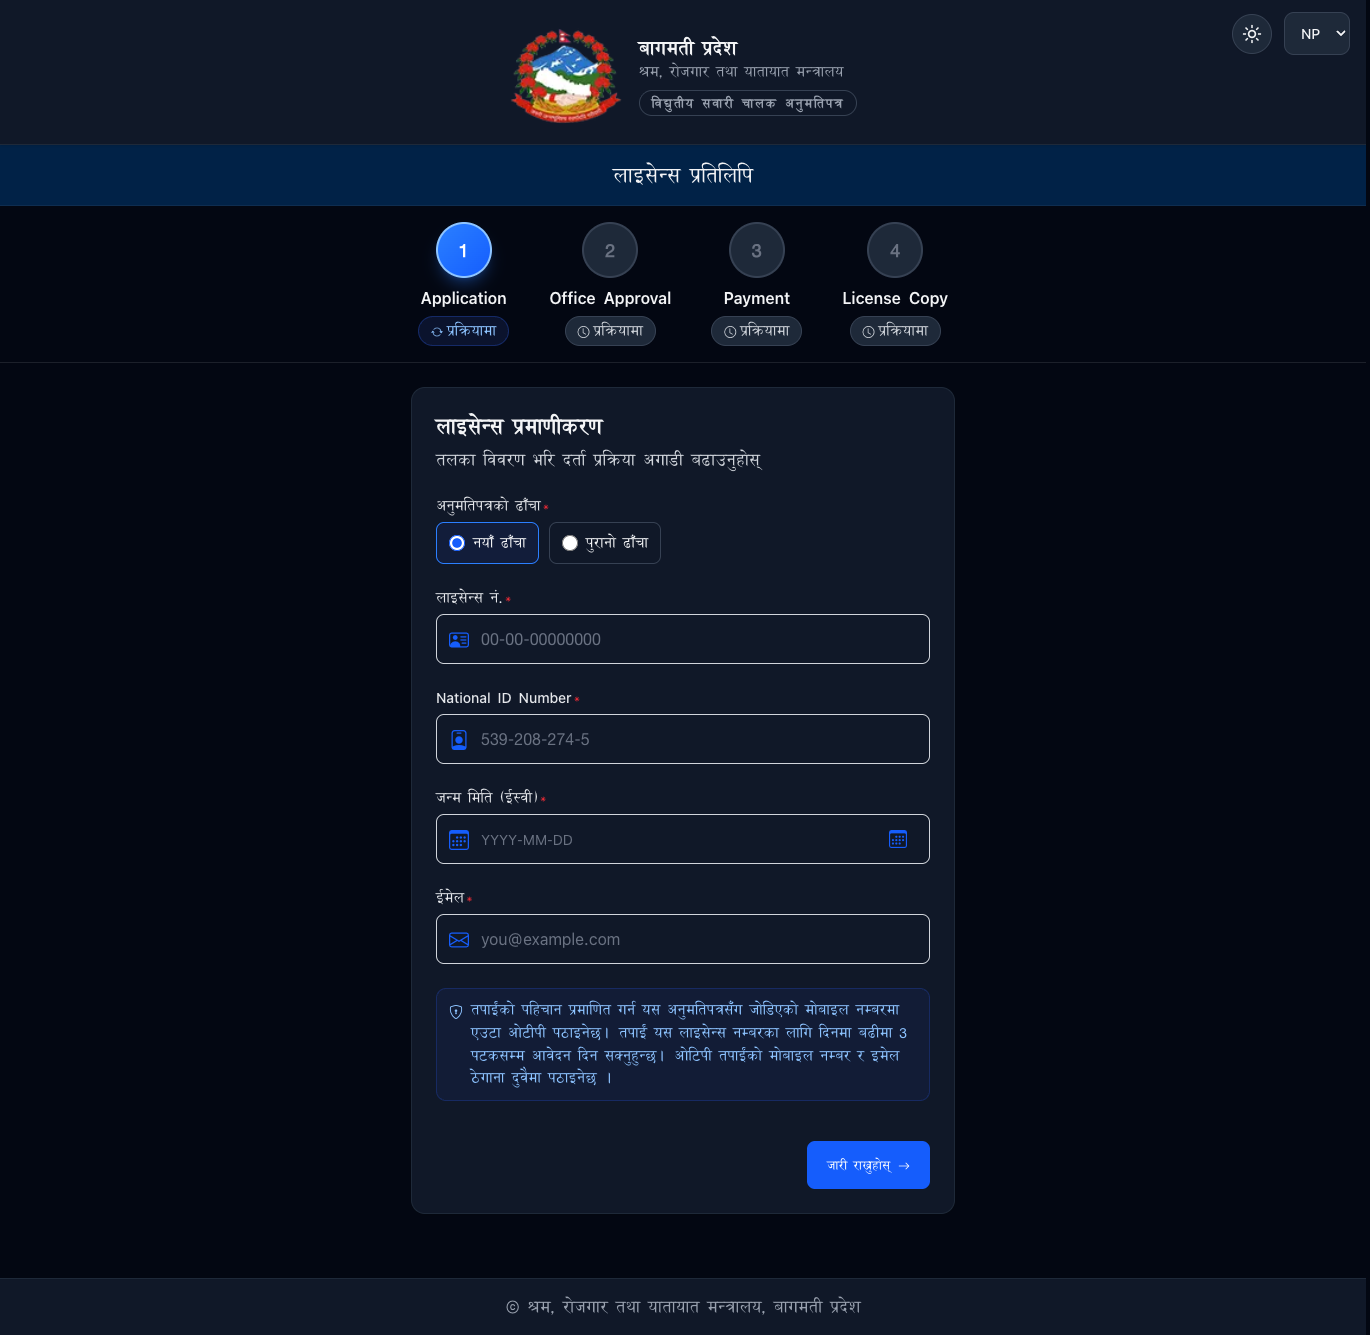
Step 3 — Application submitted. State the reason (lost / stolen / damaged) and
submit. · चरण ३ — आवेदन पेश। कारण छानी पेश गर्नुहोस्।
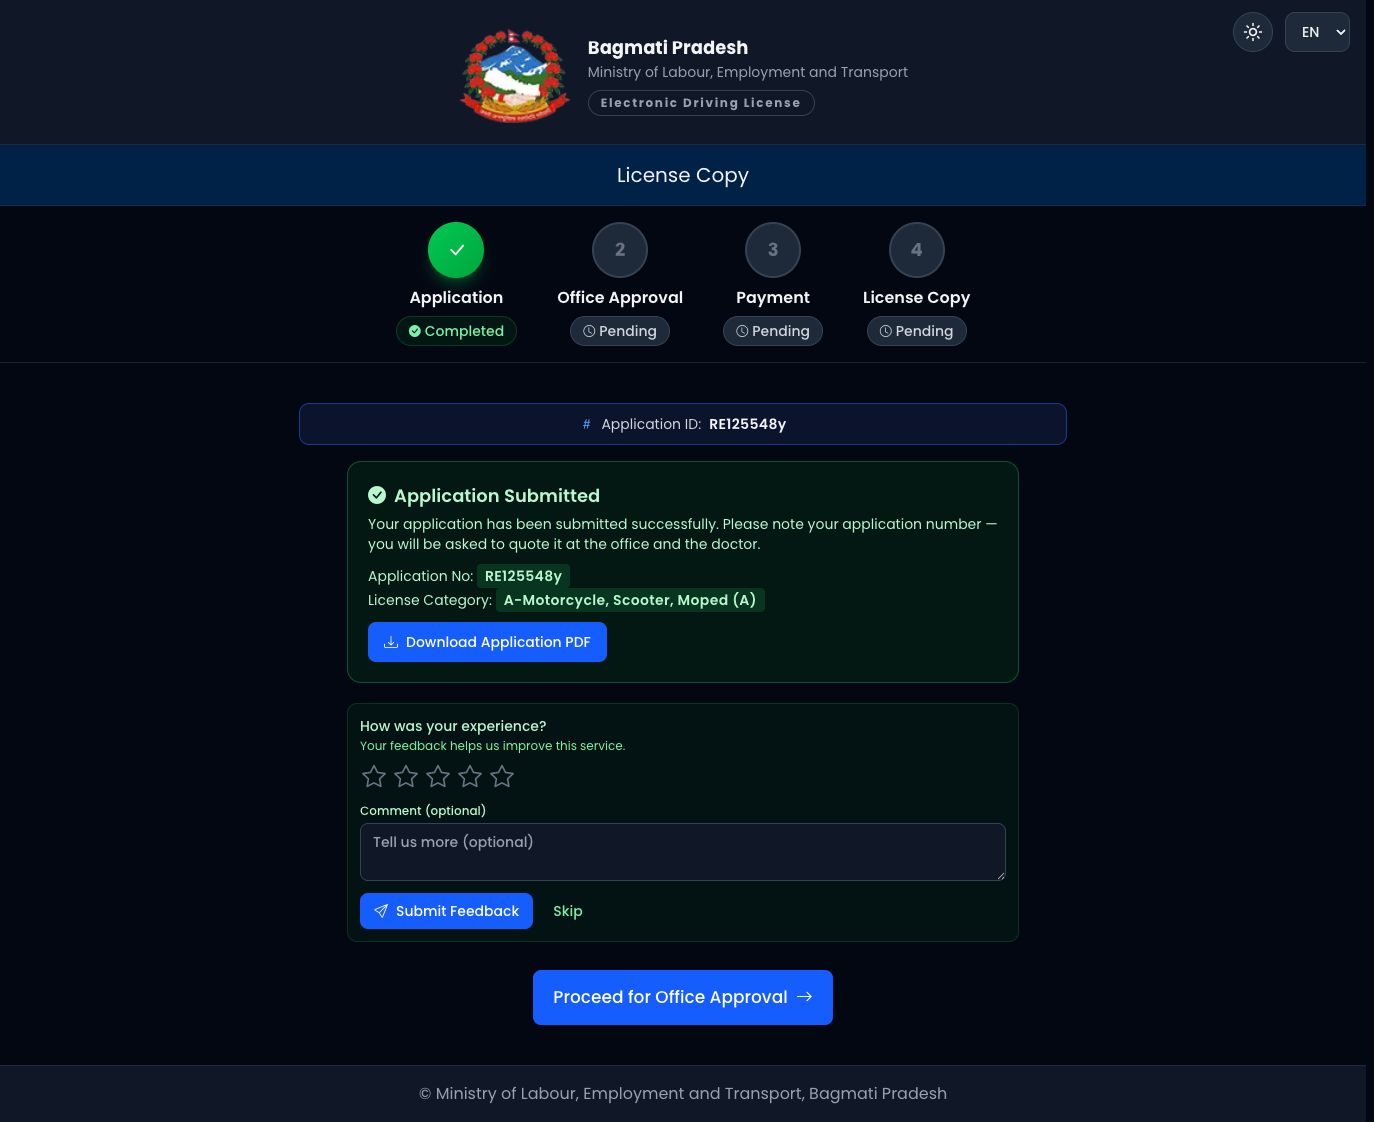
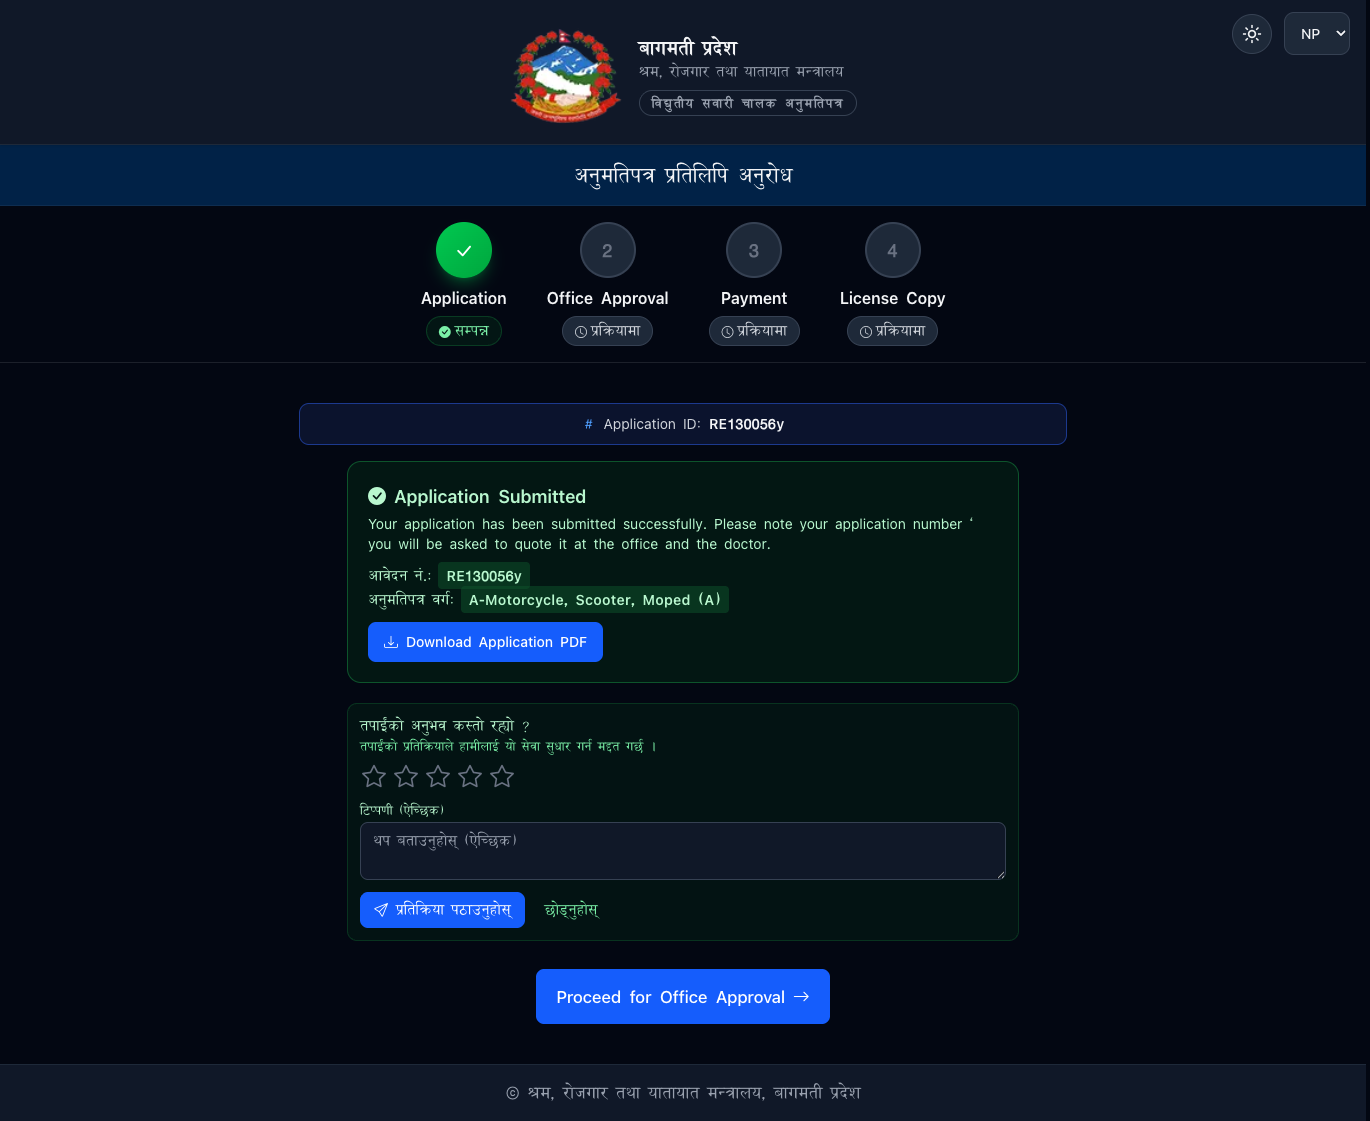
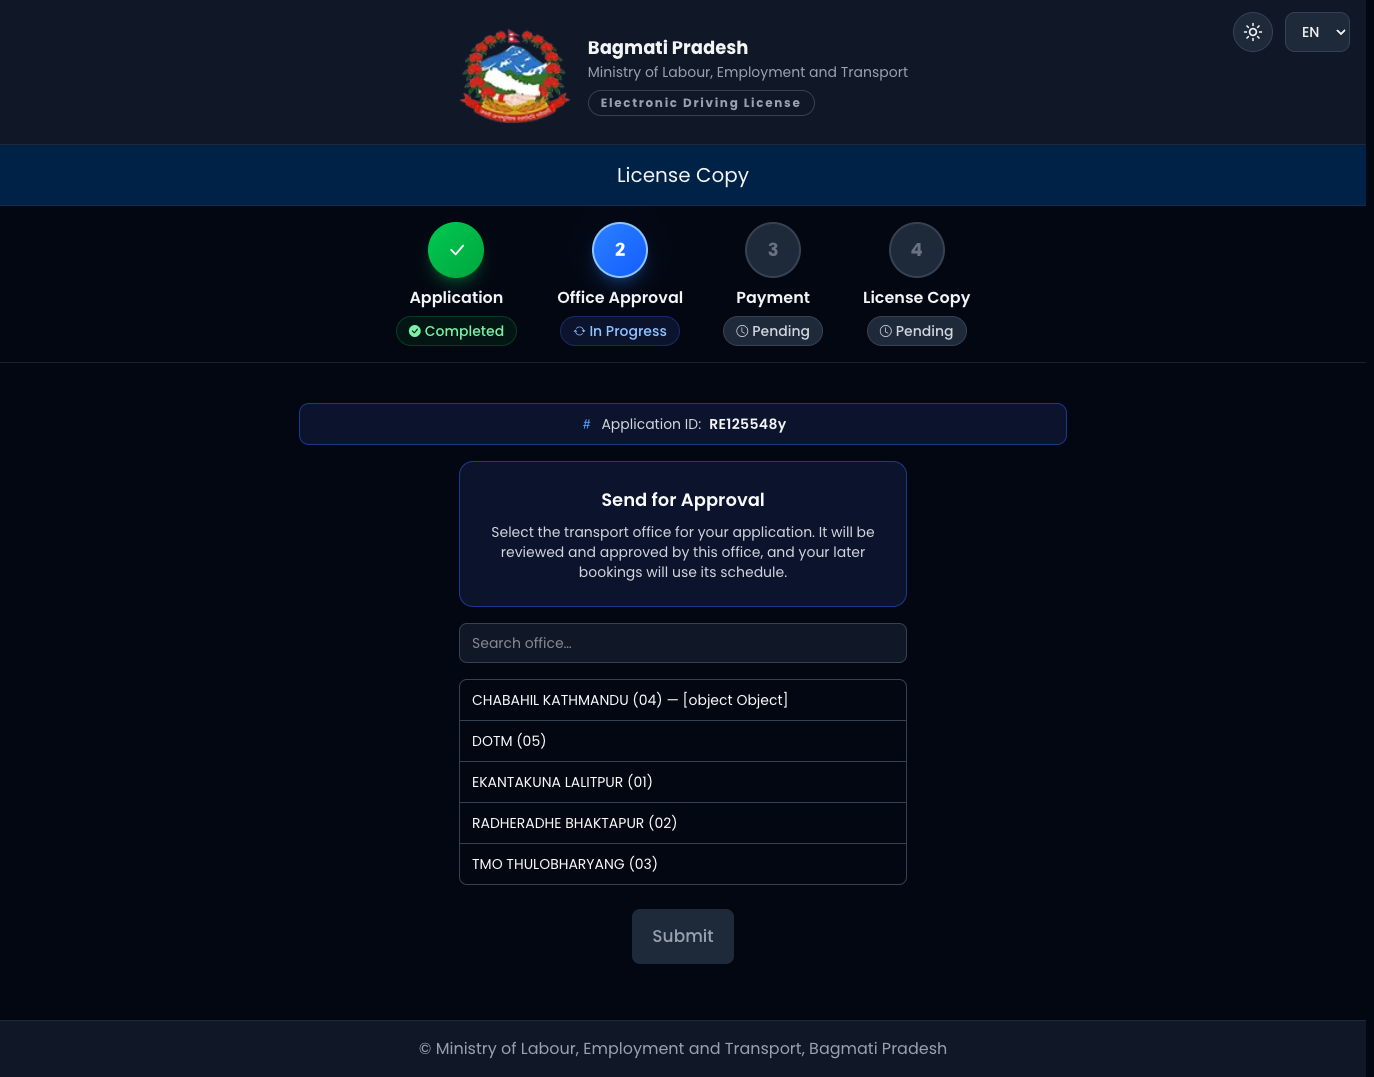
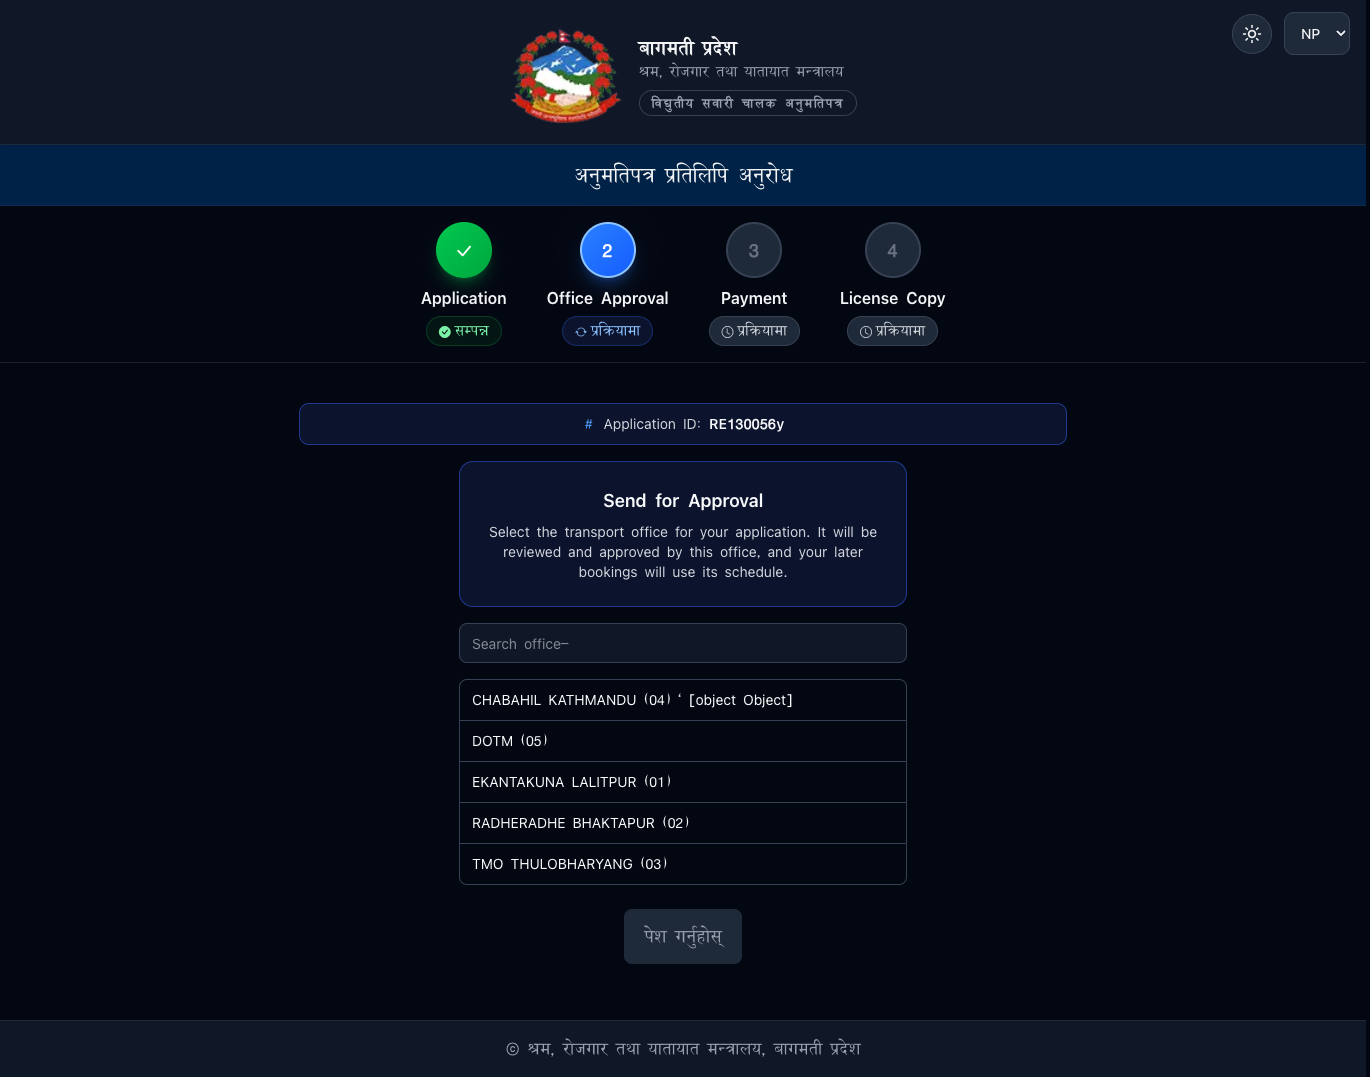
Step 4 — Office approval. Your office approves the copy request. · चरण ४ —
कार्यालय स्वीकृति। कार्यालयले प्रतिलिपि अनुरोध स्वीकृत गर्छ।
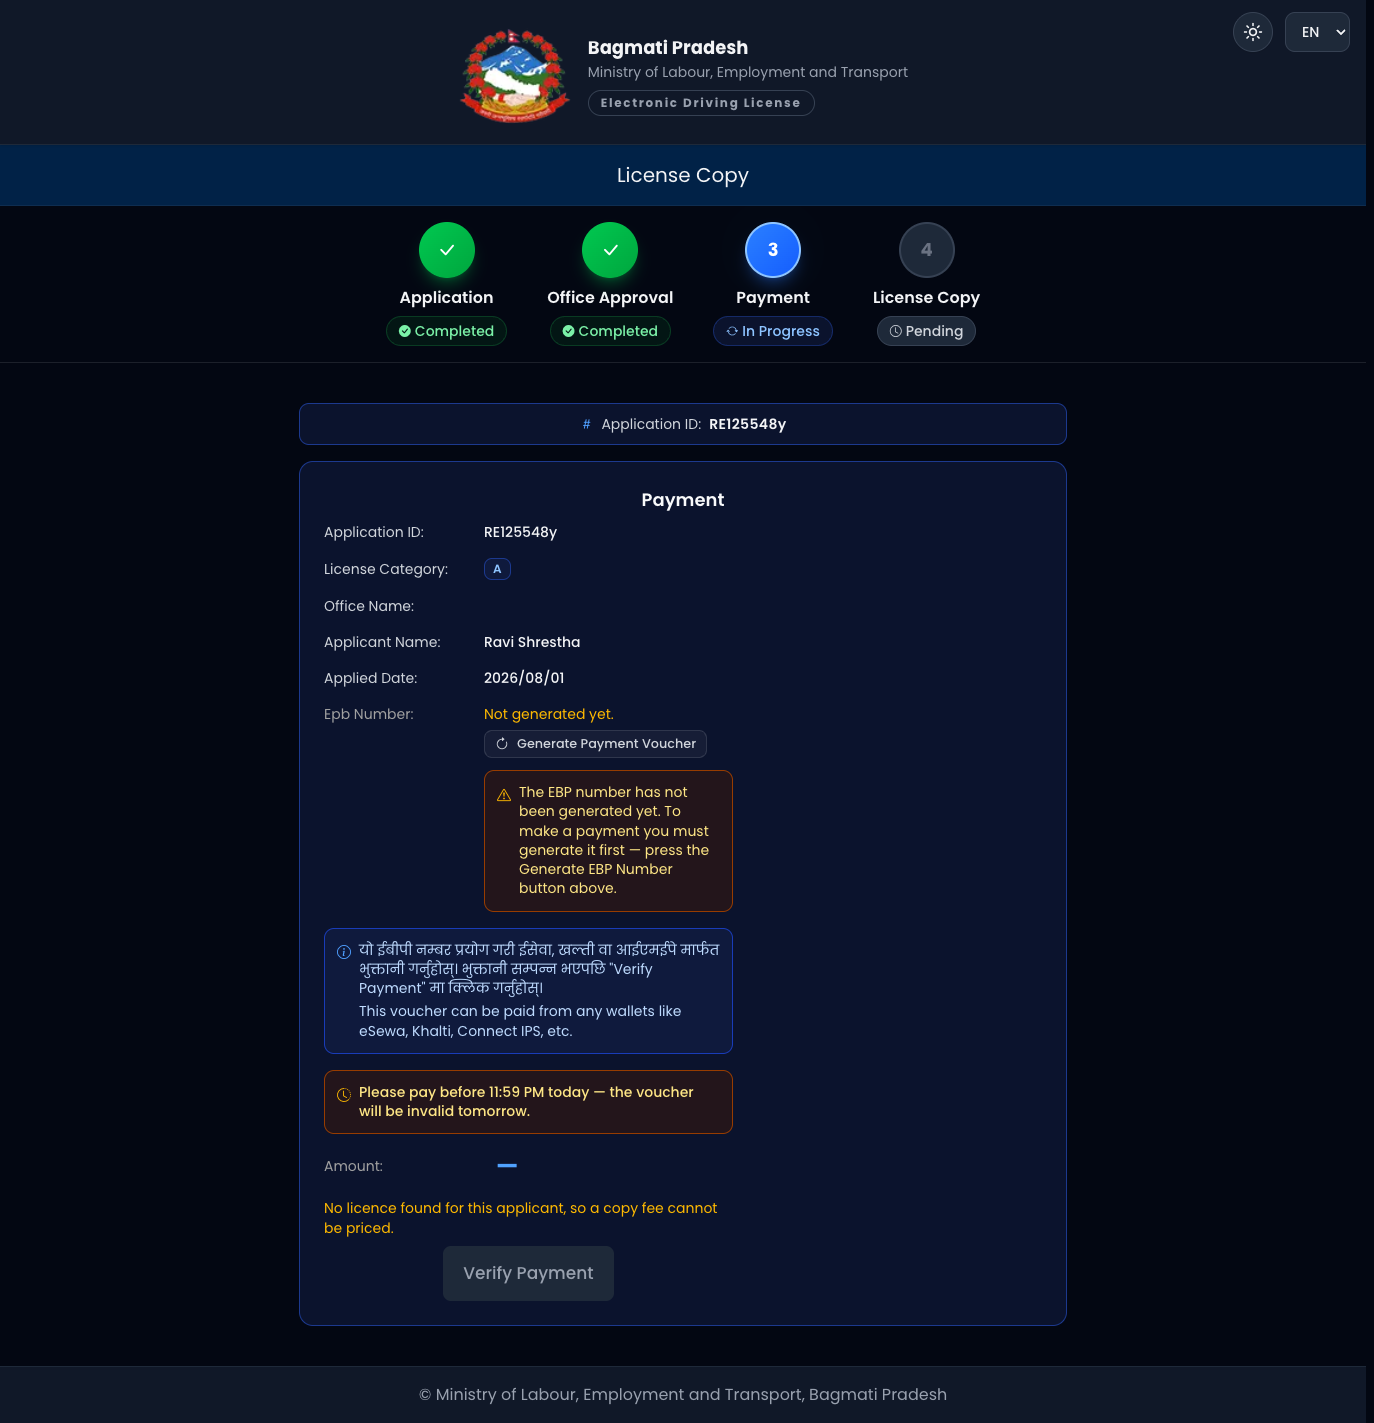
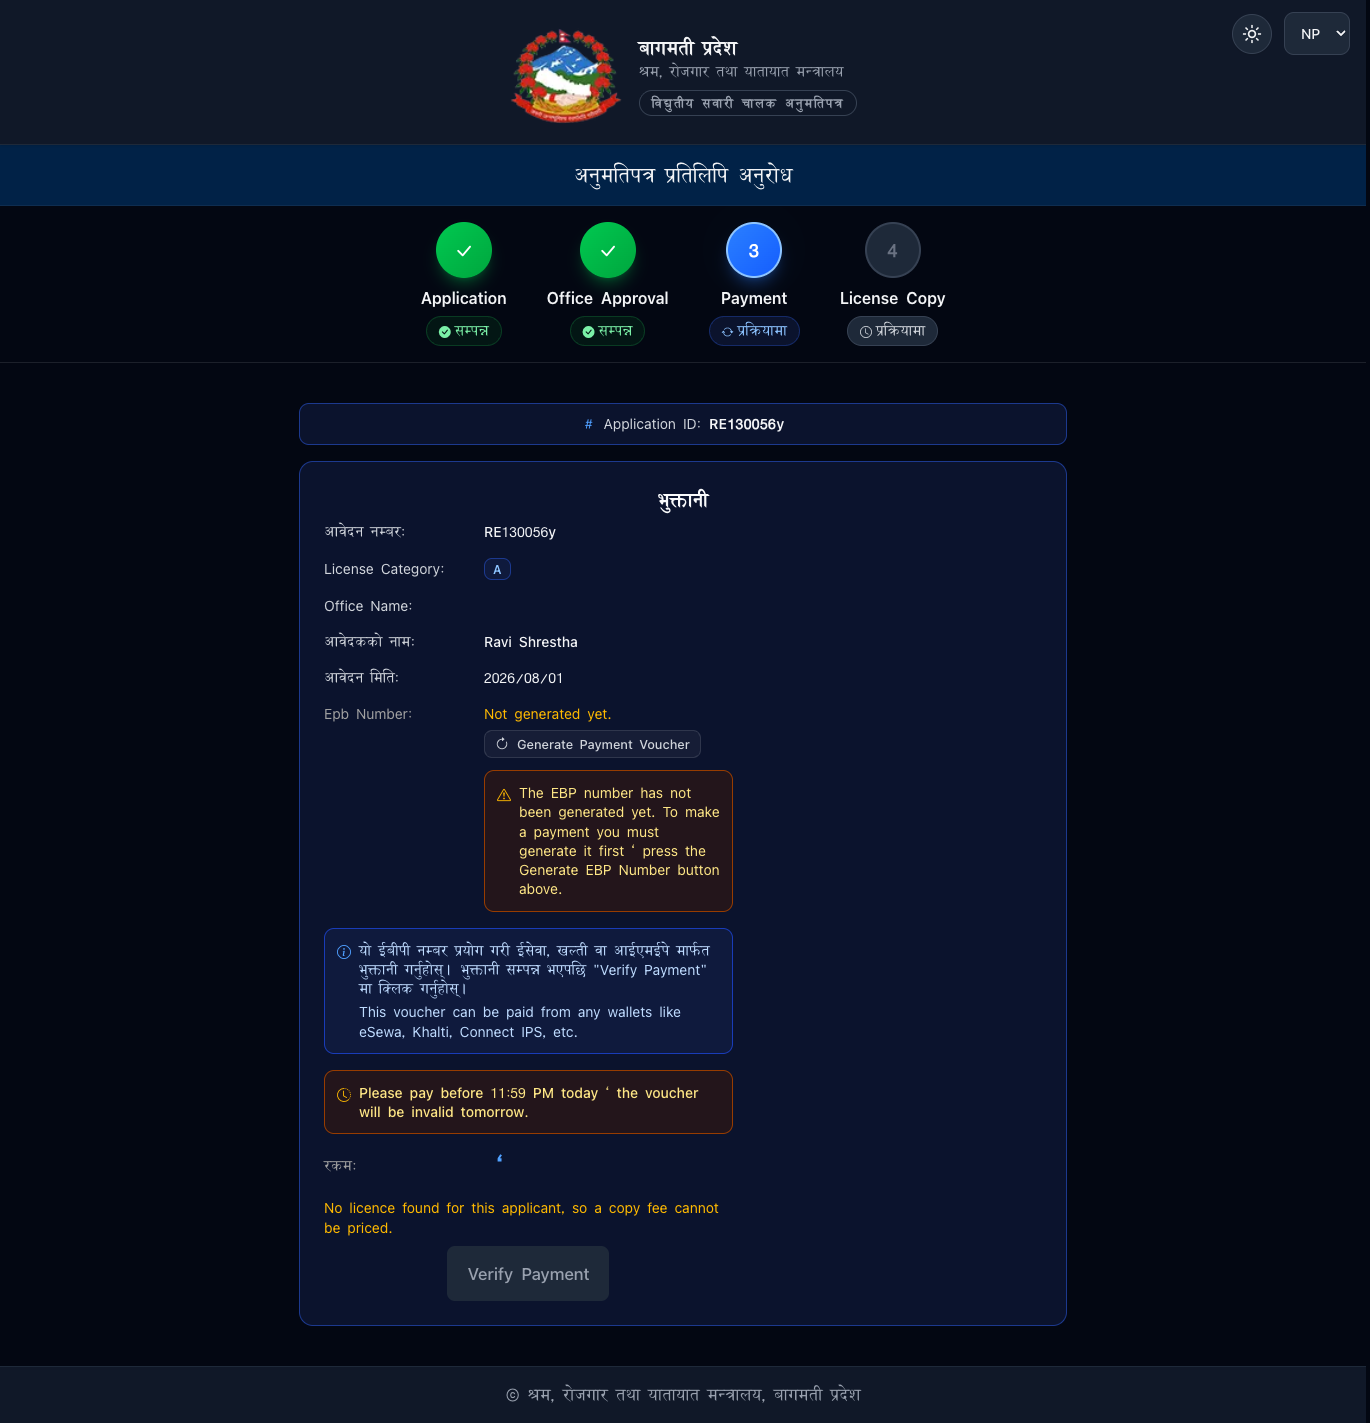
Step 5 — Copy Fee. Generate the copy-fee voucher and pay it. ·
चरण ५ — प्रतिलिपि शुल्क। प्रतिलिपि शुल्कको भौचर बनाई भुक्तानी गर्नुहोस्।
Step 6 — Copy issued. Download your duplicate licence. · चरण ६ — प्रतिलिपि
जारी। प्रतिलिपि अनुमतिपत्र डाउनलोड गर्नुहोस्।
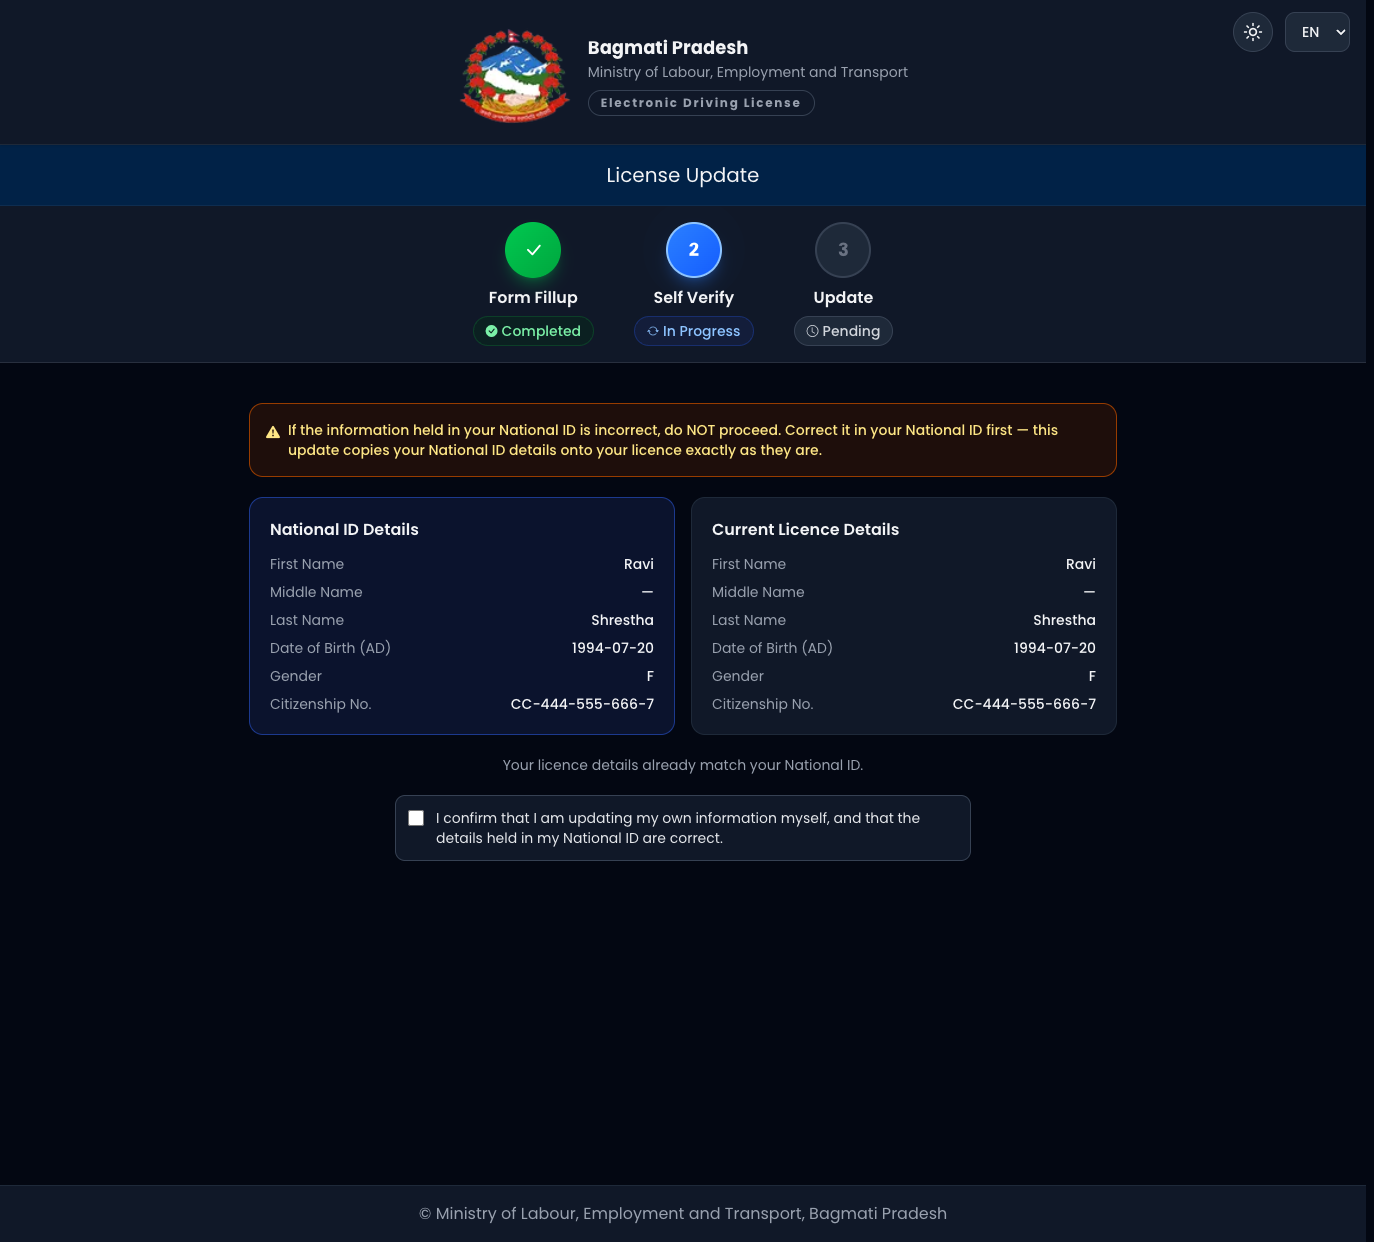
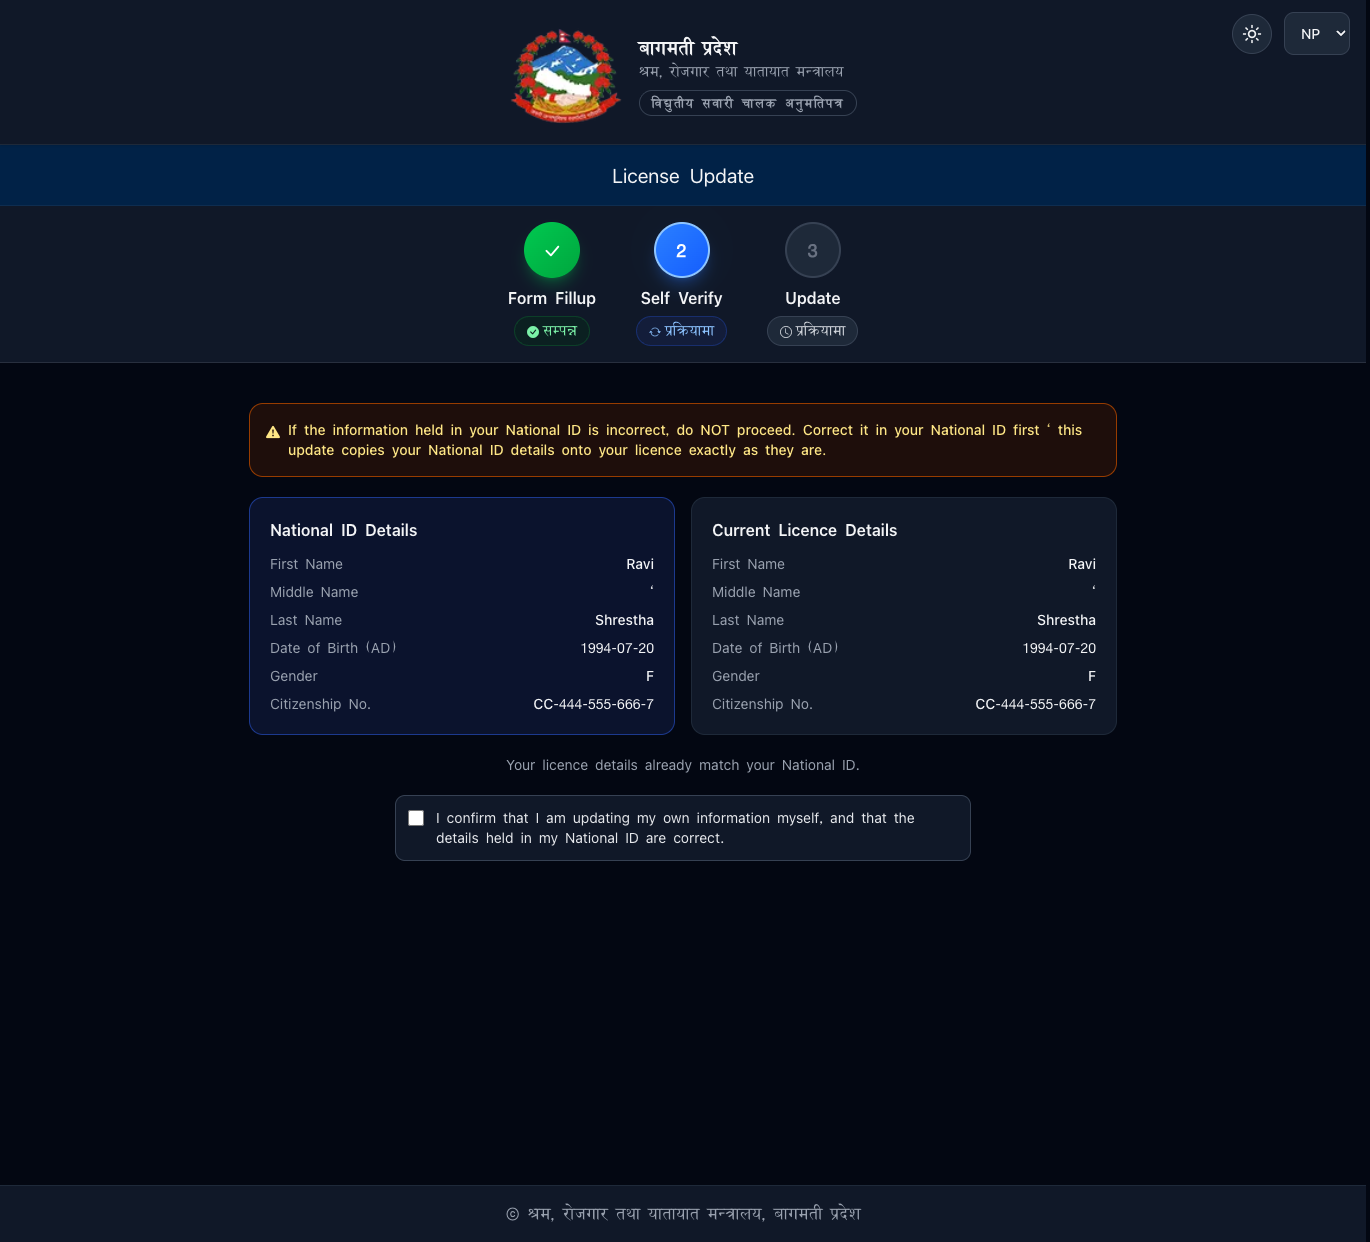
5. Licence Update · अद्यावधिक
Update the details recorded on an existing licence. अनुमतिपत्रको विवरण अद्यावधिक
गर्नुहोस्।
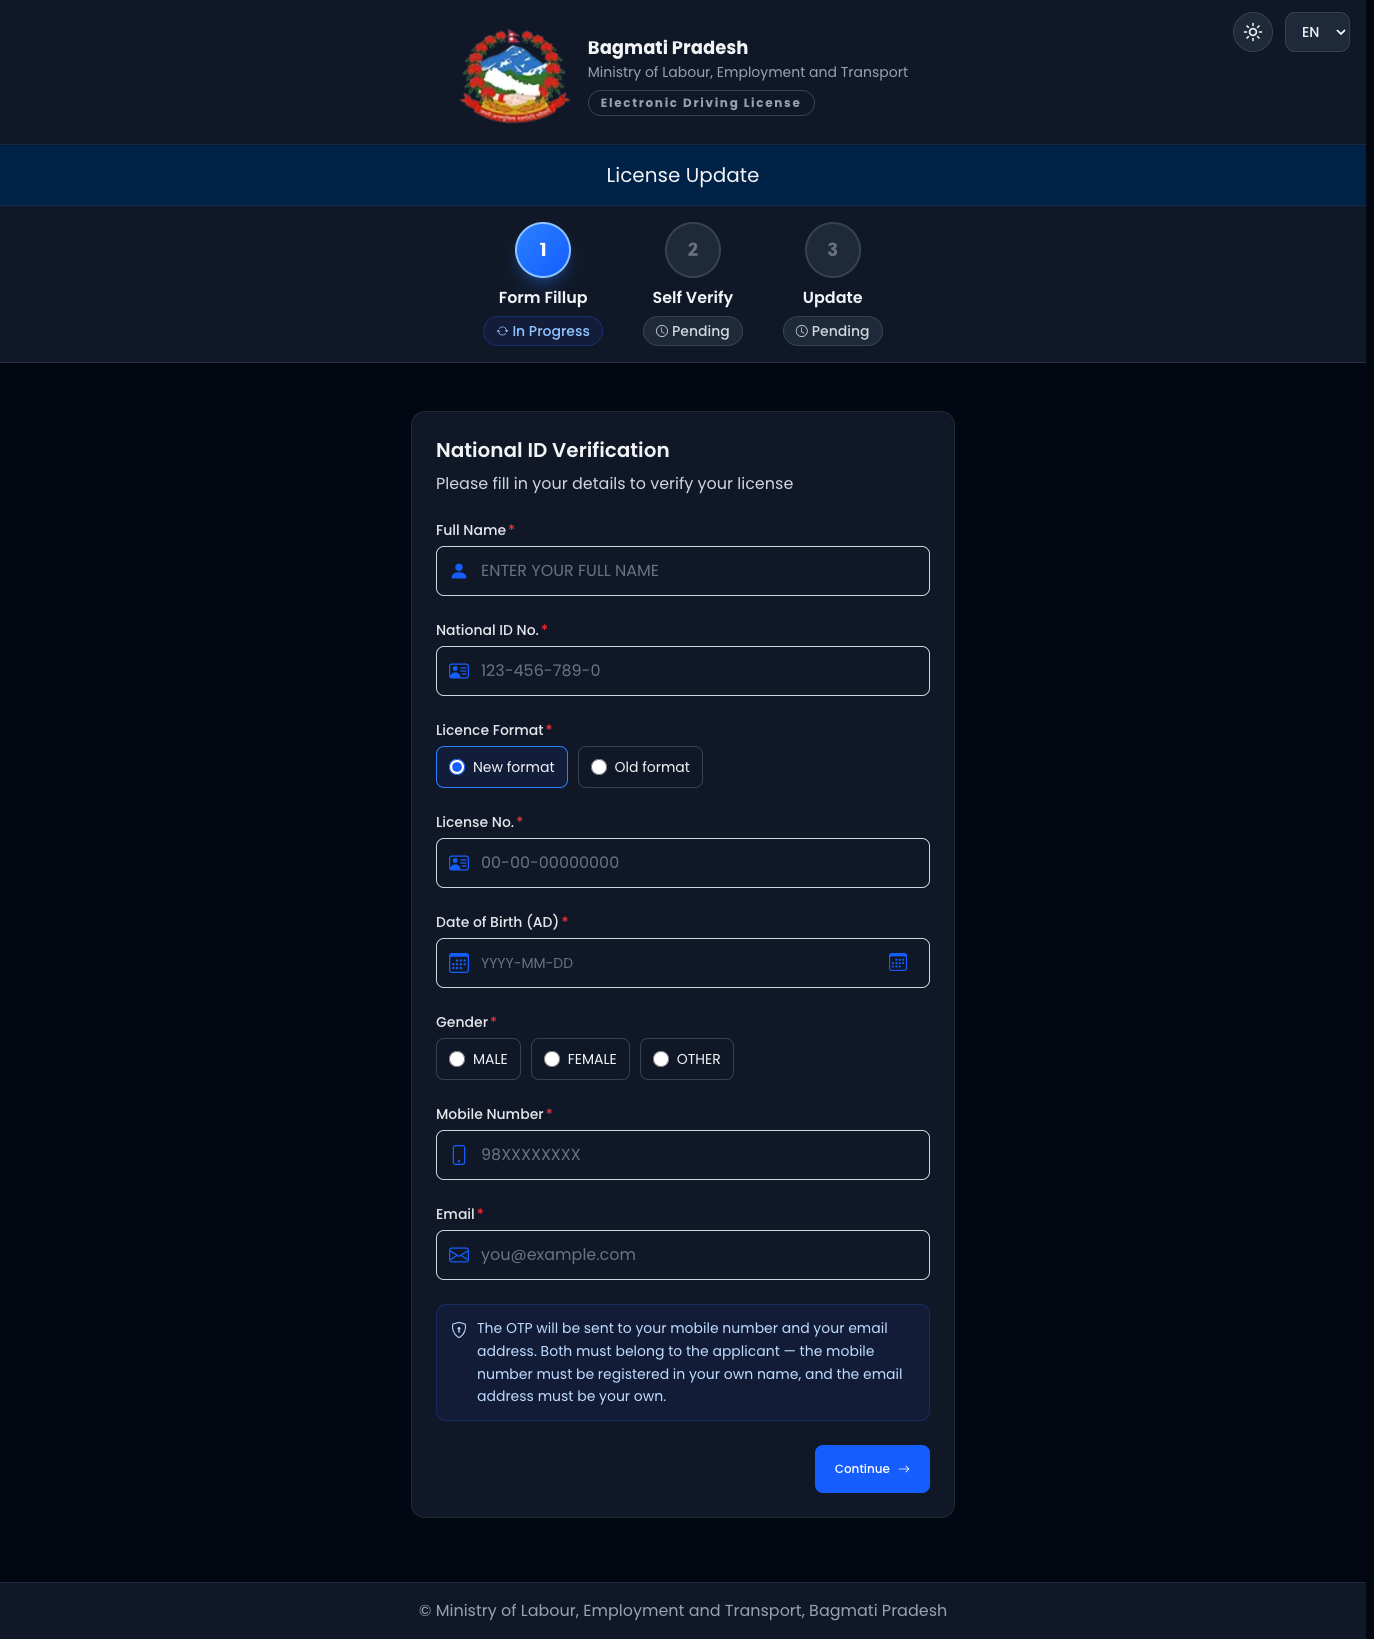
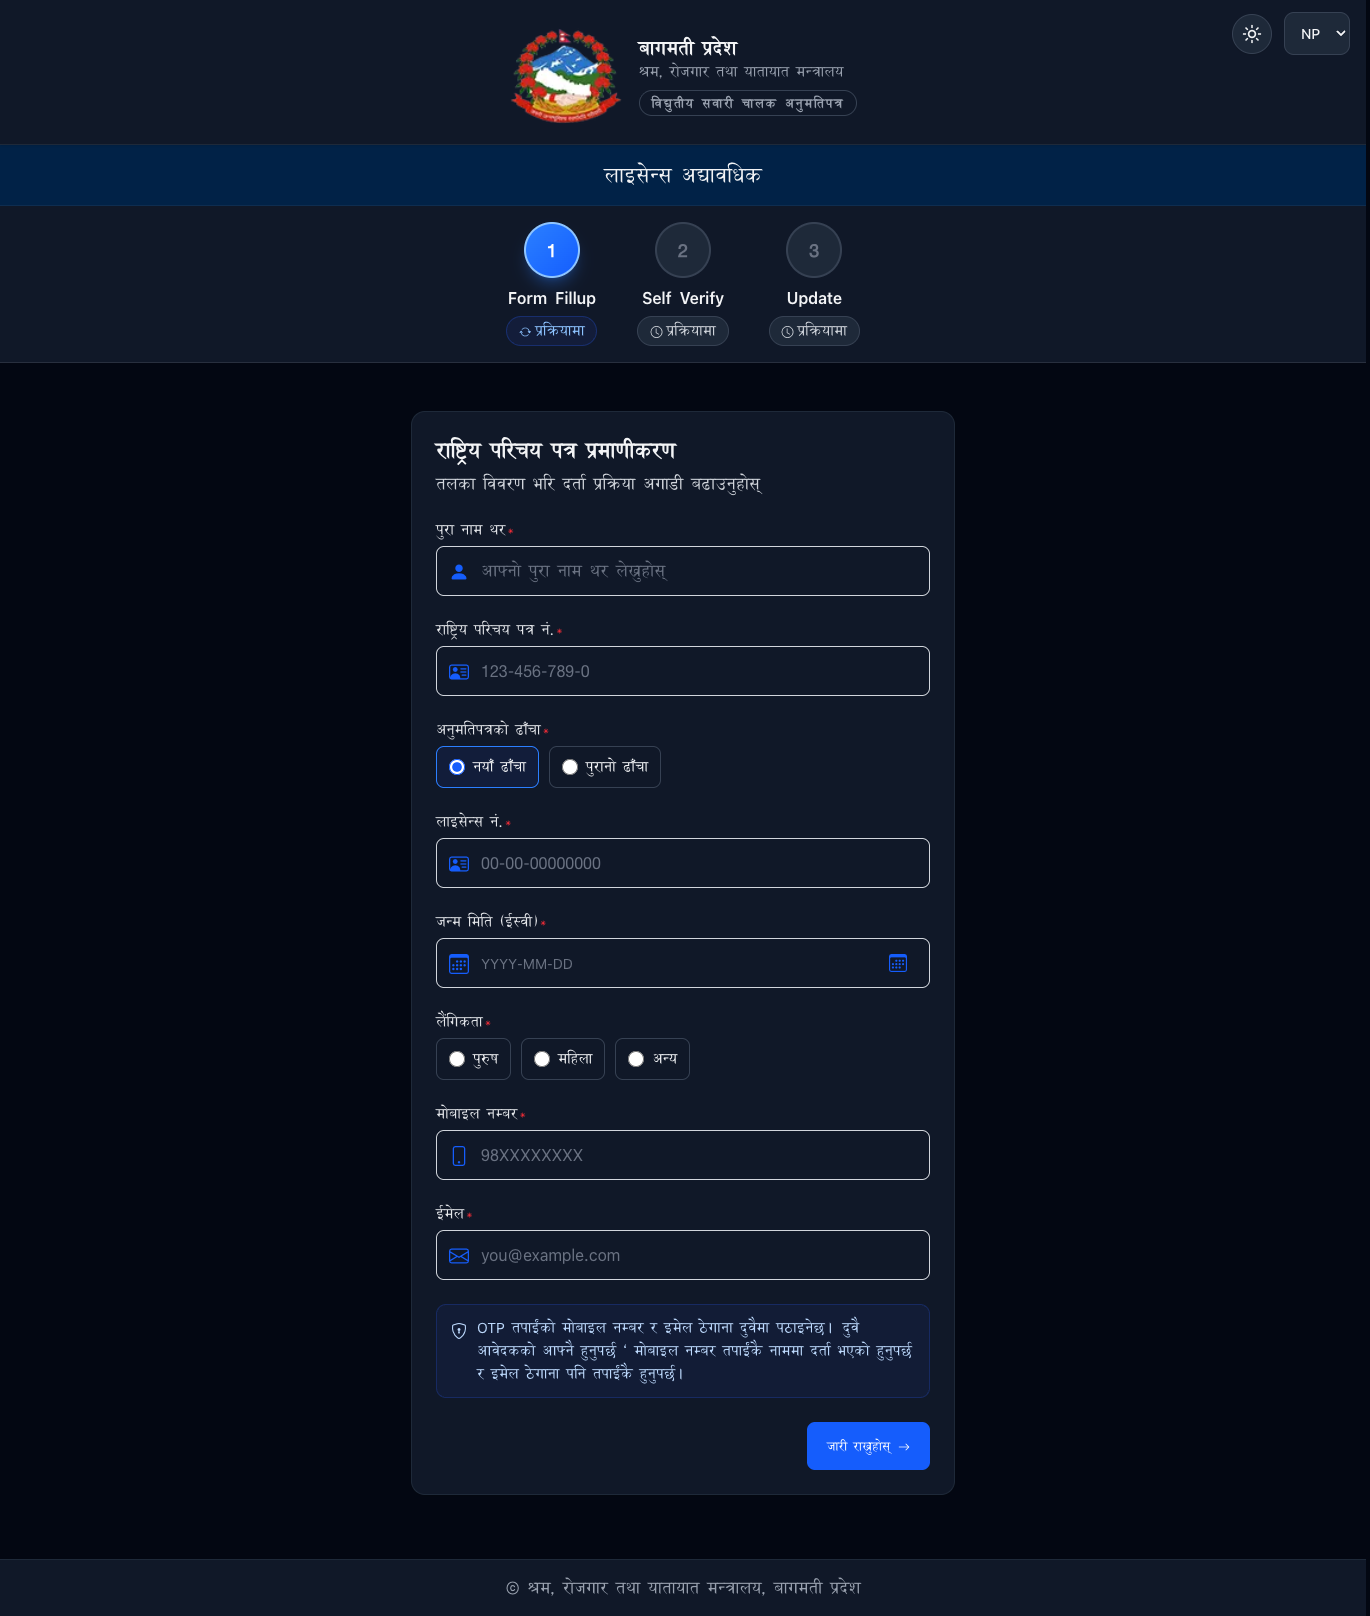
Journey · प्रक्रिया: Application → Verification (Self Verify) → Office Approval
→ Update (4 stages · ४ चरण; no medical or exam · स्वास्थ्य वा परीक्षा हुँदैन. Some
provinces charge an Update Fee before the update · केही प्रदेशमा अद्यावधिक अघि
अद्यावधिक शुल्क लाग्छ)
Step 1 — Choose License Update. · चरण १ — अद्यावधिक छान्नुहोस्।
Step 2 — Verify with National ID (NID number, your mobile, email; OTP). ·
चरण २ — NID नम्बर, मोबाइल र इमेलले प्रमाणीकरण (OTP)।
Step 3 — Application submitted. · चरण ३ — आवेदन पेश।
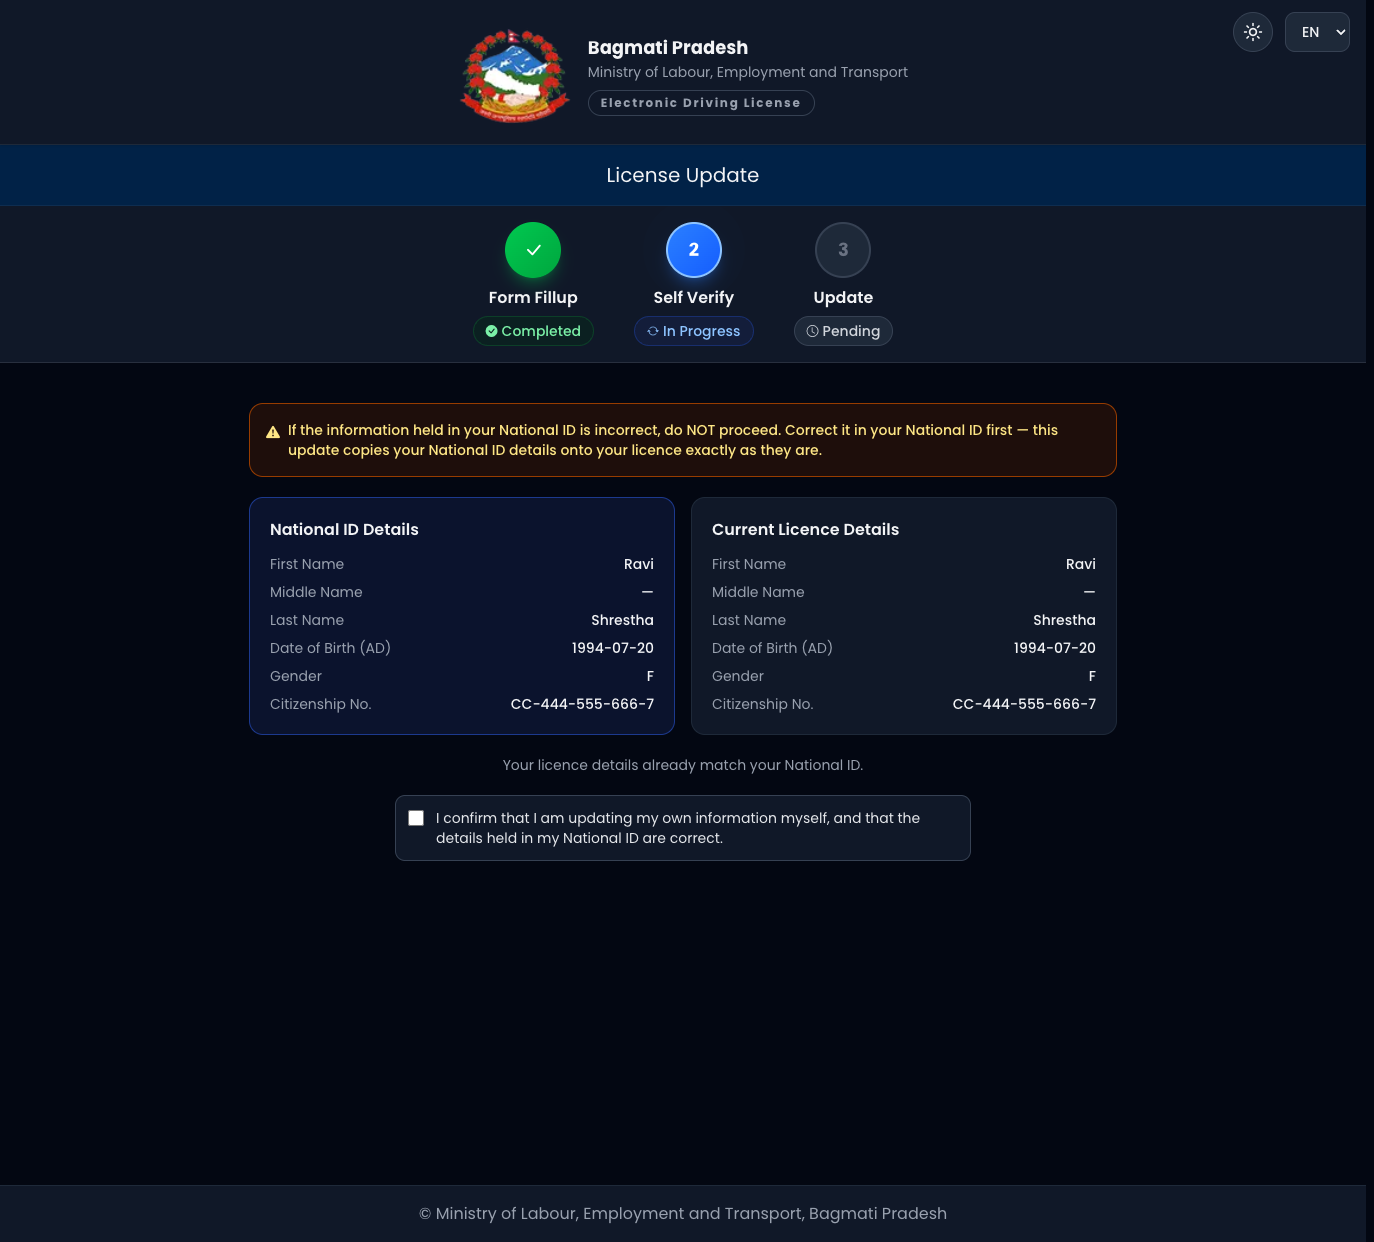
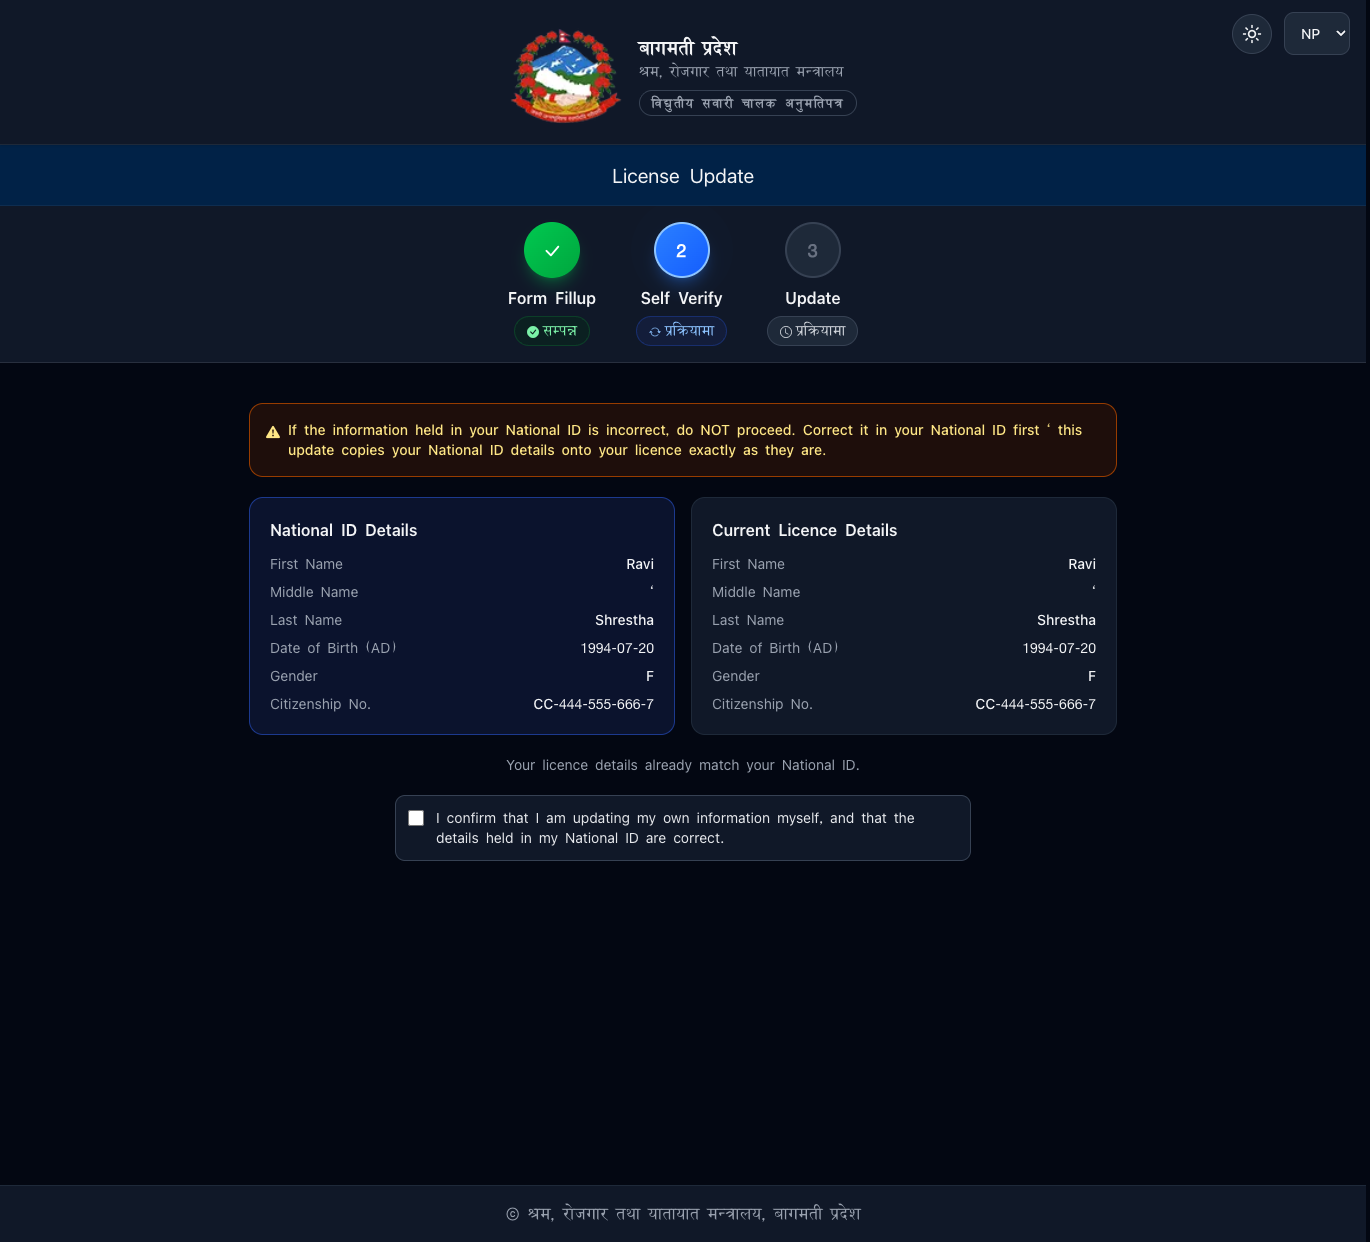
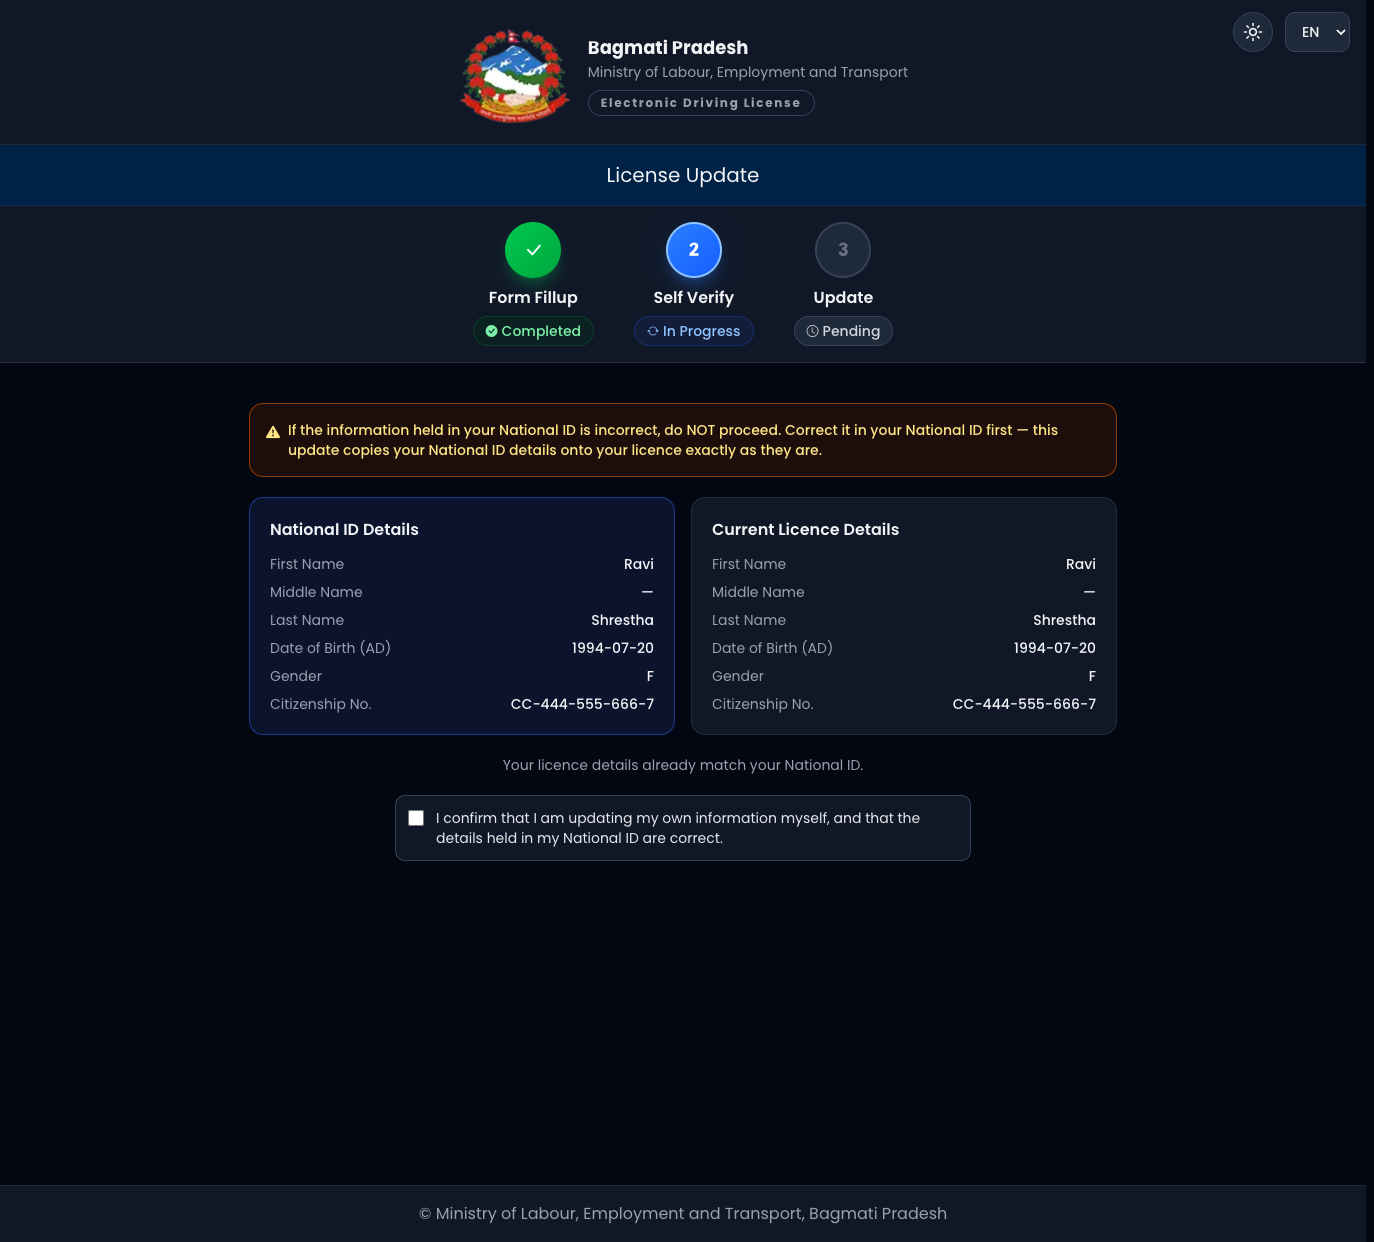
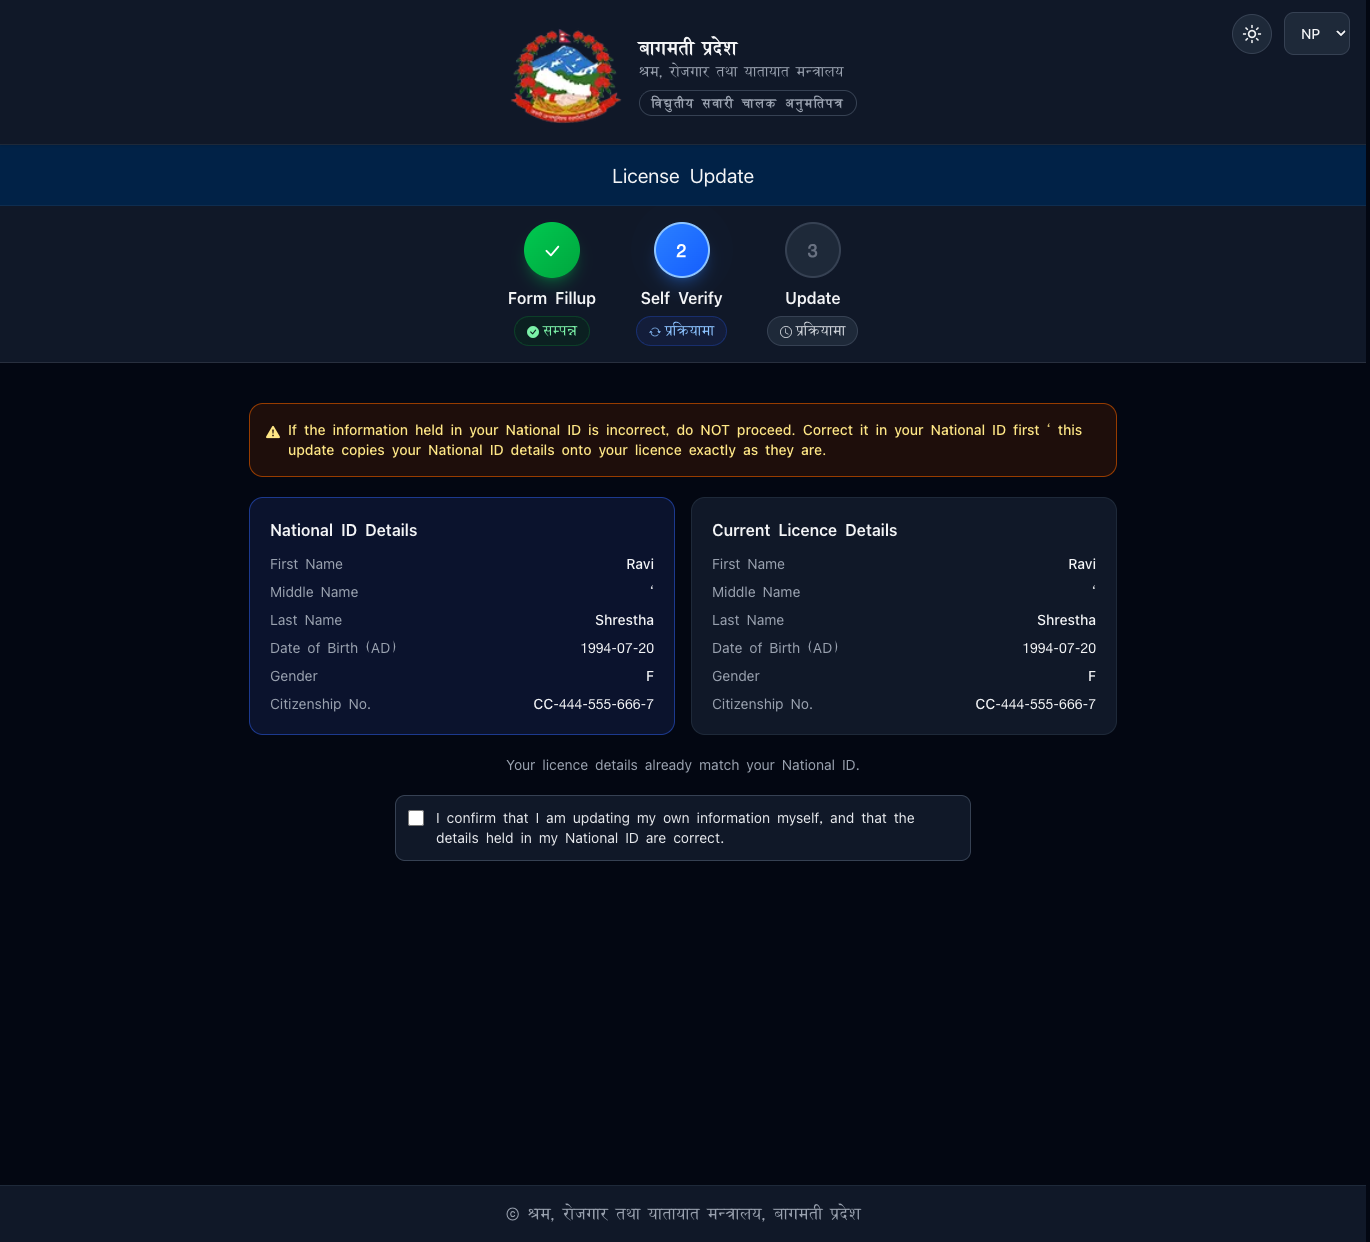
Step 4 — Verification. Review the current licence details against the National
ID and confirm. · चरण ४ — प्रमाणीकरण। हालको अनुमतिपत्र विवरण NID सँग जाँची
पुष्टि गर्नुहोस्।
Step 5 — Office approval. The office reviews and approves the update. Where the
province charges for updates, an Update Fee voucher is generated here — pay it
to proceed. · चरण ५ — कार्यालय स्वीकृति। कार्यालयले अद्यावधिक जाँची स्वीकृत
गर्छ। शुल्क लाग्ने प्रदेशमा यहाँ अद्यावधिक शुल्क भौचर बन्छ — भुक्तानी गरी अगाडि
बढ्नुहोस्।
Step 6 — Update applied. Your licence record is updated and available to
download. · चरण ६ — अद्यावधिक सम्पन्न। अभिलेख अद्यावधिक भई डाउनलोड गर्न मिल्छ।
6. Retrial · पुन-परीक्षा
Apply for a retrial after failing the trial of a New Licence or Add Category
application. नयाँ अनुमतिपत्र वा वर्ग थपको ट्रायलमा असफल भएपछि पुन-परीक्षाका लागि
आवेदन।
Journey · प्रक्रिया: Application → Retrial Fee → Retrial → License Fee / Add Fee
→ Licence / Category (5 stages · ५ चरण; no medical or office approval ·
स्वास्थ्य/कार्यालय स्वीकृति हुँदैन)
Step 1 — Choose Retrial (New License) or Retrial (Add Category). · चरण १ —
पुन-परीक्षा (नयाँ) वा पुन-परीक्षा (वर्ग थप) छान्नुहोस्।
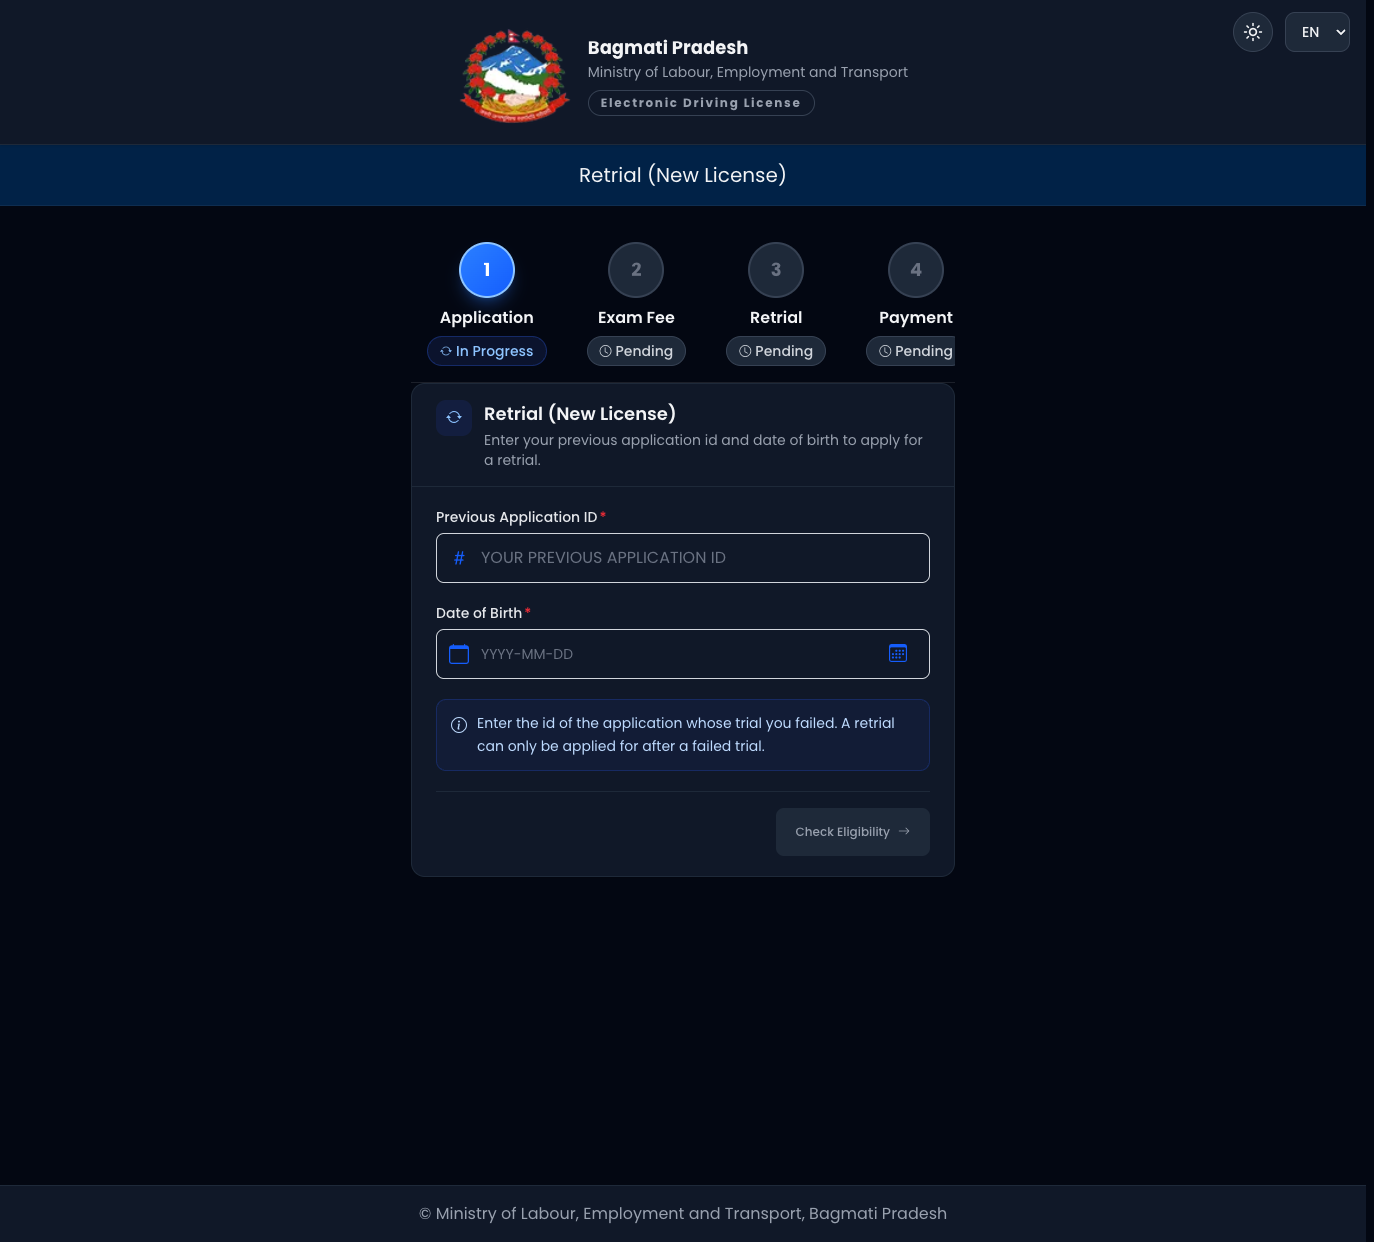
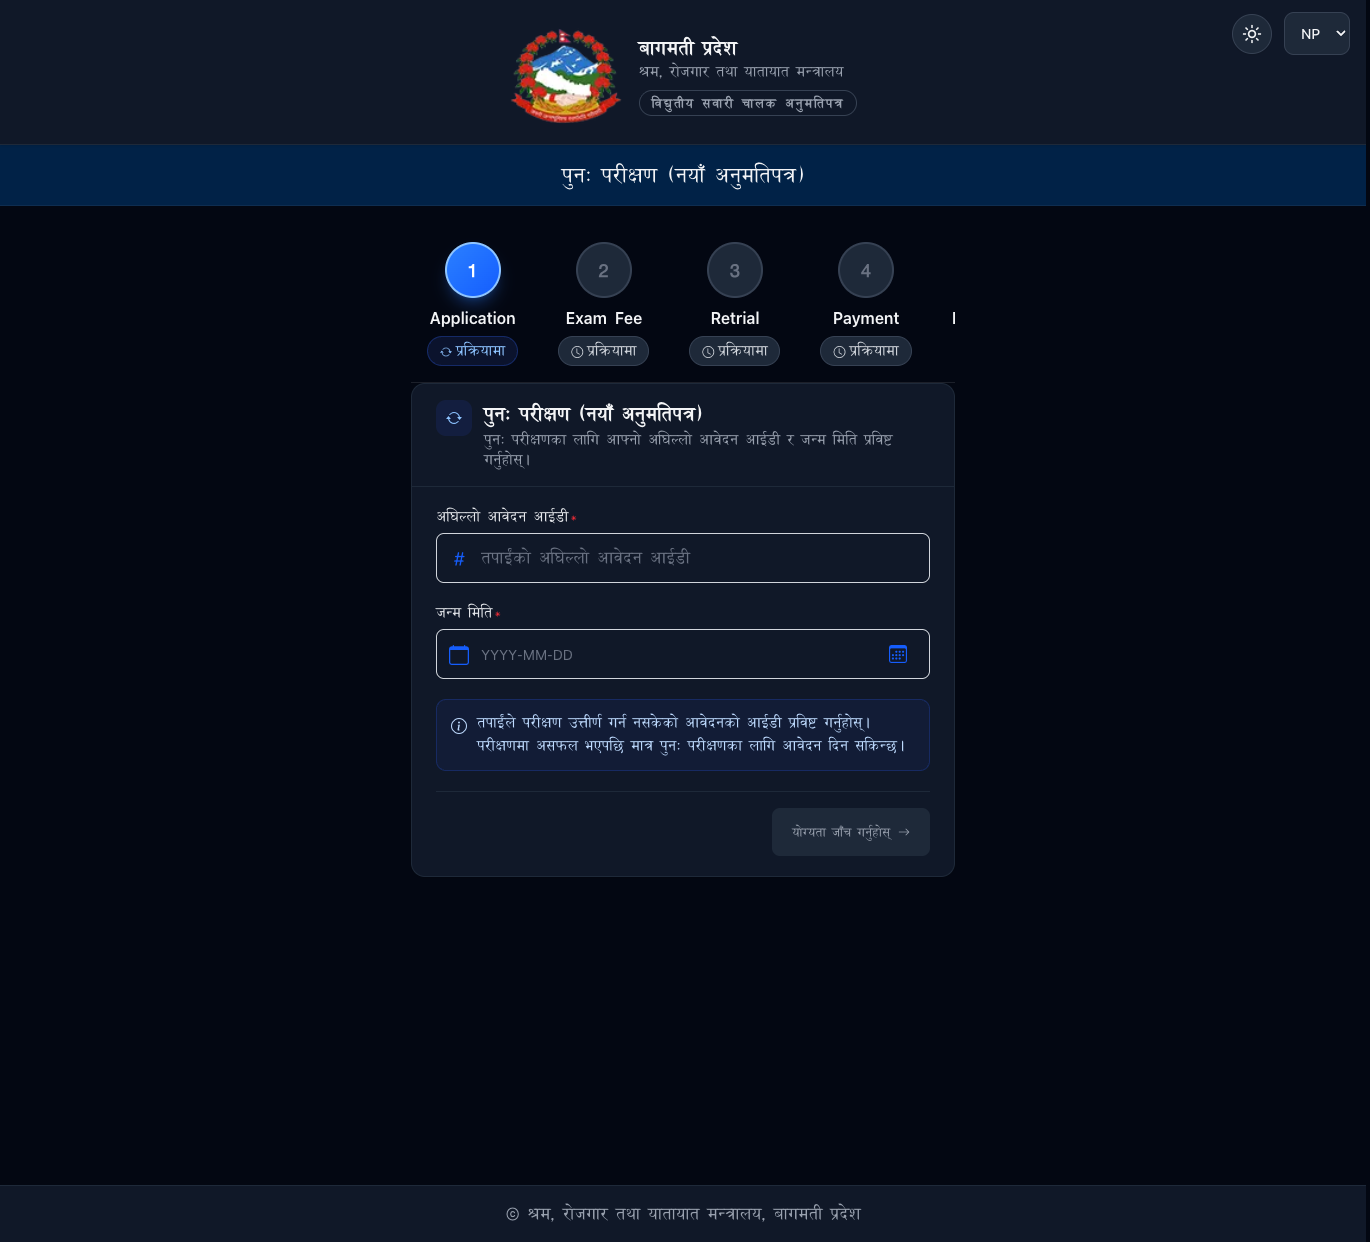
Step 2 — Check eligibility. Enter the Previous Application ID (the one whose
trial you failed) and your Date of Birth, then Check Eligibility. Retrials are
limited by a waiting period and a maximum number of attempts. · चरण २ — योग्यता
जाँच। अघिल्लो आवेदन ID (जसको ट्रायल असफल भयो) र जन्म मिति भरी योग्यता
जाँच्नुहोस्। पुन-परीक्षा प्रतीक्षा अवधि र अधिकतम पटकले सीमित छ।
Step 3 — Application. Once eligible, your retrial application is created. ·
चरण ३ — आवेदन। योग्य भएपछि पुन-परीक्षा आवेदन बन्छ।
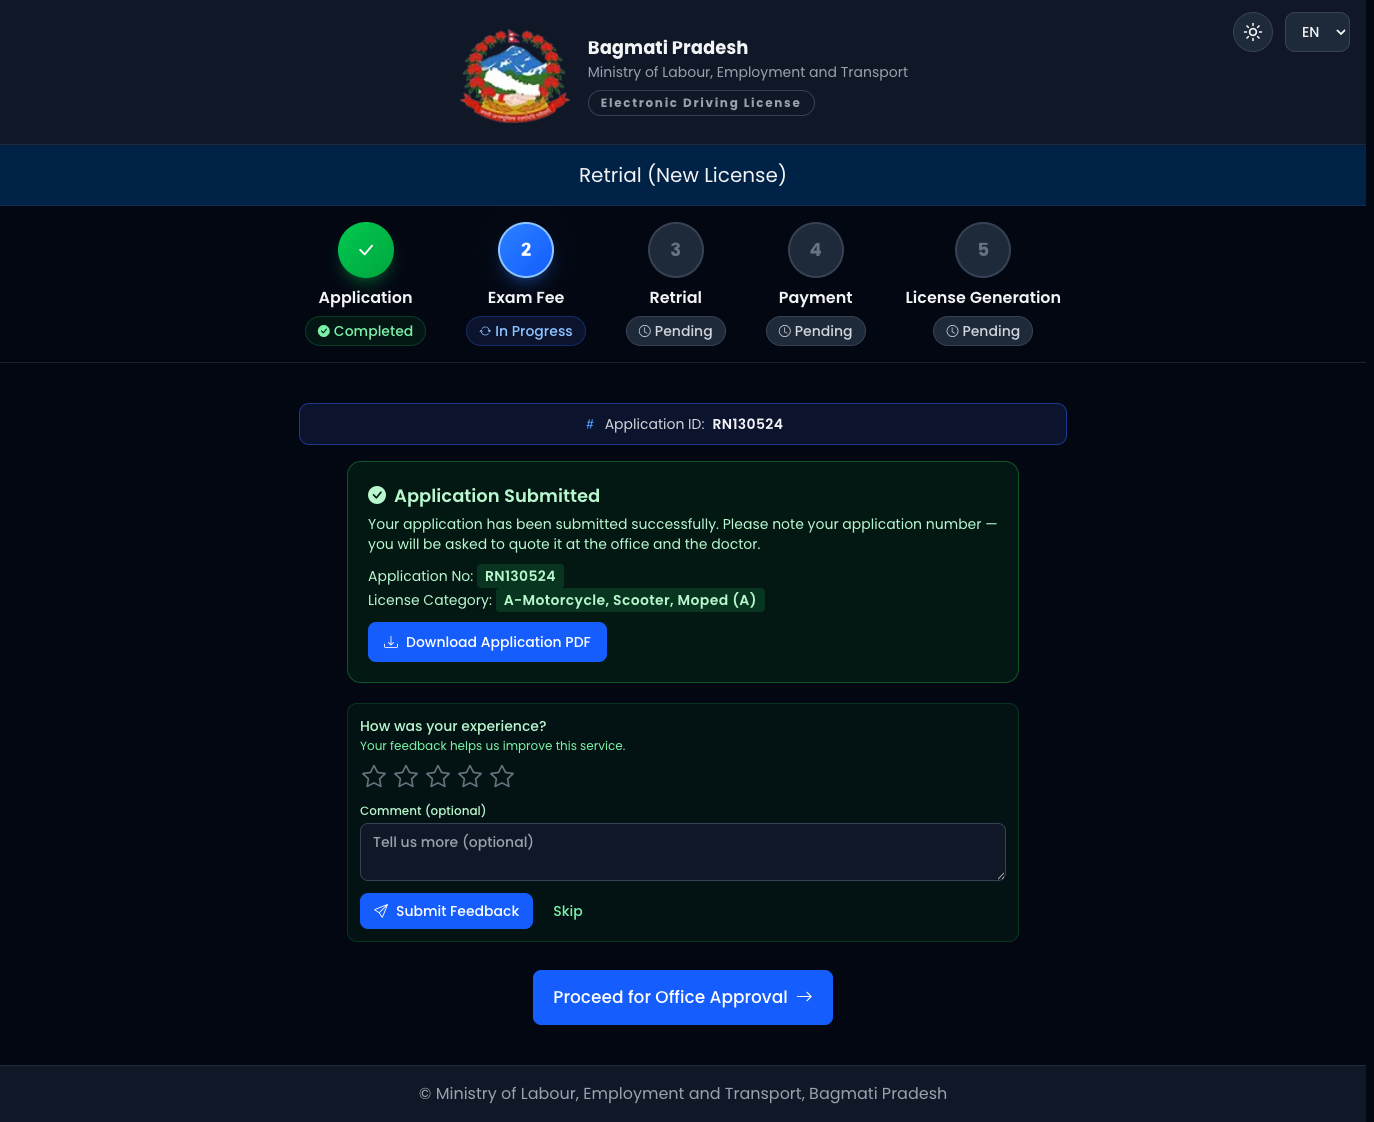
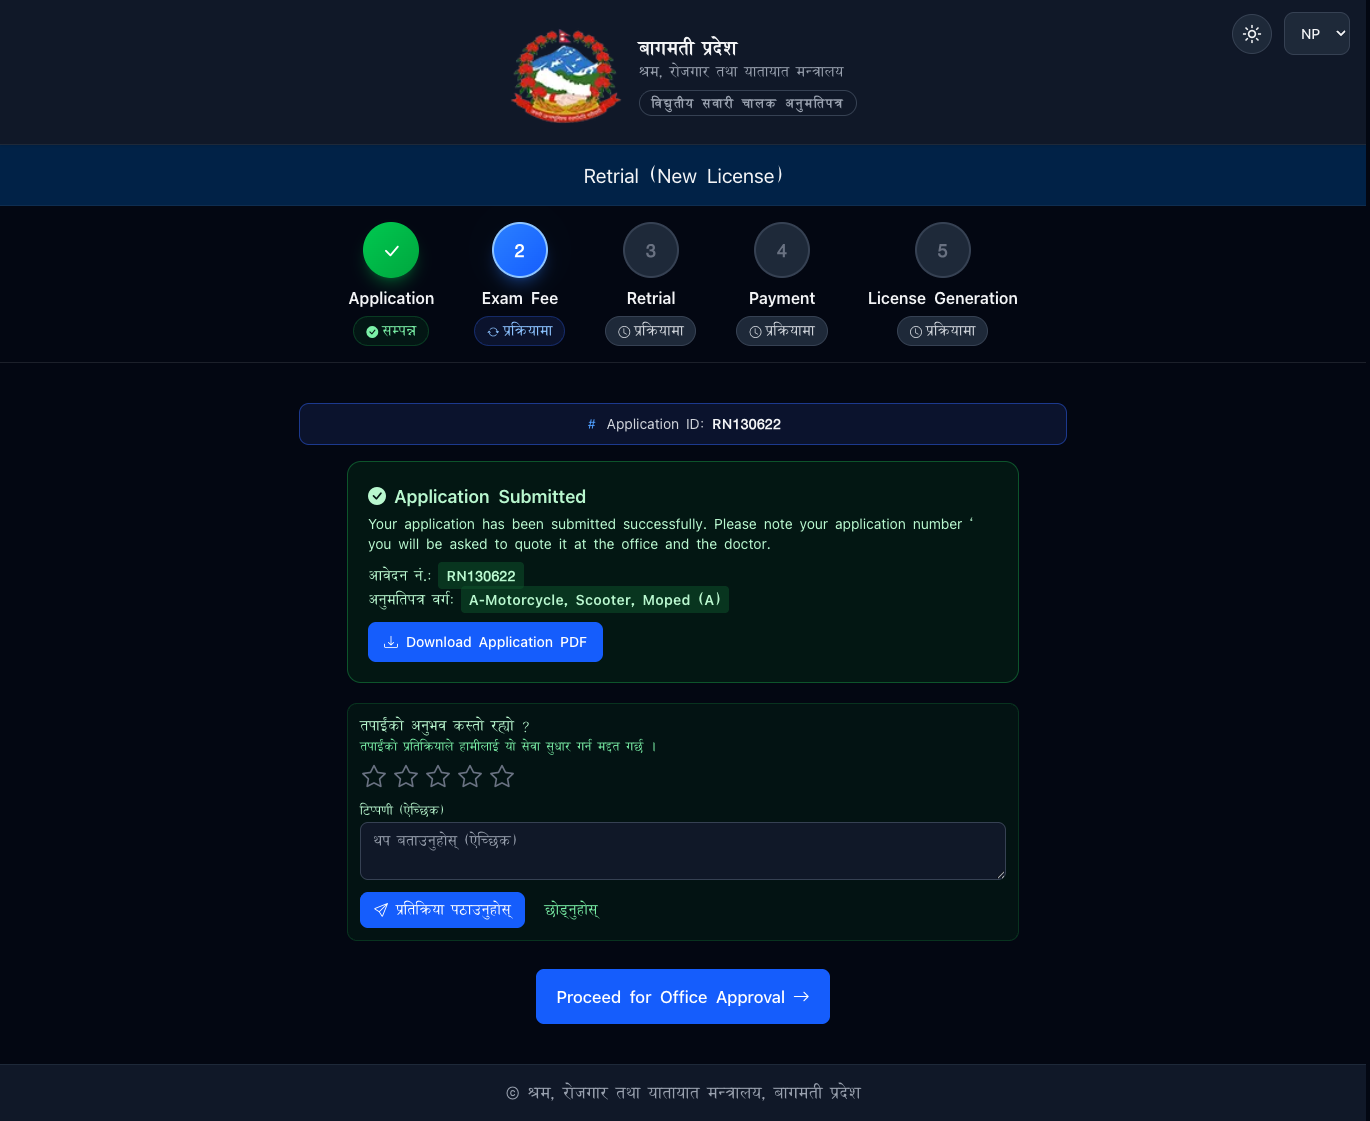
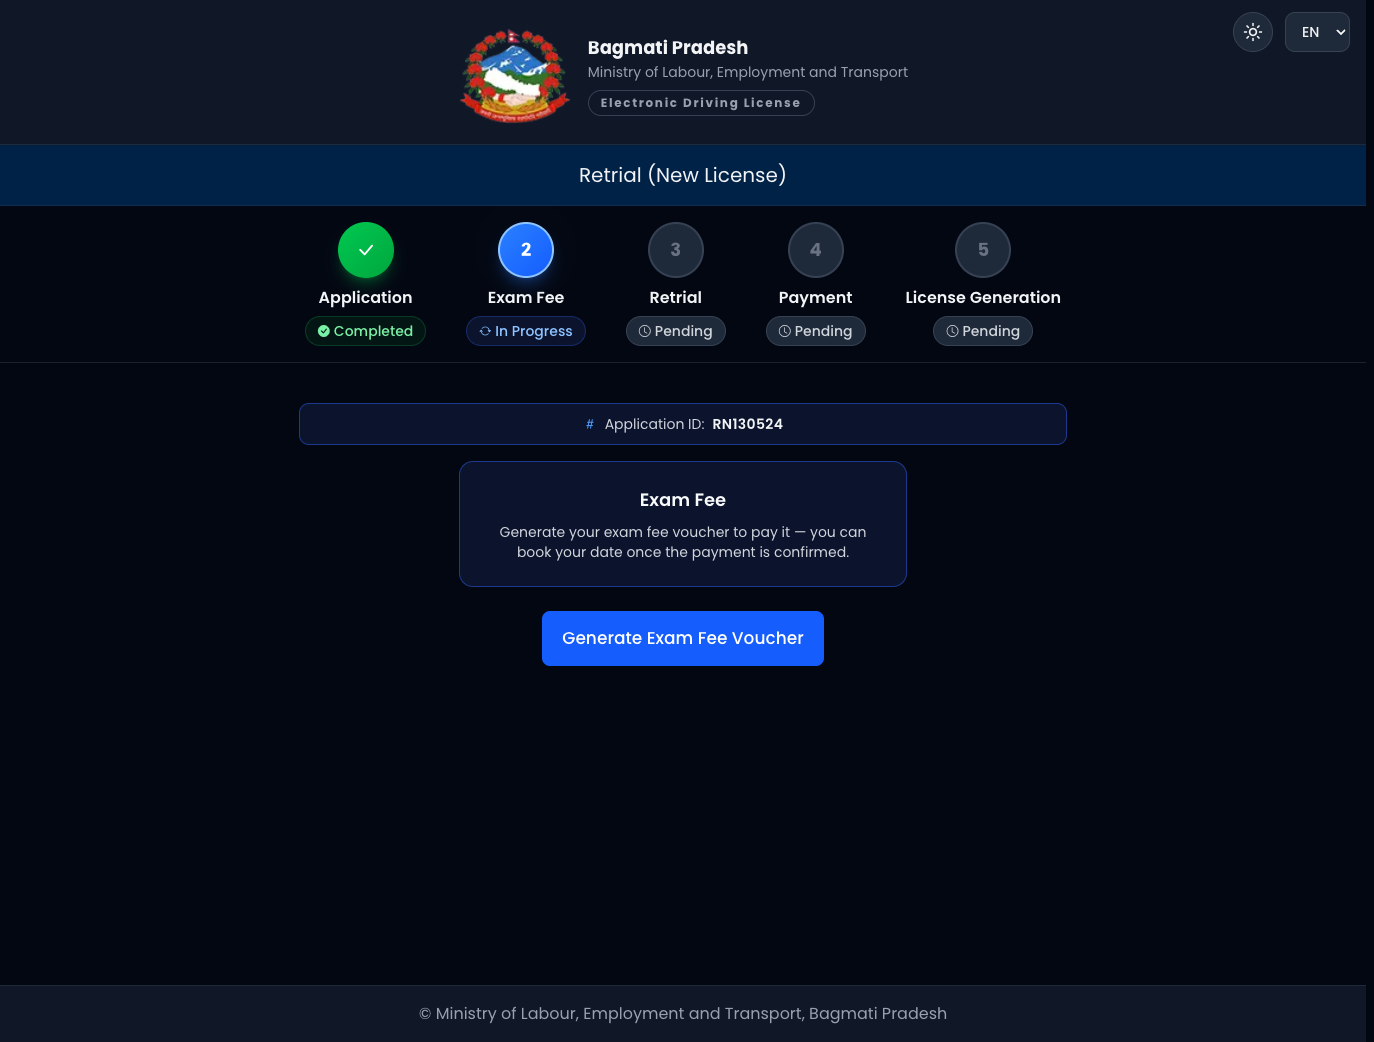
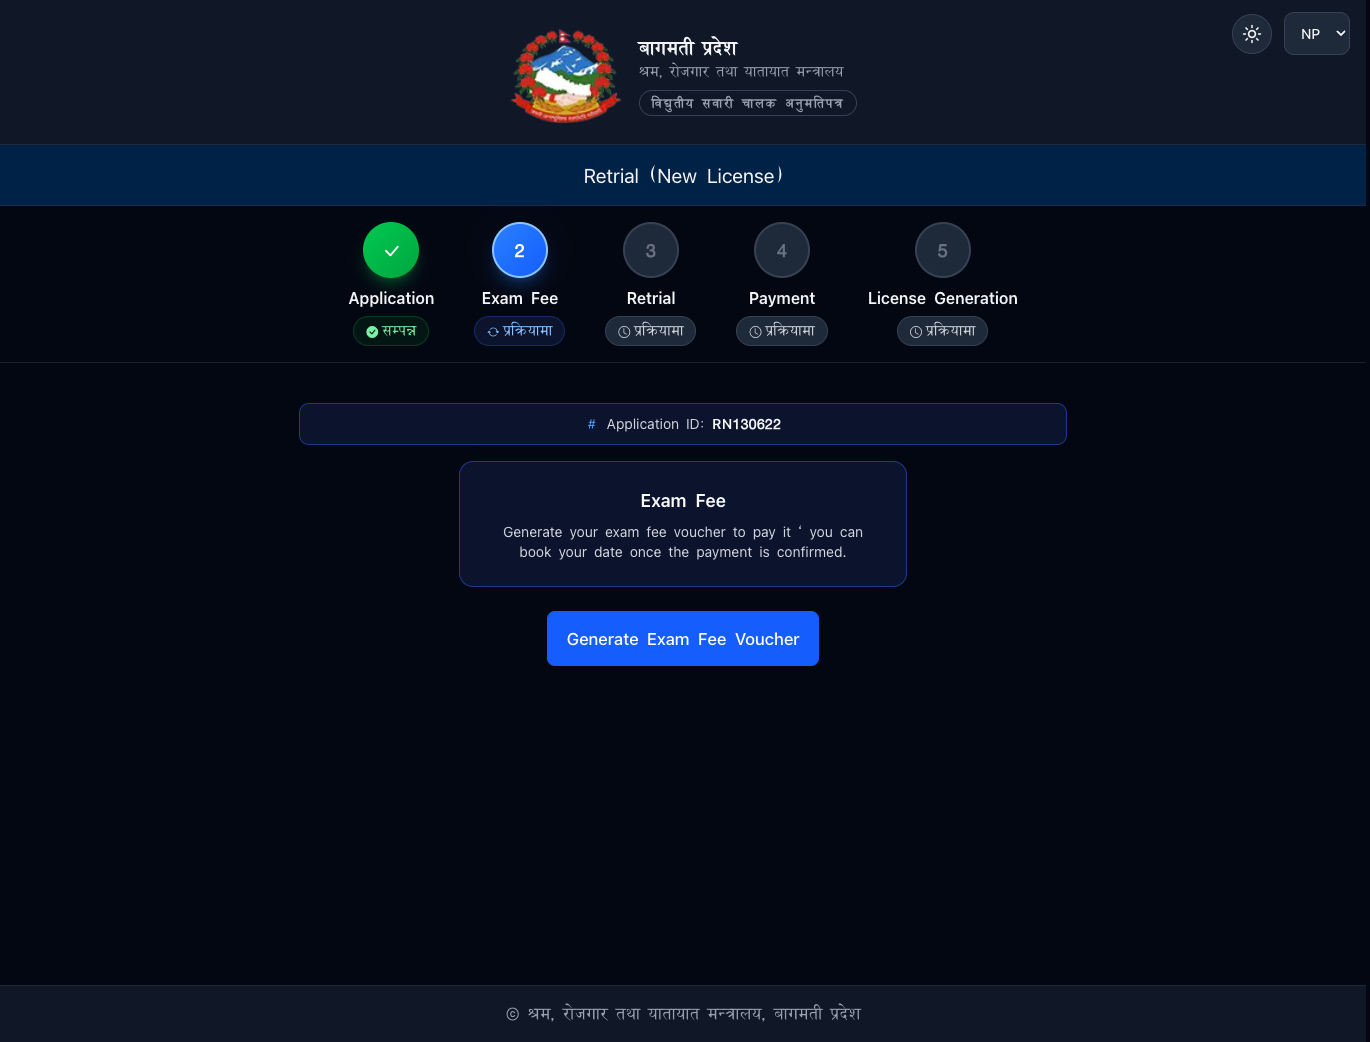
Step 4 — Retrial Fee. Generate the retrial-fee voucher and pay it. · चरण ४ —
पुन-परीक्षा शुल्क। पुन-परीक्षा शुल्कको भौचर बनाई भुक्तानी गर्नुहोस्।
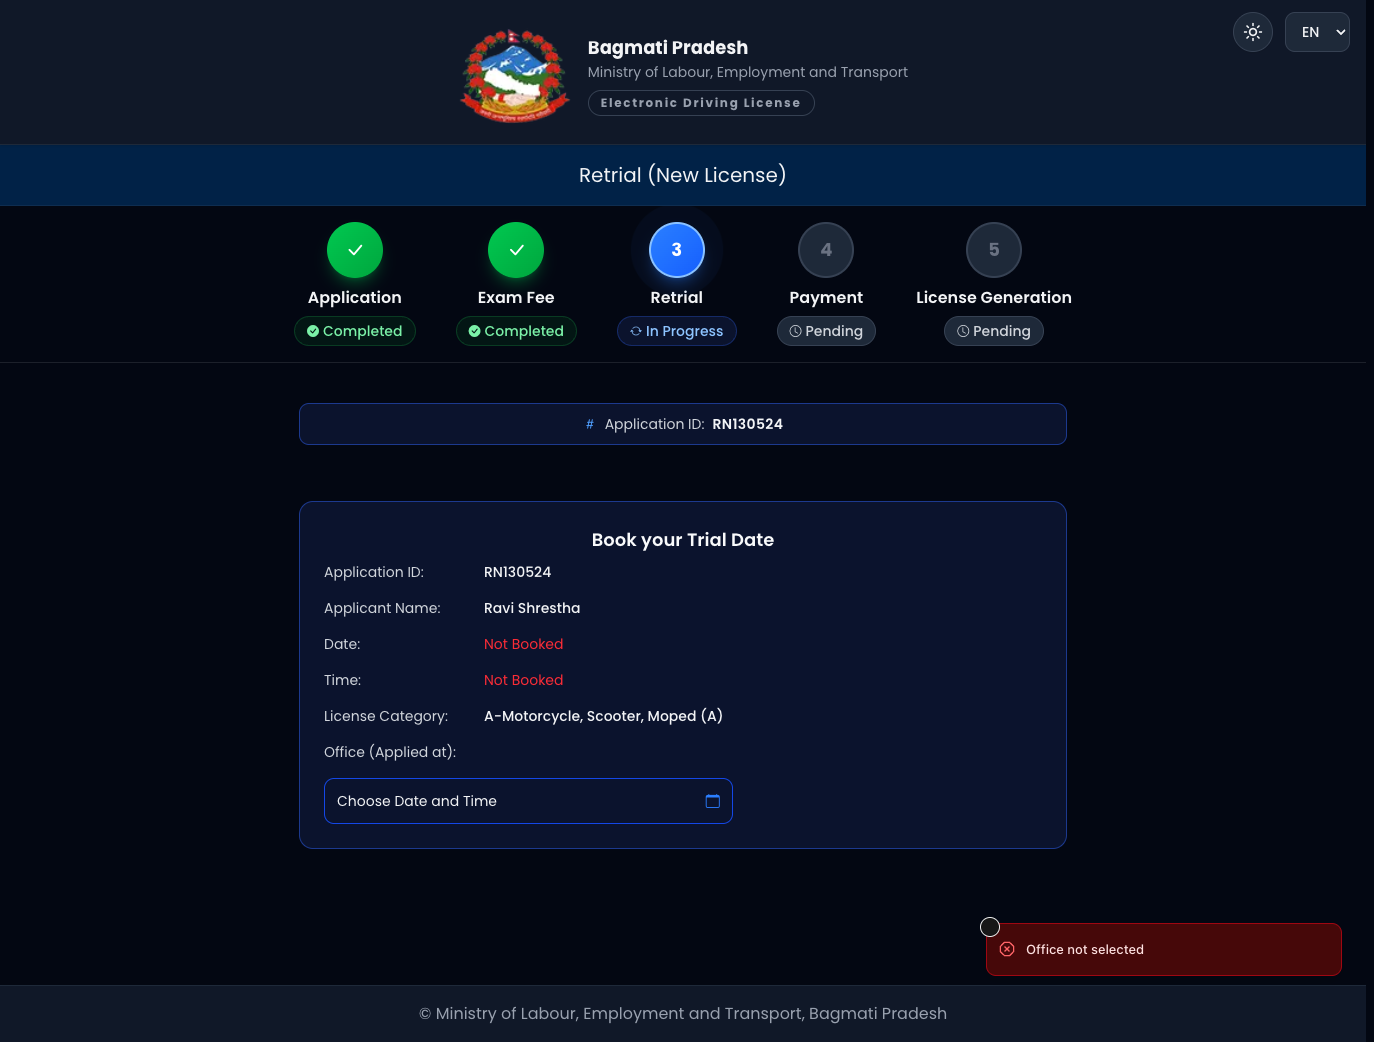
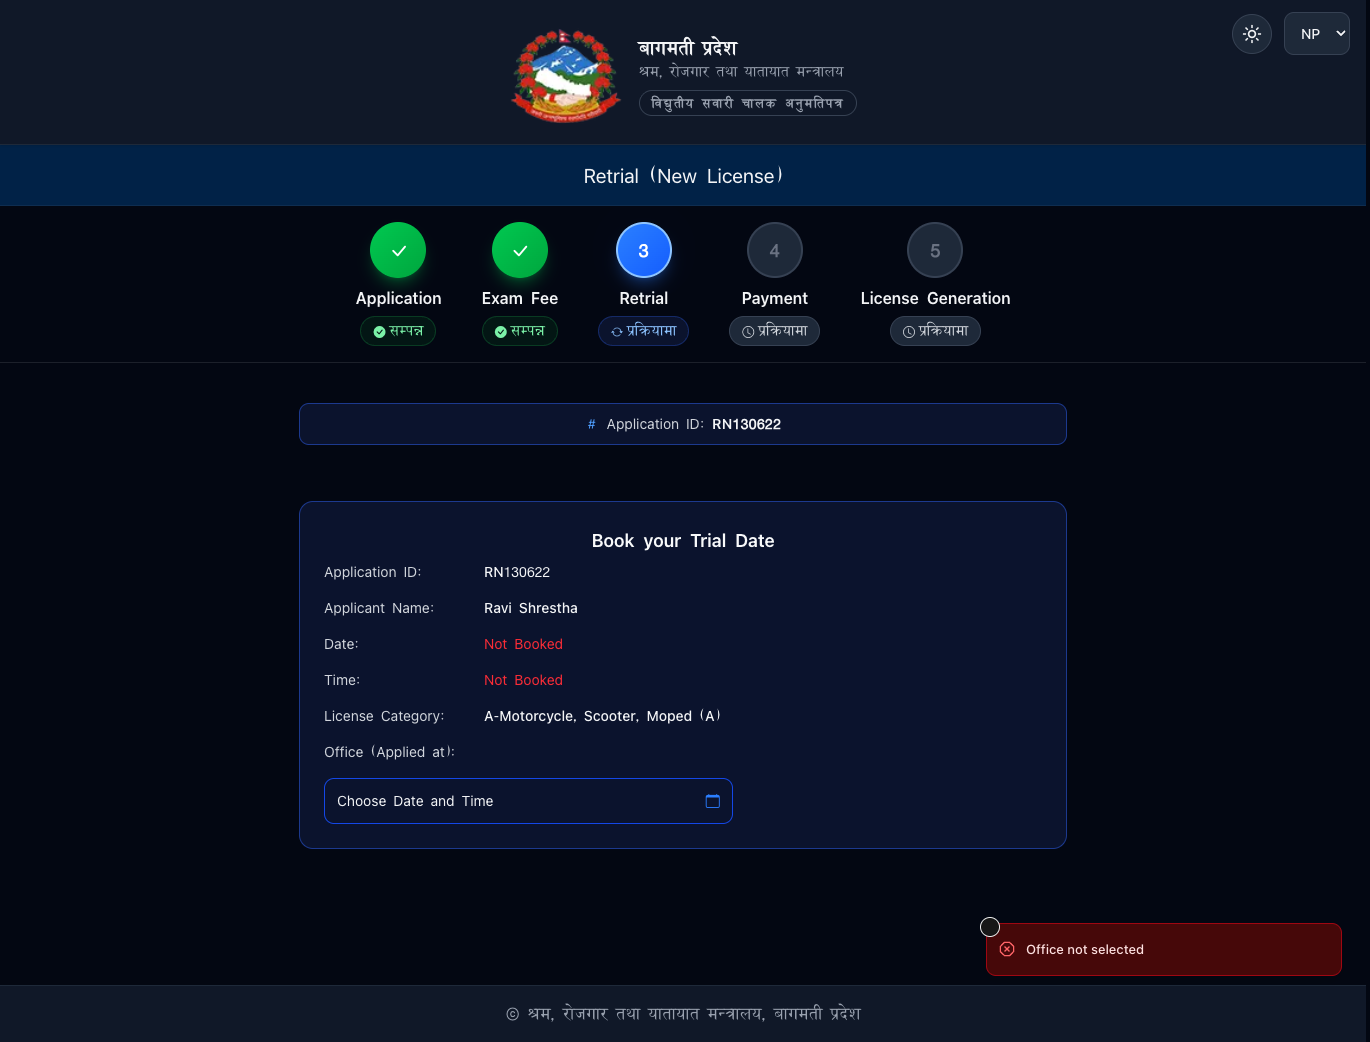
Step 5 — Retrial. Book and take the retrial. · चरण ५ — पुन-परीक्षा।
पुन-परीक्षा बुक गरी दिनुहोस्।
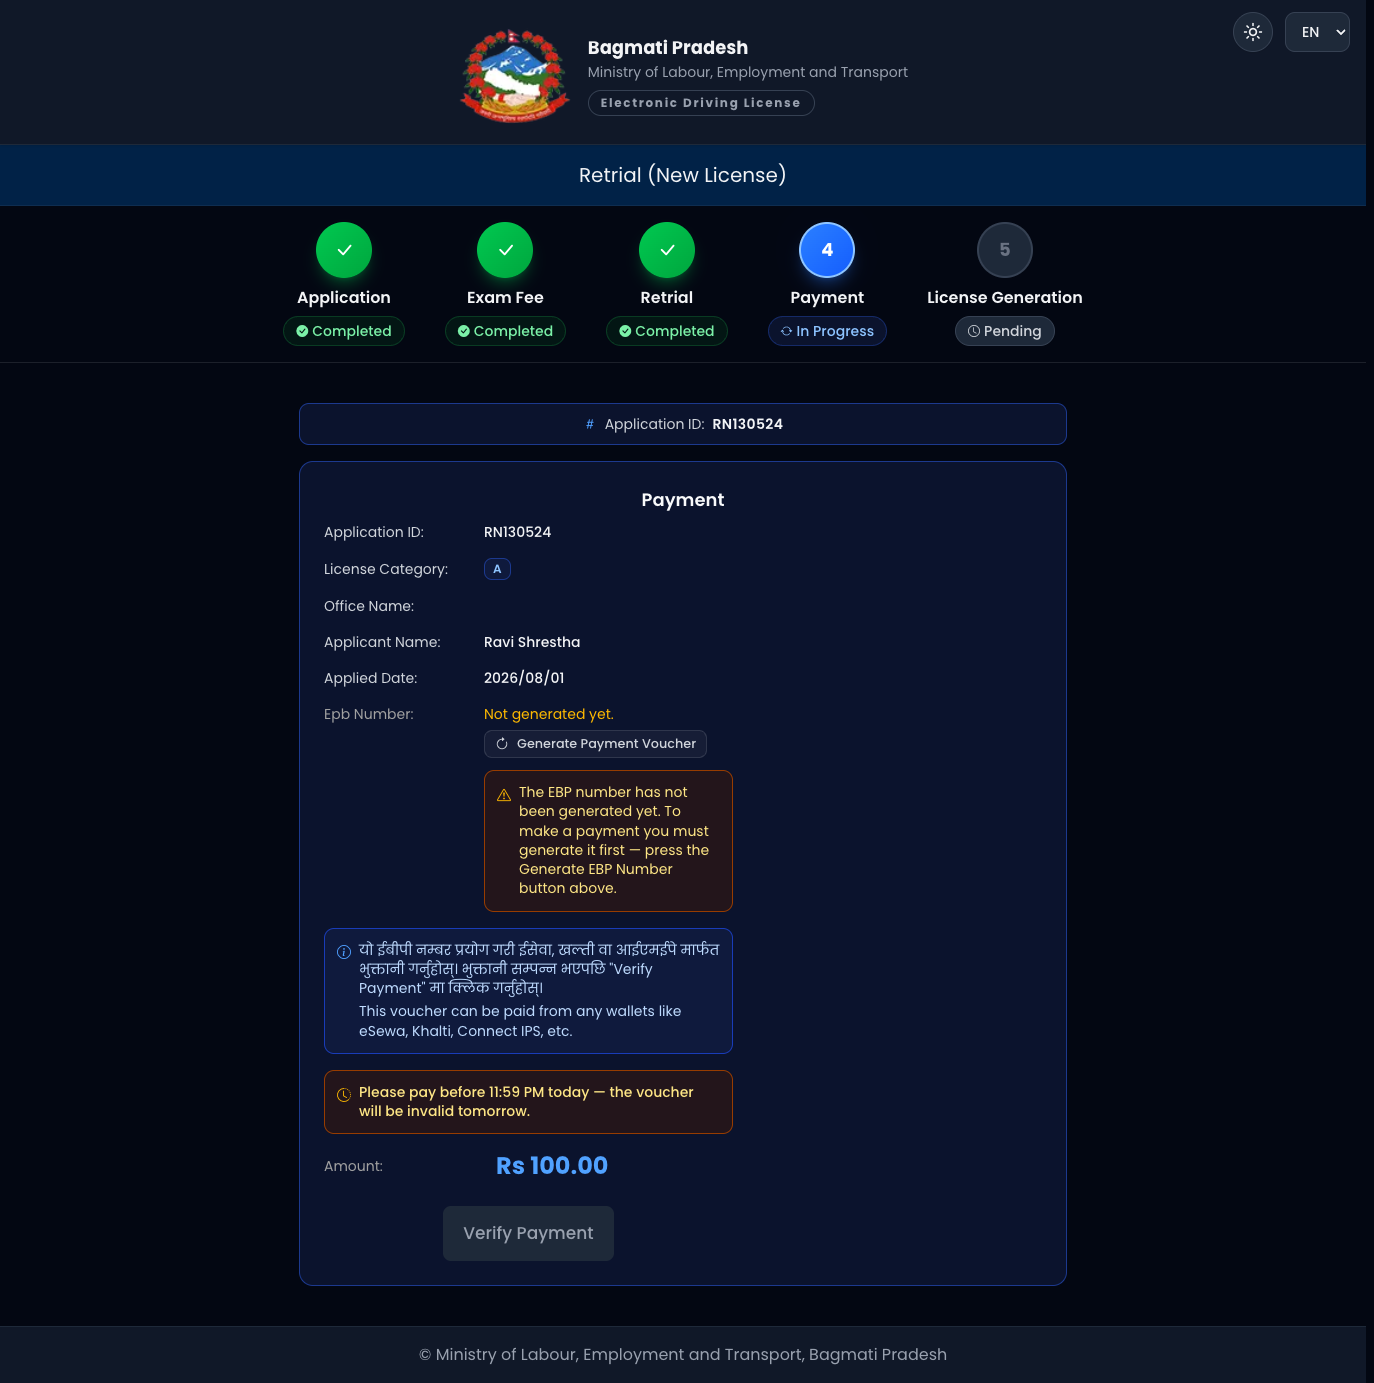
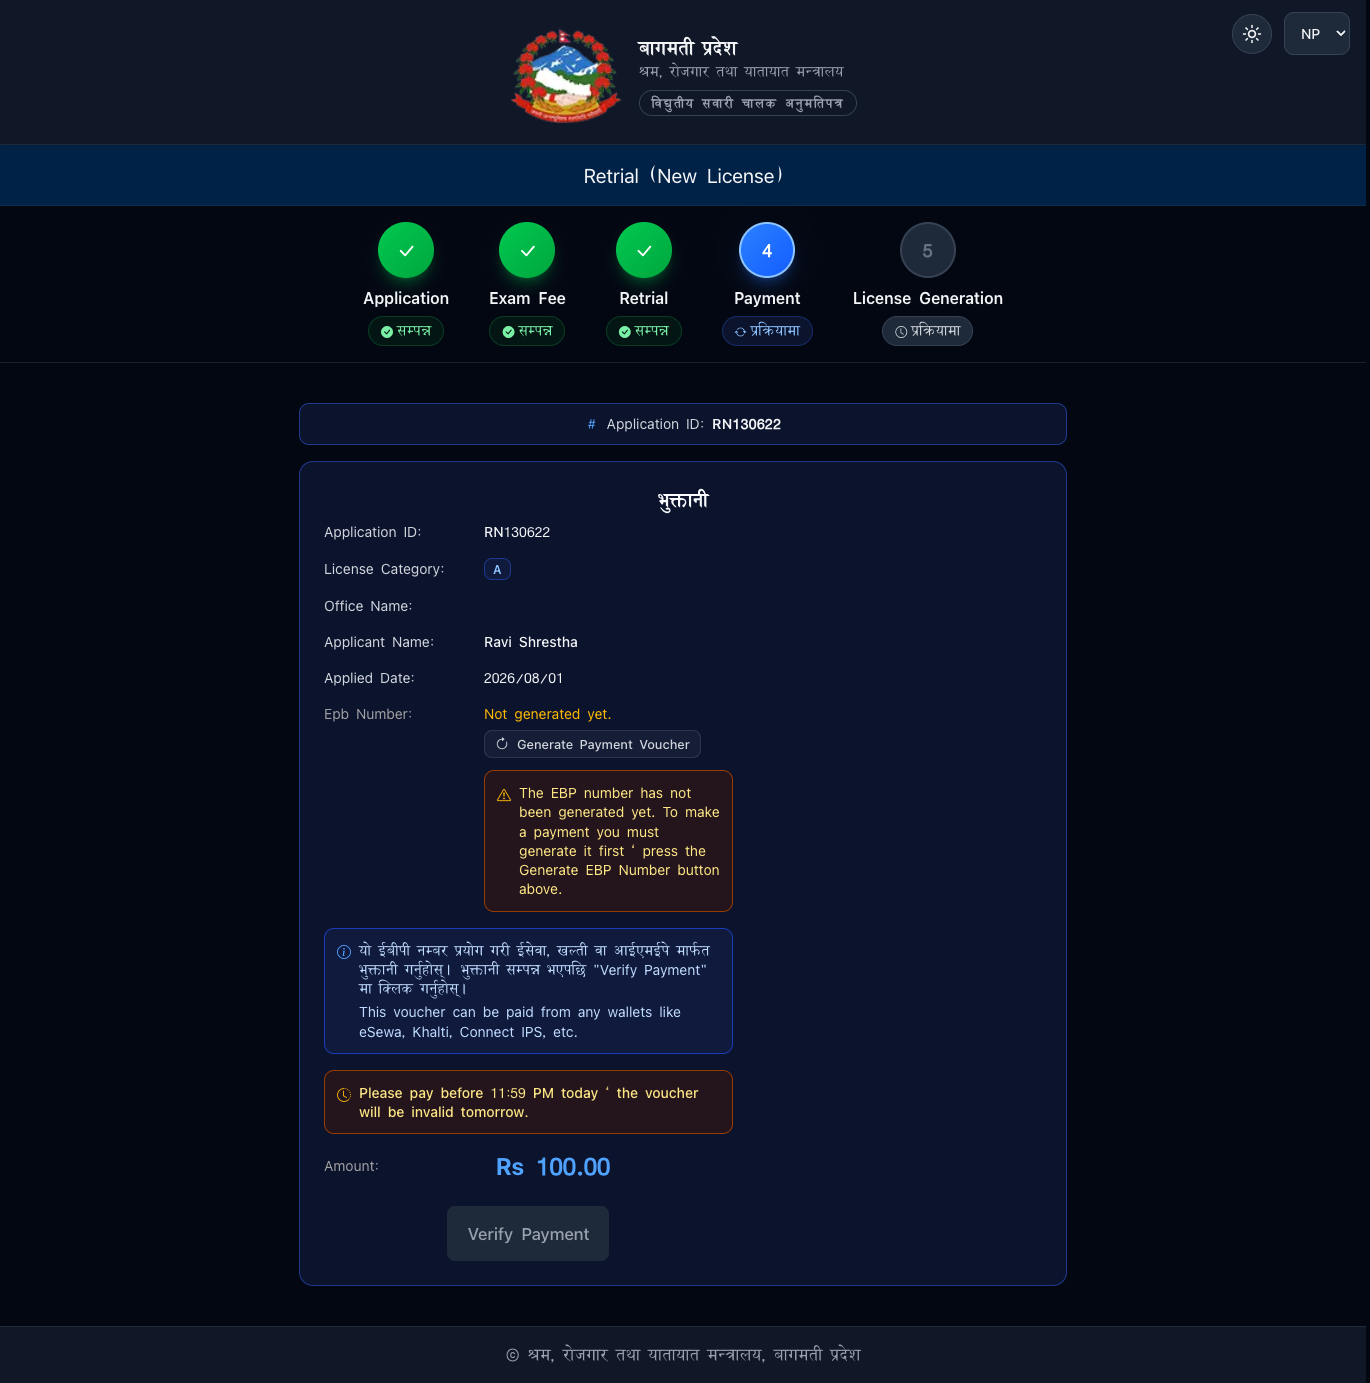
Step 6 — License Fee / Add Fee. On passing, pay the License Fee (retrial of a
new licence) or Add Fee (retrial of an add-category); your licence or category is
then issued. · चरण ६ — अनुमतिपत्र शुल्क / थप शुल्क। उत्तीर्ण भएपछि अनुमतिपत्र
शुल्क (नयाँको पुन-परीक्षा) वा थप शुल्क (वर्ग थपको पुन-परीक्षा) भुक्तानी गर्नुहोस्;
त्यसपछि अनुमतिपत्र/वर्ग जारी हुन्छ।
7. Track Application · आवेदन ट्र्याकिङ
Check the current stage and status of a submitted application. पेश गरेको आवेदनको
हालको चरण र स्थिति हेर्नुहोस्।
Step 1 — Choose Application Tracking. · चरण १ — आवेदन ट्र्याकिङ छान्नुहोस्।
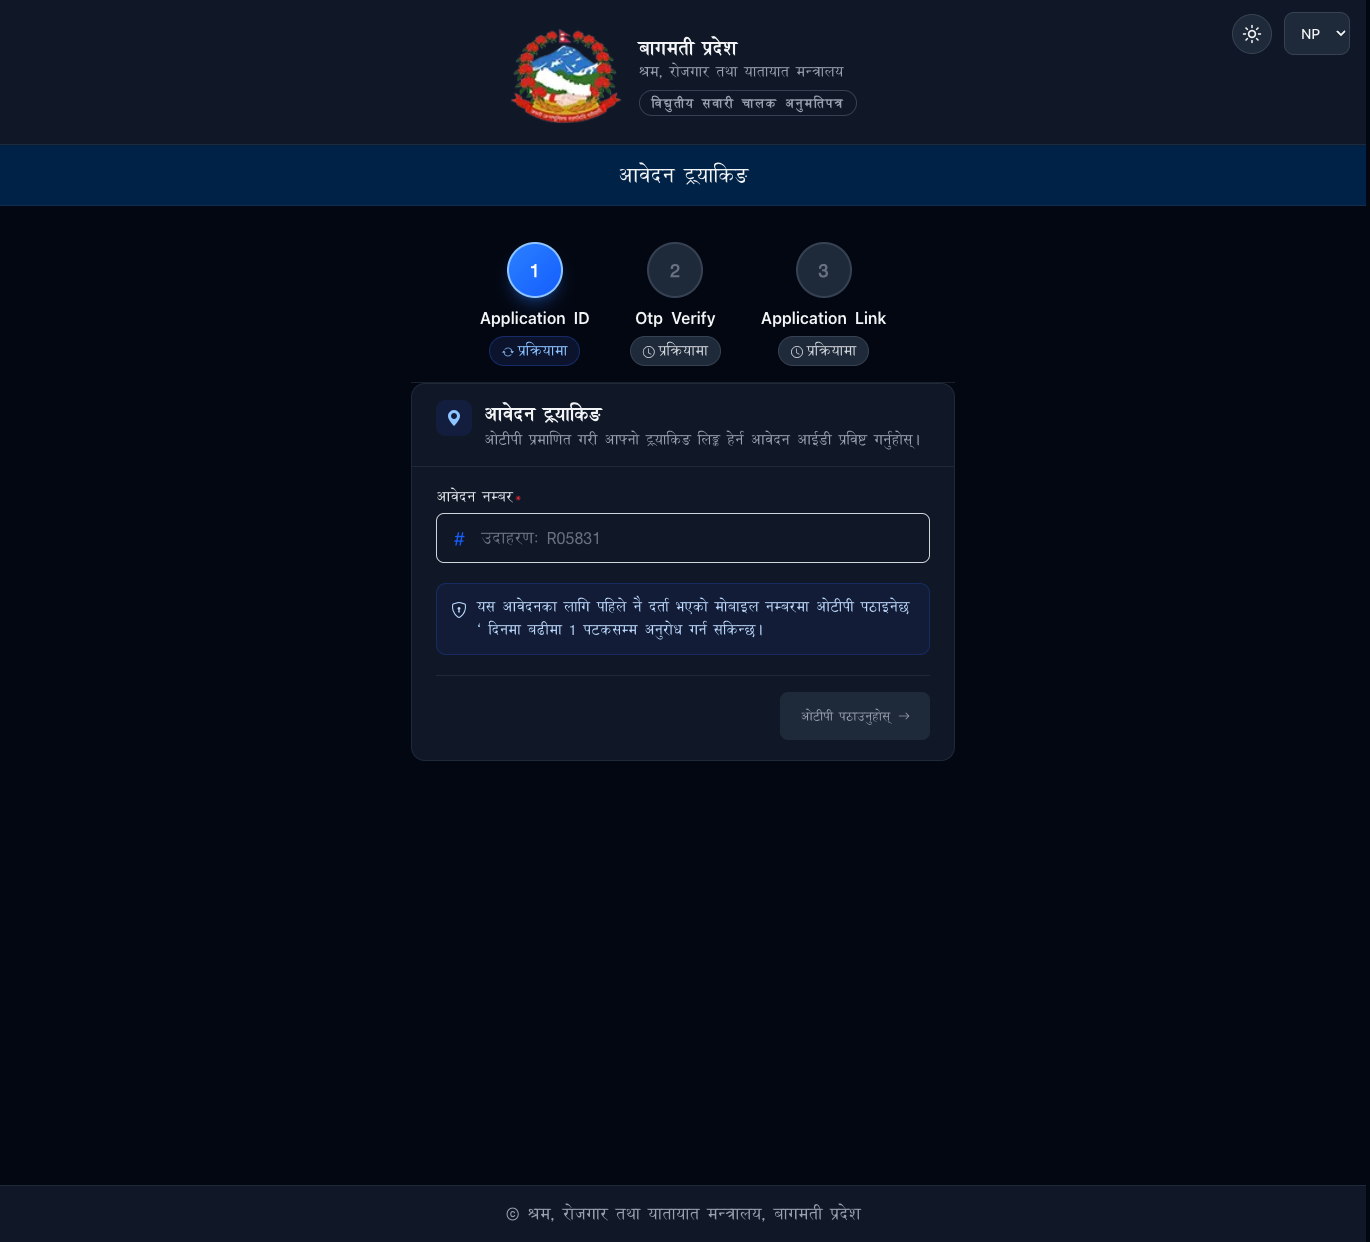
Step 2 — Enter your Application ID (e.g. R05831) and press Send OTP; a code
goes to the mobile on file (once per day). · चरण २ — आवेदन ID (जस्तै R05831)
हाली OTP पठाउनुहोस्; मोबाइलमा कोड आउँछ (दिनमा एक पटक)।
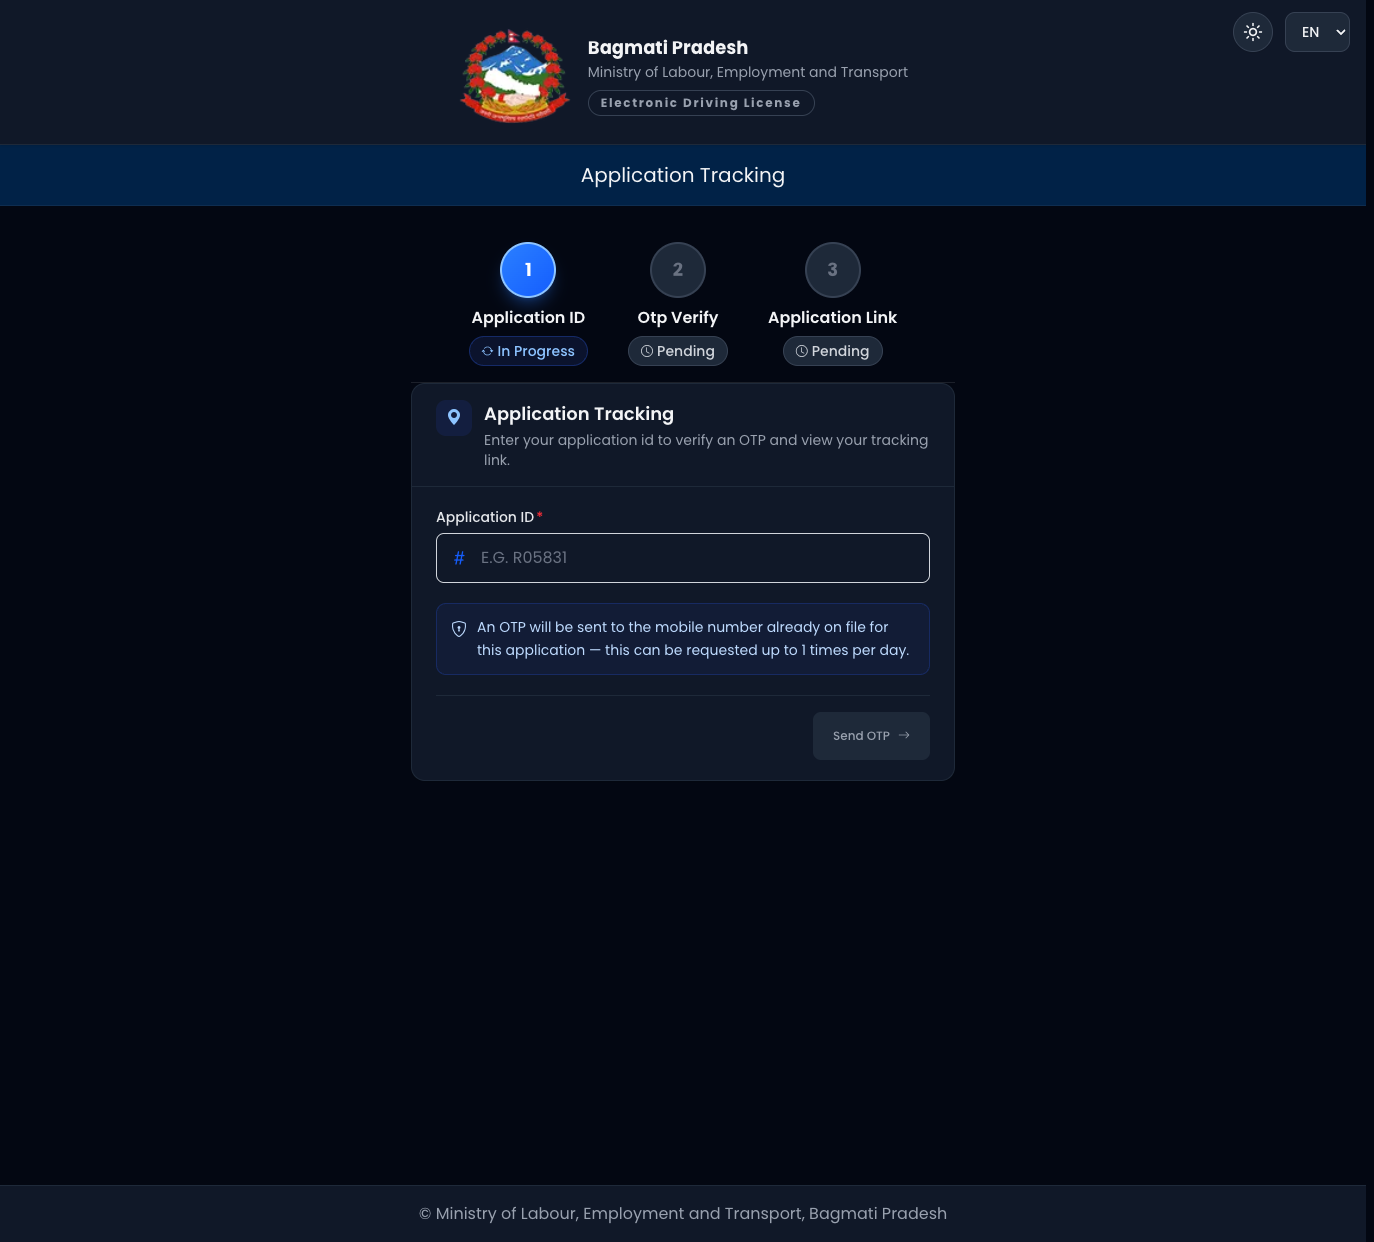
Step 3 — Verify the OTP to open the tracking link showing your stage and
status. · चरण ३ — OTP प्रमाणित गरी चरण र स्थिति देखाउने ट्र्याकिङ लिंक
खोल्नुहोस्।
8. View Licence Details · अनुमतिपत्र विवरण
Look up a licence — holder, categories, validity and status. अनुमतिपत्र विवरण —
धारक, वर्ग, वैधता र स्थिति — हेर्नुहोस्।
Step 1 — Choose Driving License Details. · चरण १ — सवारी चालक विवरण
छान्नुहोस्।
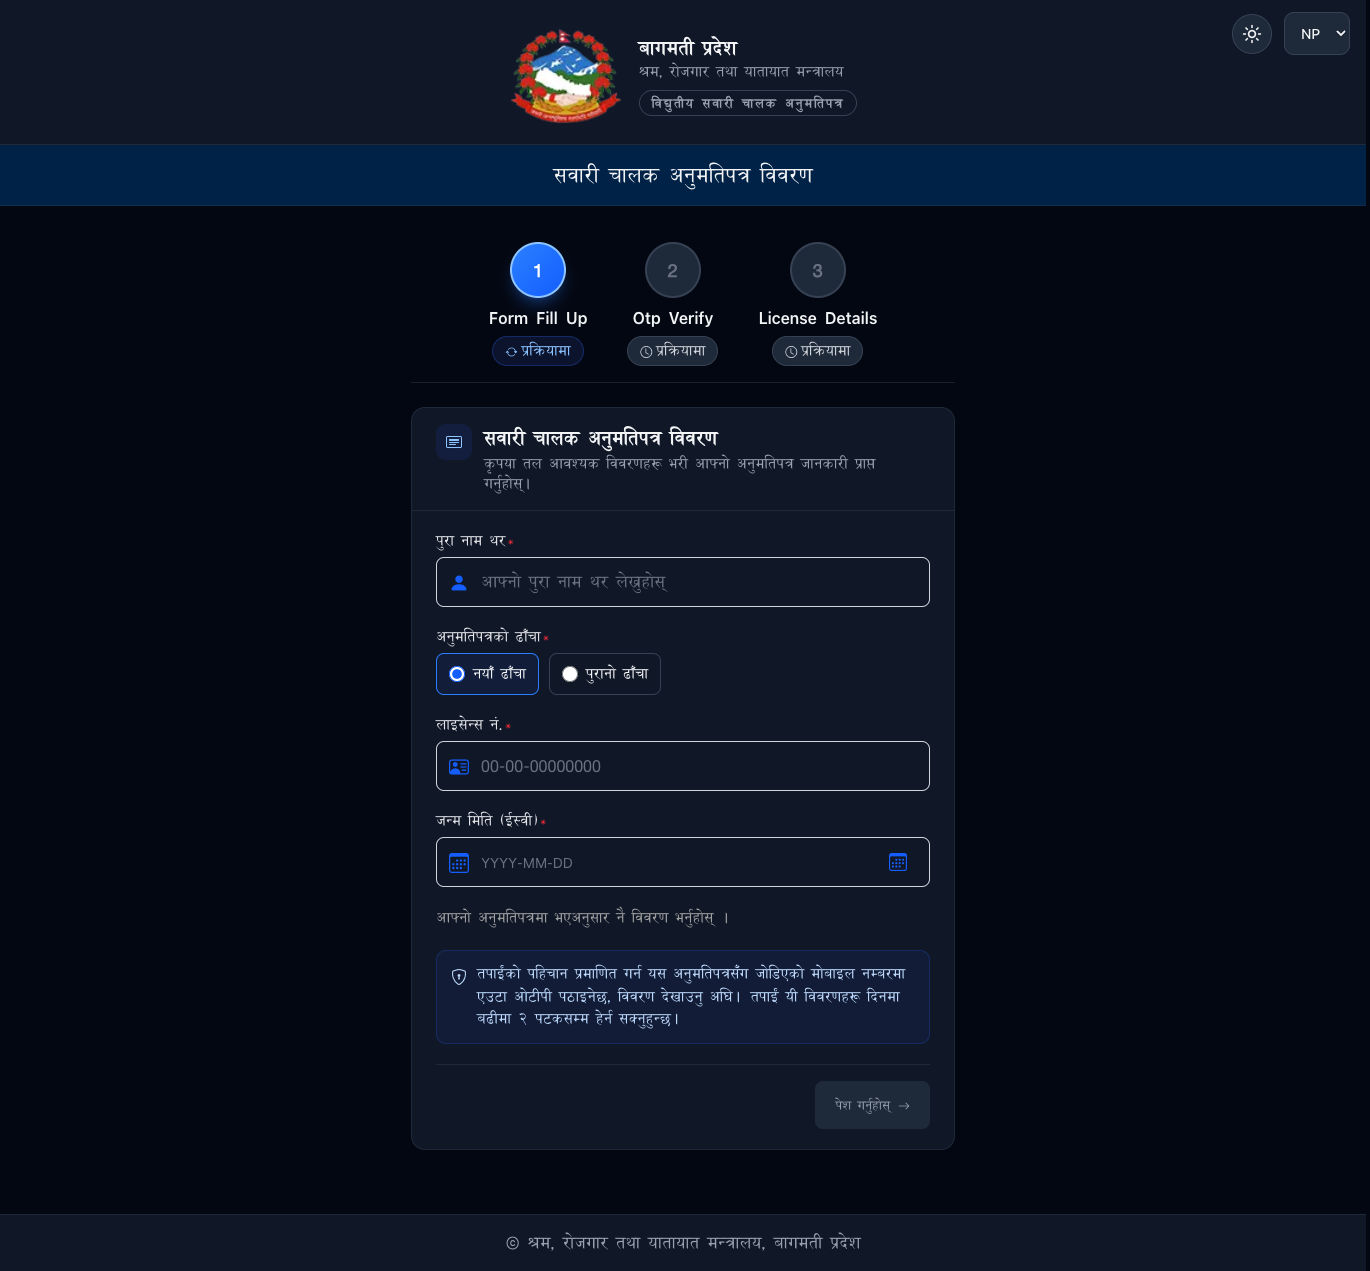
Step 2 — Enter the licence details and verify by OTP sent to the mobile on
file. · चरण २ — विवरण भरी, मोबाइलमा आउने OTP ले प्रमाणित गर्नुहोस्।
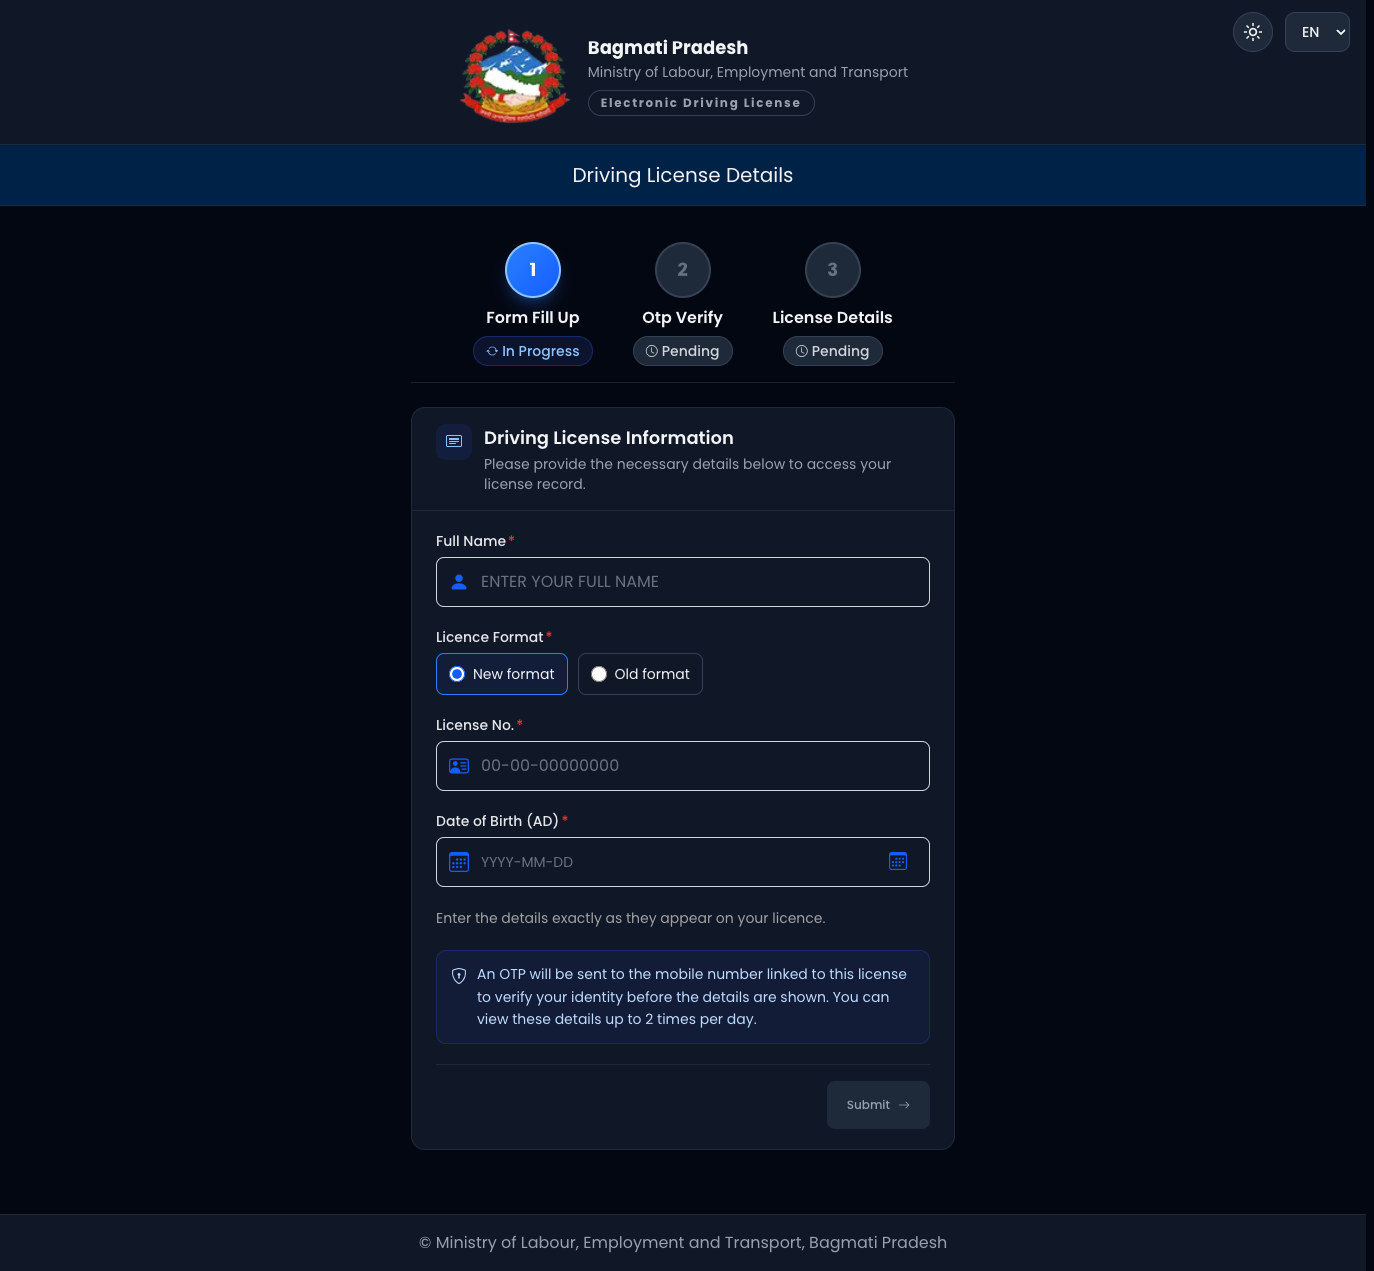
Step 3 — View the licence — holder, categories, issue/expiry and status. ·
चरण ३ — अनुमतिपत्र हेर्नुहोस् — धारक, वर्ग, जारी/म्याद र स्थिति।
Province portals · प्रदेश पोर्टल
Start from your own province's portal. Every province looks the same with its own
name and emblem. आफ्नो प्रदेशको पोर्टलबाट सुरु गर्नुहोस्।
| Province · प्रदेश | Portal · पोर्टल |
|---|---|
| Koshi · कोशी | edlvrs.koshi.gov.np |
| Madhesh · मधेश | edlvrs.madhesh.gov.np |
| Bagamati · बागमती | edlvrs.bagamati.gov.np |
| Gandaki · गण्डकी | edlvrs.gandaki.gov.np |
| Lumbini · लुम्बिनी | edlvrs.lumbini.gov.np |
| Karnali · कर्णाली | edlvrs.karnali.gov.np |
| Sudurpashchim · सुदूरपश्चिम | edlvrs.sudurpashchim.gov.np |